
Editor’s Note: This is one of the first articles ever published on ProSoundWeb (nearly 20 years ago!), and despite being “dated,” it continues to draw significant readership numbers. For those who might have missed it and/or may have read it long ago, we thought it helpful (and fun) to bring it out of the deep archives to the surface.
As Larry Crane, editor of Tape Op magazine, noted, “Plate Reverb. Many people ask me about this and I usually tell them to listen to some records from the ’70s and ’80s and look for reverb with a thick, pillowy sound that doesn’t obscure the vocal yet doesn’t quite sound like an actual room.”
In 1983, I was the owner of a 16-track studio. One of the things that really separated the sounds of the recordings we could get from the sounds of the recordings made in major facilities was the quality of the reverb.
Spring reverb was the only affordable system for small studios at that time, since EMT plate reverbs ran almost $9,000! EMT’s patent was about to expire, and when it did, competitors came out with similar products. While they were cheaper, they still averaged $2,500!
So an engineer who worked with me, Joe Errico, and I researched plate reverbs and came up with an affordable way to build one. This article presents our plans for making a plate reverb unit, which won’t require any electronics other than your mixer and a headphone amp. (If you don’t have these items, you’re not ready for a reverb plate anyway.)
The construction cost will be between $100 and $500, depending upon what components you already own — a lot less than the $2,500-$8,500 for commercially available units.
Later in the article, I’ll also detail how to find and evaluate the materials needed, construct the frame, mount and tune the plate, fit the driver and pickups, and add dampening to the plate. It concludes with some “tricks” and techniques for enhancing plate sound.
Almost everyone with a knowledge of recording is familiar with spring reverbs, or at least with their sound. (They were the most common type reverbs used in studios when this article was originally written. Now digital reverberation units are the type most often used.)
Most low-end or semi-pro reverb units were based on the spring principle, as are most musical instrument amps or accessories with reverb. That “spring sound” can range from excellent to “under water,” depending on the unit and the way it is used.
The reason spring units sound the way they do is because that is exactly what they are; springs. There are usually several rows of them, possibly with two or three strung in a series. Just like the springs on your screen door, they will “twang” or “boing” when plucked.
However, instead of being plucked, the reverb springs are excited at one end by a driver and mic’d at the other end by a pickup — and so are the twang and boing, especially on transient material. Although some designers have used tricks to smooth out their sound with excellent results, they may still have spring characteristics inherent in their sound, as well as a limited bandwidth, especially at high frequencies (8 kHz-plus).
Plate reverb has none of these drawbacks, although it can go from sounding like a true concert hall to an oil drum being banged with an ax in the subway, again depending on its application and who’s using it.
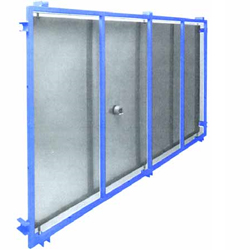
Typically, the plate is a large (one by two meters, or 39.37 by 78.74 inches) sheet of steel suspended in a tubular steel frame. In theory, the plate simulates a large concert hall, or church, with a decay time (RT-60; the time required for the level of the reverb to diminish by 60 dB) of approximately five seconds at approximately 500 Hz. A driver attached to the plate excites it, and as the sound waves travel through it, the plate flexes.
The plate’s motion is then picked up by one or two contact mics, and added to the dry signal at the mixer. Transients do not twang or boing, but behave much as they would in a reverberant room, sounding smooth and natural.
As an additional feature, incorporating a damping plate to change the decay time of the reverberated signal can be included in the design.
It was at the Broadcast Technical Institute in Nuremberg, and later at the Institute for Broadcast Engineering in Hamburg, West Germany, that the first reverberation plate using these principles was developed.
EMT (in Germany) patented and made the only available units until the patents ran out a few (now 25 or so) years ago. Since then, several American and foreign companies have come out with newer units. The plans presented here are of a hybrid unit that can be optimized to the design of any of the commercial units you may favor.
Construction
As mentioned in the introduction, the design of this unit will incorporate your mixer and cue (headphone) system as all the electronics that are required.
We will mostly concentrate on the construction of the mechanical system and the transducers-the frame, plate, driver, and pickups. This is probably the most critical of all the steps involved in the process, so be careful. The plate is actually “the instrument” used for the reverb, so it should be chosen as if it were a fine acoustic instrument.
EMT used a 1-meter by 2-meter cold-rolled steel plate approximately 1/64-inch thick. Lawson, which manufactured “The Plate” (LP1 and LP2), used basically the same size plate, but it’s a little thinner. On the other hand, some manufacturers used stainless steel. The Ecoplate by Studio Technologies used approximately the same gauge in stainless, as did Audi-ence, while DB Cassette of Sweden, who manufactured the Stocktronics Plate, used a stretched, hardened piece of cold-rolled stainless approximately 0.03 inches thick.
The question of what kind of steel to use is totally subjective. Reasons claimed for using stainless steel include consistency, high density, and the fact that it’s tarnish proof, while regular steel users claim smooth, more natural sounding reverb and a less “metallic” decay. Only you can decide what sound you prefer.