

Several times in doing the Home Recording Show podcast, we’ve had listeners write in asking about phase and wondering why we can’t just move the tracks around after recording.
Usually we answer that it can be done for guitars and a few other sources, but never on drums, and it’s not the same as actually moving the mic.
I’ve actually done this technique a few times on some tracks that were a little carelessly recorded, as well as some others that just needed a little help. In all cases it has helped. Even if you’re super careful about mic positioning, this can be a very useful technique to know.
Before I get into techniques and examples, I’ll give you the best reason I can think of for why shifting a recorded track is not the same as moving a mic.
It’s not the same in any case where there is bleed or off axis sound. If you move the mic, you’re changing the off axis sound as well as the direct sound. If you time adjust, you’re just changing the relationship of that sound to another, the direct sound and bleed move together. If you time adjust by any large amount you could end up causing more problems because while the direct sound sources are in phase, the off axis sounds are not.
You may also run into a situation where that causes an echoing effect when combined with other mics.
With that said, if there is already a problem with the tracks, its worth a try.
If you’re confused about what this is all about, here are some examples.
Guitar
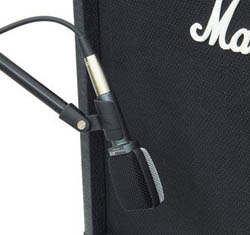
I was given some guitar tracks as part of a mix. There is a Shure SM57 and an Audio-Technica AT4033 on the amp. I don’t know the exact positions, other than that the 4033 was a little further away.
The mics sound OK on their own, but are completely useless when combined (click each link to listen):
Techniques
As you can hear, there’s an obvious comb filtering issue and it doesn’t go away with the polarity switch alone.
At this point we have a few options:
—get rid of one of the mics. The downside being that either mics is kind of boring
—time adjust by nudging the second file earlier
—time adjust by delaying the first track
Options 2 or 3 will have the same result. One method is not really better or worse.
I don’t like option 1. It makes me feel lazy.
With either option 2 or 3, I need to get a rough estimate of how much offset there is. This means finding a transient and zooming in close.
When it’s the same source with two mics the waveforms should be fairly similar. Find a transient on the first track and drag a selection to that peak on the second track.
Set your timebase in the DAW to samples and you should see how much of a delay you need to compensate for.
You can use either method to time adjust.
In Reaper there is a brilliant feature that makes nudging the audio in this type of situation very easy. It has an option to show a mono waveform of the combined active tracks within a folder. You can actually see the two waveforms stacked. Simply drag one of the tracks and line up the waveforms.
As far as I know this only works in Reaper, as shown in the image directly below:

In Pro Tools you would set your nudge value to be the same number of samples we calculated earlier. Nudge either the close mic later, or far mic earlier.
If the mics were fairly close together it should be under 300 samples. In this case it was just 56 samples.
If you want to use a plugin for this, find one that works in samples and enter the value.
Let’s here how these mics combine after adjustment:
It’s so much better, and we have a sound that is more tonally interesting than either mic alone.
Ensemble
Here is another situation. This is a 3-track live recording from Cuba that I was given to mix and master. There are two Neumann M150 omni tube condensers in front of the musicians, and a cardioid mic within the group to pick up vocals and percussion:
I found that shifting the tracks slightly improved the center image and made the recording sound a little more focused, it is a fairly subtle change. In this case I used the left side mic as the target, as it was latest and adjusted the right side by 194 samples and center mic by 513:
Drum Kit
If you’re still interested in this, you probably want to know how it works on a drum kit. Until today I haven’t tried.
I have a drum kit with two overheads, kick, snare and three tom mics. I’m going to use the snare as the standard and move the other tracks around to match:
On the drums, at least on this recording, the change was very subtle. The longest delay was 190 samples between the snare and overheads. Only 4 ms. That’s a tiny amount. The result is a little less wide having removed the distance from the overheads to the snare:
Sometimes it makes a huge difference, sometimes its subtle. I think its worth a few minutes of experimenting even when you are very careful about mic placement.
Jon Tidey is a Producer/Engineer who runs his own studio, EPIC Sounds, and enjoys writing about audio on his blog AudioGeekZine.com.