
For many engineers, the term “sound check” refers to the time the band hits the stage before the gig, plays a few numbers, has their monitor levels adjusted and then heads off to relax before the show.
For others, including me, the term encompasses an entire procedure from system tuning through line checks, not stopping until both the performers and sound crew are happy. This is especially important because my company handles a lot of one-offs where we’ve never previously worked with the acts.
We start with loudspeaker positioning, making sure they’re going to cover the entire audience without too much spill on to the stage. A frequent problem is too much bass spill, so we arrange the subwoofers in cardioid or end fire configurations to reduce the problem.
In tuning the main system, we start with the mains and make sure each box or driver band is working by sending them noise or a song. Next we test any front or side fills, as well as delays (if applicable).
Once we’ve verified that every cabinet is working correctly, a test track is played with the system EQ flat and we critically listen to each zone (mains, fills, delays) independently to make sure they’re sounding OK. At this point we’re not worried about the interaction of the system and room, just that the loudspeakers are performing properly.
If we’re using an installed house system or a portable system not our own, it’s fed a mono track that’s panned left and right to make sure the speakers sound the same on each side. Quite frequently we encounter installed systems that sound vastly different from side to side.
Ringing It Out
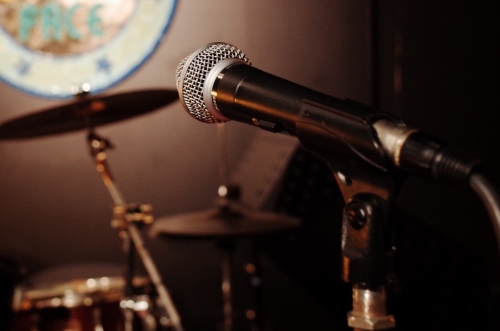
We’re certified “old school” so don’t just rely on software-based analyzers for tuning, but they’re a valuable tool, particularly in evaluating higher frequencies that our (older) ears don’t hear quite as well.
The process starts with a stand-mounted cardioid microphone placed near the front edge of the stage with the capsule pointing straight up. Meanwhile the measurement mic for the analyzer is placed an equal distance from left and right main loudspeakers. (Think of a triangle with the mic at the point and each main stack at the corners.)

Before making any noise, we warn everyone in the room (via the board mic) that some feedback is coming soon. They can clear the area or put in ear plugs (which we offer).
We start with the mains and bring up the level until there’s a single ring of feedback. We make a note of the frequency and pull it out via the system graphic EQ, then push the level up until another ring is heard. This continues until there are multiple rings at the same time. Note: If you’re not good at picking out frequencies, then a system analyzer’s display can be valuable in showing what frequencies are being excited. This process is then repeated with fills and delays playing. And if drastic cuts are called for, a parametric EQ is utilized for a more “surgical” approach.
Next, the mic on stage is moved where the primary performer will be located and faced the correct way, and then we evaluate the sound of the system and how much gain is available. A few test tracks confirm how the system sounds, and at this point, balance is set between the mains, fills and delays. I walk the room listening to tracks, judging tonality and balance, and making any adjustments by ear. I also talk into a vocal mic and listen.
One At A Time
Now it’s time to wire up the stage. One of the keys to an easy show is to label everything in case of a problem.
We label all input cables and sub-snakes to trace a signal path quickly or for a quick, accurate re-patch when changes happen (and they always do).
When working corporate shows, we also run a few backup lines for important channels like the podium, wireless feeds and video sends.
For bands, the console is arranged in a typical festival style, kick in channel 1, then snare, hat, toms, overheads, percussion, bass guitar, guitars, keys, other instruments like horns, and then vocals. On corporates, the podium mics are the first channels, followed by wireless, playbacks, audience Q & A mics, VOG (“voice of god”) mic and board talkback mic.
Now it’s time for a line check, starting with making sure every input is working and then testing every mic and DI. If we have enough crew at the gig, this may take place simultaneously while the stage is being wired. Once the mics and DIs are placed and tested, it’s time to start dialing in the channels before the band arrives.
For example, we roll off the bottom end of the vocal mics and drum overheads to keep any stage rumble from bleeding into the PA. The input trims are set to a good starting position and the vocal mics are double-checked. Groups and VCAs can be assigned now, along with setting up a few standard effects like snare and vocal verbs and delays.
When the band arrives we give them time to noodle around a bit and get things positioned to their liking. Then we begin sound check by going through the instruments one at a time. Kick drum is the usual starting point, with drummers asked to strike as hard as they do during a show. The gain setting is checked to make sure there’s no clipping, and then the tone is dialed in with the channel EQ. Compression and gating are also set.

Once kick is done, the channel stays live as we move on to snare. When it’s sounding right, the snare verb (if requested) is dialed in, and then the drummer is asked to play both kick and snare so the balance can be evaluated. Then it’s on to hi-hat and toms, played individually first and then with the other parts of the kit.
Overheads come next, with the drummer asked to play all around the kit while we listen on headphones soloed to the overhead mics. The goal is to pick up mostly cymbals and not so much snare. Depending on the show, a mic might also be employed for ride cymbal because it can get lost in the mix when using just overheads.
If the PA is stereo, drums are panned a bit to add some depth. Specifically, kick and snare remain centered with hi-hat panned slightly to one side and toms to the other side.


