Step 1 – Tuning the System: First Steps
For the most accurate FFT measurement we always want the measurement microphone to hear the absolute minimum number of sound sources at one time. The ideal is a single point source. This avoids time/phase and excessive room excitation problems which seriously influence the accuracy of any FFT measurements.
To begin make sure all other support systems except the mains left and right are muted (including all the subs!)
NOTE: The subs will be added into the total system during the final optimization process but should be muted during all the original tuning processes to get the best possible tonal balance from the system itself without the Subs influencing all of the low frequency measurement results.
Place the measurement microphone at approximately 70 to 100 feet out from and on axis to one side of the main system. If there are no obstructions (i.e., no chairs) between the microphone and the system the most accurate measurement will be made with the microphone set directly lying on the floor as a ground plane setup otherwise the microphone should be on a stand at audience head height.
On the mixing console input channel that is patched from the output from the audio interface unit, pan that input channel fully to whichever side of the stereo mains is closer to the measurement microphone. Bring up the reference pink noise into the one side only of the main L-R system to a “comfortable” listening level and using the level controls on either the audio interface unit or the mixing console output (i.e., the summed ref mix output level feeding to the audio interface unit) balance the levels as they appear on the Smaart Magnitude screen such that they are matched as closely as possible without any overloading or clipping. The resulting display on the magnitude screen should average somewhere around the center 0 dB line.
Using the Delay Locator function within Smaart, set the offset time between the direct sound from the mixing console (the reference source) and the sound arriving (later) at the measurement microphone (the measurement source). For accurate FFT measurements the two sources being compared must arrive as close as possible to the same time alignment. The accuracy of this time offset can be checked by looking at the upper phase display on the Smaart screen. (understanding phase displays is, unfortunately, beyond the scope of this document) Some fine tuning can be done to the offset time but absolute accuracy will not affect the final result too much as long, because the offset distance versus time reading shown on the Smaart screen is somewhat relative to the actual distance of the measurement microphone from the source including any additional possible system latency throughput time.
Step 2 – Tuning the System : Beginning The Tuning On The Mains
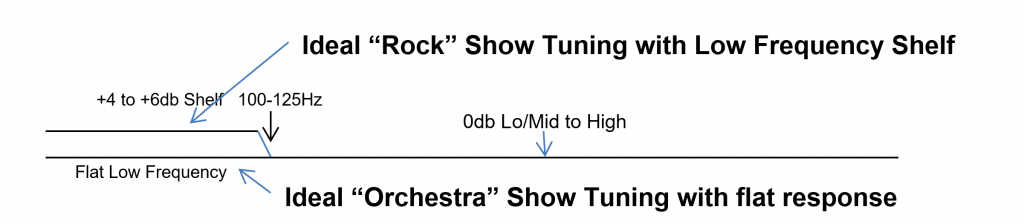
We are now ready to begin the actual tuning process. It is at this stage that many vital decisions have to be made that will directly affect the sound of the actual show. The ideal tuning, below 100 Hz, required for a heavy rock show with tight close micing will not be suitable for an orchestral-style show with multiple open microphones at very high gain settings. So below 100 Hz the tuning is very subject to the style of music. A +4 to +6 dB step up in level from no higher than 100 Hz and below being ideal for rock shows but a very flat response below 100 Hz is ideal for orchestral or playback/speech-only systems.
Now with pink noise exciting one side of the system and the levels balanced within Smaart, if you look at the Magnitude display within Smaart you can see an average of the raw response of the active side of the mains system. Many factors including the rigging, pinning, original design of the system, the design of the original factory crossover programs and finally (the most significant one!) the acoustic properties of the venue interacting with the system will all influence what this raw response actually looks like but the following approach to tuning any system should always be as consistent as possible.
Note: Be sure that even though we will be making tuning adjustments with only one side of the mains active all the following adjustments need to be done on a group that has both the left and right sides of the main system assigned to it. All the following settings will then be actually adjusting both sides of the stereo main system.
Remember that what you are trying to achieve with this system tuning method is a system that accurately translates what is being created on the mixing console (i.e. a “Linear Transfer Function”) so when looking at the raw response of the system with known flat response pink noise as the reference source it is immediately obvious what the active side of the main system is producing and how much it deviates from our stated goal.
**Note 1: A great many modern line array systems will “present” at the raw factory response settings with a quite significant rising “tilt” from the low mid frequency area (around 500Hz) all the way down to the low frequency limit of the system response together with a long drop down in the high frequency response. This type of response curve is, in many cases, pre-designed into those systems but if not corrected in the system tuning will not produce the high definition and clarity required when using that system in a large acoustically challenging venue. Using this FFT measurement setup we can immediately see that, if not corrected, that system is definitely not going to translate what is coming out of the mixing console accurately!
Always remember that this pre-existing low mid into low frequency “tilt” (boost), if not corrected with this tuning method, will translate as a low mid/low frequency shelf boost on every input channel of the mixing console even with all those input channels equalization set to flat thus ruining the nice “flat” response of all those carefully chosen microphones on the stage.
***Note 2: One of the most critical things to understand and master is the overall low-frequency definition of the entire system. Far too many shows are ruined, not necessarily by a bad mix, but by putting a good mix into a system with no definition in the low frequencies. The ideal is to have a kick drum or bass note that is really only the actual tight (short!) fundamental without any longer overtone coloring and ruining the tightness of the overall mix.
The method of achieving this tight low frequency response is that during the tuning process knowing and carefully balancing exactly WHERE and HOW MUCH low frequency energy is being generated by the complete system WITHOUT THE SUBS TURNED ON! – what is the overall level (below 100 Hz) in just the mains system (and is it relatively smooth?); how much lows level is in the sides system and even how much lows level is in the front fill system. Many modern line array systems have massive amounts of low=frequency energy just in the array itself (making the use of subs almost redundant if this lows balance in the array itself is not controlled carefully).
It is vital that each individual section of the overall system be very carefully balanced in the lows such that when the entire system is turned on (i.e., all the elements summed together) that becomes the completely balanced TOTAL low frequency of the full system BEFORE adding in the Subs.
This process is obviously very venue dependent – in a very reverberant venue you must be extremely disciplined to reduce the low frequency levels quite dramatically in all sections of the system and only use the Subs as an extension of the low frequency NOT as a louder element (i.e. TURN THEM DOWN!!).
The concept behind all this relates directly to an engineer using high quality studio monitor type speakers with a very flat overall frequency response making final decisions on the levels of low frequency instruments within a final mix. A mix created on such a linear reference system will then translate to virtually any other system because the amount of low frequency is “real” NOT generated by excessive out of balance low frequency bias as seen on some large concert systems.
It will take some getting used to listening to what really “flat” low frequency response sounds like but if this method is followed carefully you will find that you can now put more low frequency elements into a mix than ever before but those elements will now have really tight definition and clarity and of course will now translate to all your archive board mixes, broadcast feeds, etc.