

When deploying wireless, whether it’s a single system or several, and whether it’s for a tour, a one-off, a broadcast, at a church or wherever, it’s important to keep track of a whole range of parameters besides the most obvious one of frequency selection.
Why? The two main reasons are consistency and preparation.
In other words, making sure that anything that needs to be replaced, from a single piece to the entire system, is checked and vetted as well as outfitted with the same settings. The goal is to avoid disrupting or delaying the show.
Here’s a checklist of key parameters, followed by some specifics:
Mic Receivers
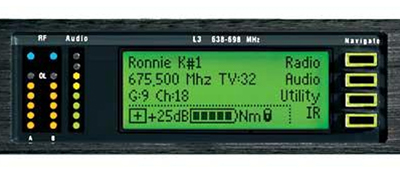
—Output level
—Squelch settings
—Sync settings
—Rear panel switch settings such as mic/line and ground lift
—Battery type, for monitoring purposes
—IP address, also for monitoring purposes
—Sample rate and other information when using digital output
—Firmware revision number
Mic Transmitters (handheld and belt pack)
—Input sensitivity/gain
—RF Tx power
—EQ and/or high-pass filter (HPF) settings
—Capsule type/model (with handheld)
IEM Transmitters
—Input sensitivity
—Tx power
—Mono/stereo
—Sync settings
—IP address
IEM Receivers
—Squelch settings
—Limiter settings
—EQ settings
—Pilot tone
—Stereo/mono
Antennas
—Type
—Placement
—Cable
Spelling It Out
Now for the specifics. Wireless mic receiver outputs and IEM transmitter inputs are usually (and should be) worked out in consultation with the mix engineers, with the choice usually being between some version of mic or line level.
Whatever the choice, make sure that all units are set the same way. It’s important to get on this one early because once line check starts, it’s far too easy for the engineers to push a pad switch or grab a gain knob to compensate for the one channel that’s different from all the rest. This same idea applies to any ground-lift switches on the rear of the receivers; set them all to the “ground” position as a starting point.
With receiver squelch settings, keep in mind that if you’ve done a reset, the receiver may have defaulted to the lowest squelch setting. In today’s noisy RF environments, wide open squelch settings are unlikely to do the job. I recommend starting with a low-to-moderate setting (i.e., 9 dB on a Sennheiser system) and see where things go from there. Sometimes more is needed.
It’s important to stay on top of what information is being transferred during the sync process, and it’s also important to stay on top of changes as they occur. For example, during rehearsals the sensitivity setting on an instrument belt pack may change a few times as the engineers and backline techs work out the best settings for each player/instrument.
Once this has been nailed down, I recommend entering that setting into the receiver and then adding “sensitivity” to the list of parameters that get synced. That way, you won’t end up inadvertently changing the sensitivity during the course of normal frequency changes – and – in the event that a pack fails, the replacement can be synched and ready to go instantly. The same thing applies to various other parameters that can be synced, such as power level, name, cable emulation, etc.
Be aware that many newer systems have different power consumption curves for alkaline and rechargeable batteries, so that needs to be set correctly in order to get accurate battery level display information. Also with many of the new systems, all parameters and adjustments are done in firmware, so performance can change from revision to revision (especially since most revisions are to fix something anyway).
On a recent tour, I had two identical receivers in a backline rack. With the squelch set the same on both units, one would open up with the occasional “hit” (with transmitters off) while the other would stay closed and quiet.
Upon investigation, I found that the unit that was opening up had much older firmware. I didn’t get a chance to update this unit, but with everything else being the same (positioning, antennas and so on), I’m pretty sure that the firmware was the culprit.
Modern Complications
The single most common fault I’ve seen with remote monitoring systems is “losing” a unit due to an IP address issue. This usually shows up as the unit being present in the display but “grayed out” and unresponsive to control inputs (while happily working away in the actual rack).
So if there are static IP addresses for each unit, make sure they’re written down or otherwise saved (I use a spreadsheet). And if you are using “automatic,” make a note of that too.
The same goes for sample rate and other information when using digital output. This is the first thing to check if a replacement unit won’t “talk” to whatever the original unit was connected to (like an AES input in the stage rack).
With wireless mic transmitters, all of the above applies, plus note that once RF power level has been set, it can often be stored in the sync settings on the receiver. In addition, make note of any EQ, HPF or pad settings that are in the hardware of the handheld/belt pack (in other words, not part of the sync process). Finally, make sure mic capsules are suitable for handheld transmitters.
With IEM transmitters, be aware of the input sensitivity, although this is usually up to the monitor engineer. Also check transmit power levels, mono/stereo settings and associated pilot tone settings where applicable.
With antennas, you can never go wrong with tracking the make and model of each one and ensuring they’re compatible with your systems. Other things to focus on include gain/attenuation settings (if the antennas include them), frequency range if antennas are narrow band (i.e., filtered to a specific range), and the length and type of cable for the antennas, along with couplers and/or adapters. This information is absolutely necessary for cable loss calculations. Finally, scout locations and mounts for the antennas ahead of time.
Other, Other Things
In live audio, it’s been my experience that RF gear tends to move around a lot more (in rental inventory) than say, an amplifier that might live in the same amp rack for years. As a result, there’s a very good probability that any given rack of wireless gear will a) have been put together for your show, and b) probably have a variety of different settings from unit-to-unit left over from the previous show(s).

So for starters, it’s a good idea to perform a re-set on all units to get them back to the same start point. In addition, if you have input as to how the rig gets built (or if you’re building it yourself), try to ensure that the units get racked with the lowest bands corresponding to your lowest unit numbers.
For example, if rack-mounting Sennheiser 2050 Series IEM systems, start with all of the “A” band units (516-558 MHz), followed by any “G” band (558-626 MHz) units, and then any “B” band (626-698 MHz) units. (The same applies to all systems, regardless of manufacturer).
Why is this important? Because frequency coordination programs like IAS, as well as coordination/monitoring programs like Shure Wireless Workbench, Sennheiser Wireless Systems Manager, and Lectrosonics Wireless Designer all organize frequencies from lowest to highest.
Thus if you want to have the numbers and names in your coordination (and monitoring) correspond to the units in the rack, then the systems need to be racked as described here. (For example, “IEM Mix-1” is the top-left channel in the rack, joined by “IEM Mix-2” at top-right, and the coordination looks like 516.125 – IEM Mix-1, 518.525 – IEM Mix-2, and so on.)


