
Applications
Does the propensity to pick up sound from the rear cause problems for ribbon mics on a live stage? Not really. Close mic’ing provides excellent isolation from leakage and feedback in spite of the rear lobe. That isolation comes from two factors:
1) The deep nulls in the polar pattern at the sides, and
2) The strong proximity effect, which, if rolled off, removes the lows in any leaked signal.
Because ribbon mics take the “edge” off the sound by rolling off the highs, they tend to work great on guitar amps, upright bass, strings and horns. By mellowing the sound of guitar amps, they can help guitars not compete for space with the vocals.
Ribbons also find use as drum overheads and vocal mics because of their smooth highs, which can be boosted with gentle EQ. Further, they can reduce excess sibilance in a vocal.
Many ribbon mics are not completely symmetrical. They might have a warmer sound at the front and a brighter sound at the back, offering some sonic options. The back side produces a signal that is opposite in polarity to that of the front, so if you mic an instrument or vocal with the back of a ribbon mic, be sure to invert its polarity.
Also, use a shock mount because ribbons are sensitive to mechanical vibration. It’s good practice to handle these mics carefully. Store them in their protective cases with the ribbon positioned vertically to prevent sagging over time due to gravity.
Don’t blow into them, and keep them away from power transformers to avoid hum. And, don’t put a ribbon mic in a kick drum because the force of the air puff can deform the ribbon.
Placement
When using a side-addressed ribbon mic with a figure-8 pattern, aim the 90-degree side of the mic at nearby sound sources that you want to reject.
For example, suppose you have several guitar amps side-by-side on stage. Aim a ribbon mic at each amp to reduce pickup of adjacent amps to the sides. Although close mic’ing provides the most isolation, you might prefer to place the mic 6 to 8 inches from the amp to get a less boomy sound.
Ribbon mics do have some off-axis coloration (peaks and dips) in the vertical plane. So for the flattest response, aim the mic straight at the sound source, rather than tilting it up or down. This also results in the best transient response because the sound wave strikes the entire ribbon at once. However, Royer notes that angling the mic by 15 degrees or more protects the element in extremely high SPL situations.
With horns, place the mic near the center of the horn bell for a brighter sound, and away from the center for a darker sound.
A drum kit can be miked overhead with two ribbon mics. The side nulls will reject instruments, vocals and loudspeakers all around the kit. You might apply some high-end boost to compensate for the mic’s high-end rolloff, or just leave the EQ flat to soften the edgy tone of some cymbals.
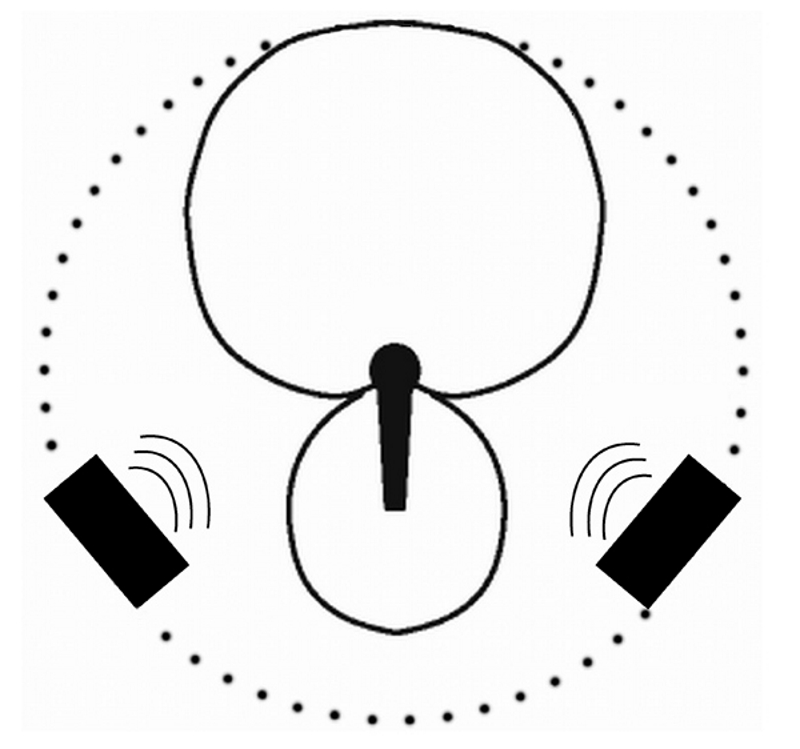
When using a hypercardioid pattern with a singer, put the monitor loudspeakers at 110 degrees to either side off axis, where the pattern nulls are located (Figure 5). This will provide maximum gain-before- eedback. If a monitor is directly in front of the singer, aim the mic horizontally to point it’s null at the monitor.
Suppose you’re miking a singer/guitarist with a vocal mic and guitar mic—there could be phase cancellations because the guitar mic will pick up vocal leakage, but with a delay. Prevent that with a coincident pair of bidirectional ribbon mics. Place the mics horizontally with tops touching. Aim the null of the vocal mic at the guitar, and aim the null of the guitar mic at the singer. You just solved an otherwise “sticky wicket.”
The new breed of rugged ribbons can handle life on the road while providing the warm, smooth sound that many engineers love, as well as a wide range of options for sonic creativity.