
Anyone faced with setting up loudspeakers on stands has asked this question: just how high up should they be? The short answer: as high as possible. Allow me to explain.
The first concern is high-frequency propagation loss (also known as air loss) which is a physical phenomenon created by humanoid absorbers and long distances in open air. HF wavelengths are short and an audience of people is good at absorbing that energy.
However, this is less than ideal for the folks located in the back of the room. The goal is to position compression driver/horn (or tweeter) of the loudspeakers above people so that the output isn’t all damped by the time it reaches the third row, which is common for “vertically challenged” front fills.
While we’re on the subject, a word of warning: if the room is overly reverberant, it may be necessary to angle the loudspeakers downward a bit to avoid direct energy smacking the back wall. It’s a trade-off of getting HF energy far enough back but aimed properly for the acoustical conditions of the room.
The next concern is another law of physics called the inverse square law, the spreading of sonic energy in space that results in less sound pressure level (SPL) as it moves further away from the source. Depending on the configuration, loudspeakers can bend this rule but only over a limited range.
If there’s just a single box or a few constant curvature enclosures on stands, it’s necessary to physically arrange the loudspeakers in relation to the audience to combat the level drop rather than arrange them in relation to other loudspeakers.
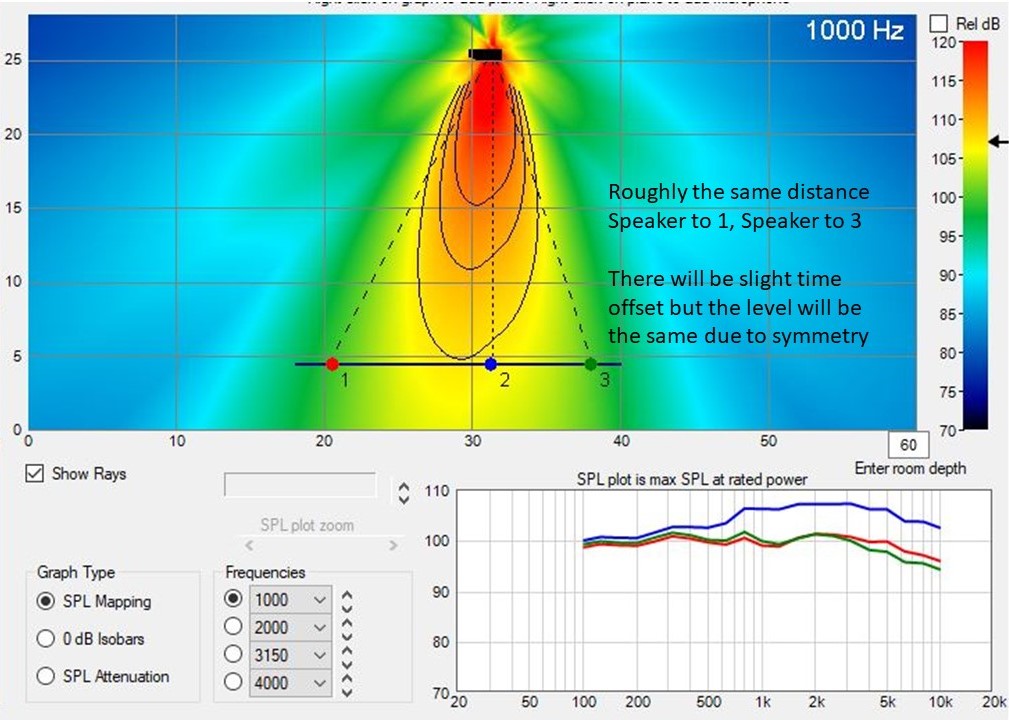
Enter a term called the distance ratio. This ratio defines the distance from the loudspeaker(s) to the “first row of seats” or closest seat and the same loudspeaker(s) to the “last row of seats” or farthest seat. In terms of distance ratio, the best case in this scenario for placement is directly overhead for a flat audience plane.
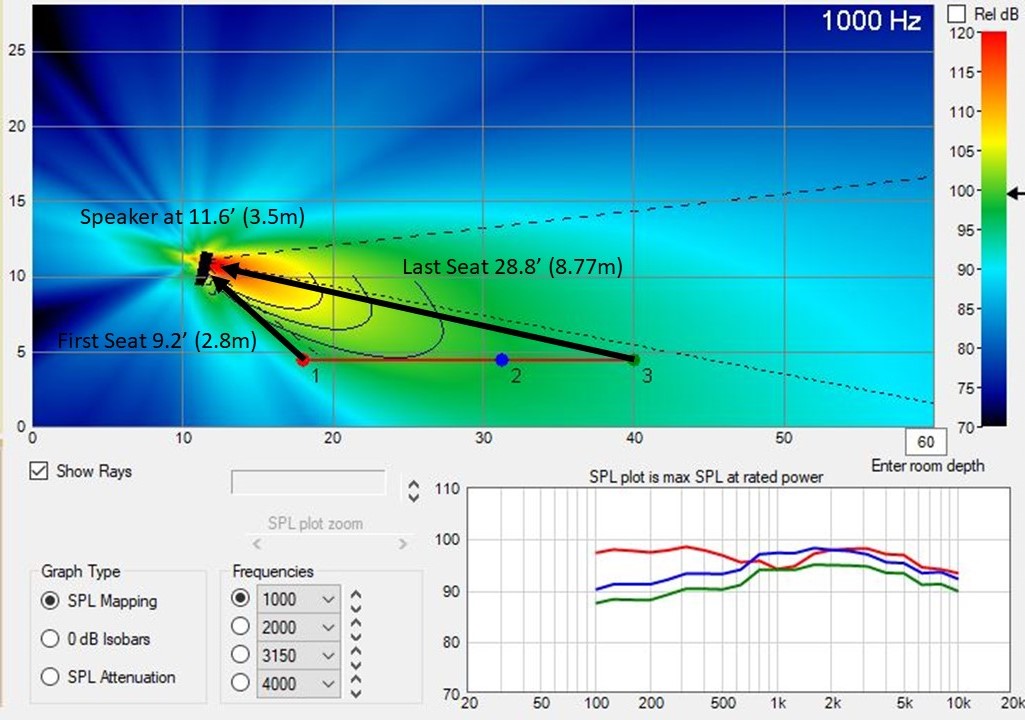
The red, blue and green dots in Figure 1 are microphone positions that show a frequency response in the bottom right of the graphic and represent the first row and last row (as we’ll see later). The variation in evidence here is due to axial loss.
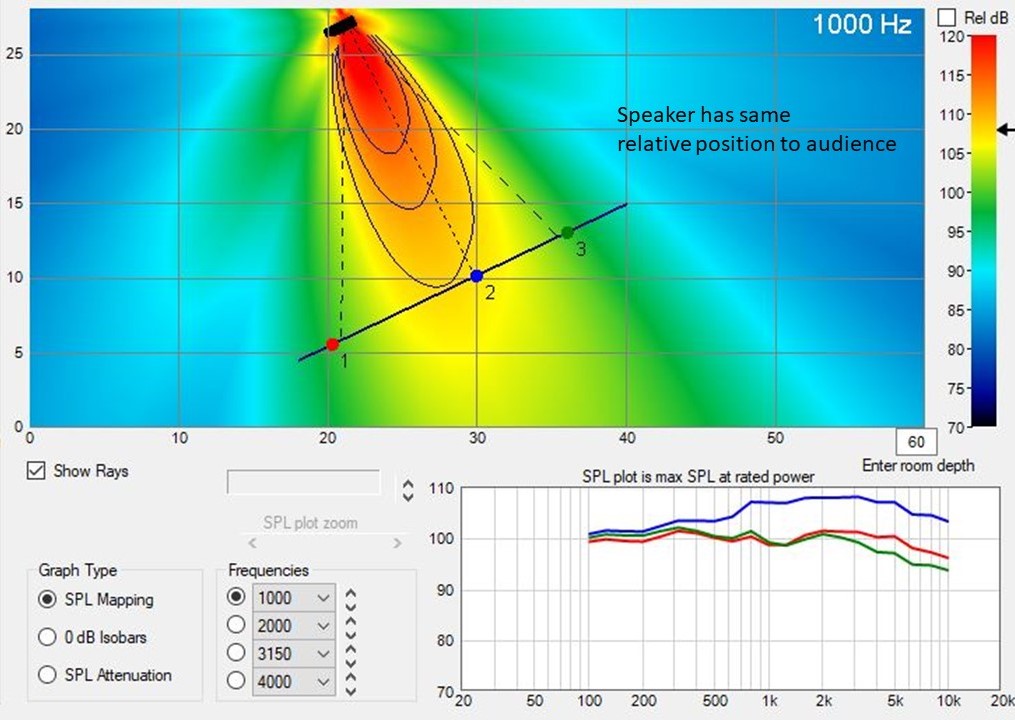
If the seating is on a slope, a flown speaker that is perpendicular to the audience will have the same relative effect as above (Figure 2). When loudspeakers are on stands, they end up closer to one part of the audience than the configuration above due to triangulation. There are two (actually three) options: 1) decrease the distance ratio by raising the stand, or 2) decrease the distance ratio by moving the loudspeaker away from the audience, or 3) both.
The lower the distance ratio, the less drop (variation) there will be in SPL from front to back. Figure 3 shows a loudspeaker on a stand with its top at 5.8 feet (1.7 meters) off the ground. The seating plane is 4.5 feet (1.4 meters) to represent sitting head height.
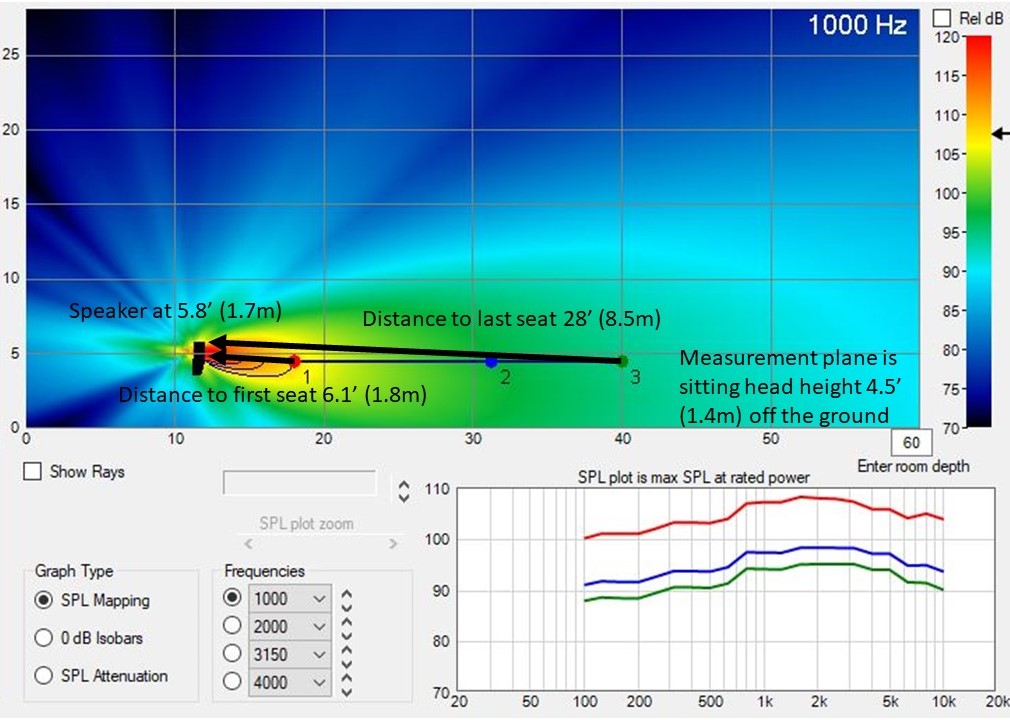
Meanwhile, the distance from the first seat to the loudspeaker is 6.1 feet (1.8 meters) and from the last seat it’s 28 feet (8.5 meters). This is a distance ratio of 4.6:1, meaning there be a drop of more 13 dB from the first seat to the last, and it will be about 4.5 times louder in the front seat than the last seat.
This configuration puts us in a “Chinese finger trap” of gain. Crank it up to satisfy the last row and the people in the front will get blasted; make it comfortable for the people in the front and the folks in the back will struggle to hear.
Option 1 is raising the loudspeaker height. Doubling it to 11.6 feet (3.5 meters), which is possible with heavy-duty stands (and note the loudspeaker itself is 2 feet tall) will produce the result seen in Figure 4. The distance is now 9.2 feet (2.8 meters) to the first seat and 28.8 feet (8.7 meters) to the back, and the ratio is now 3:1. We lose 9.8 dB from front to back.
The loudspeaker distance didn’t change much to the last seat even with doubling the height, while the distance to the front seat changed much more and there’s now a 3:1 ratio. This is still not ideal (2:1 is spec) but the level is better matched across the audience.
If option 2 can also be implemented, the situation is further improved (Figure 5). The loudspeaker will remain at the same height but is pushed back 6 feet. The distance to the first seat is now 14 feet (4.2 meters) and it’s 34.7 feet (10.6 meters) to the back. The ratio is 2.5:1, there’s a 7.8 dB drop and it’s more than 2 times louder in the front.
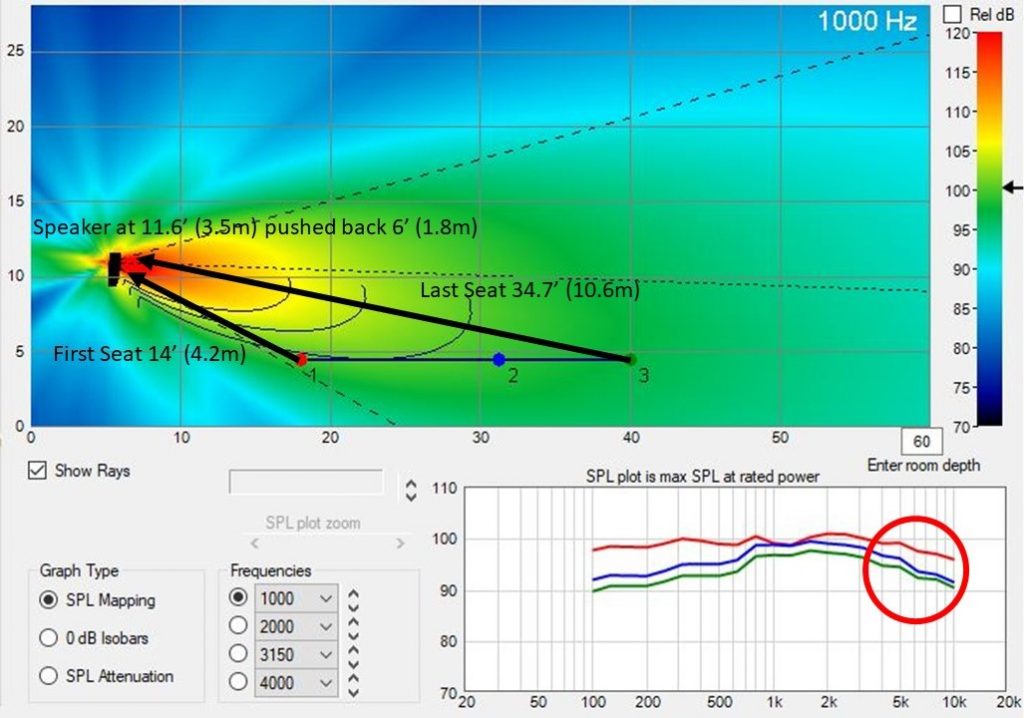
Observe the green and blue measurements are now closer in level. The overall gain is up 4 dB to get the high end to the same level. Also note that the loudspeaker had to re-aimed to make the measurements as similar as possible.
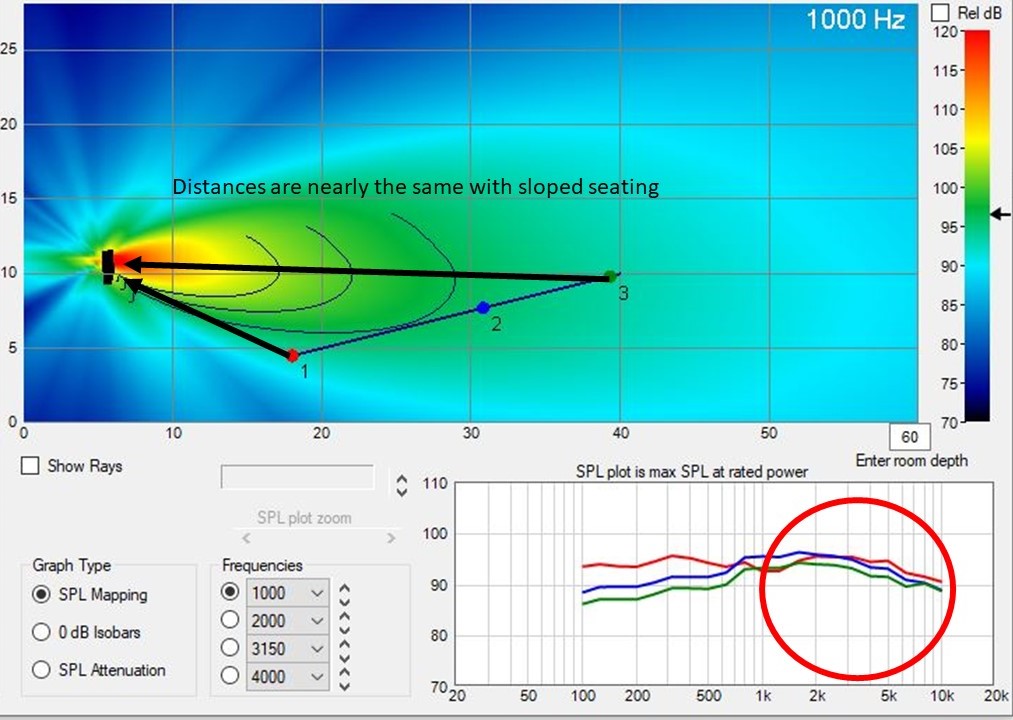
Overall this configuration is much improved from the 13 dB drop seen in the first attempt. This method works with sloped seating as well. The ratio stays the same with a sloped seating plane and the measurements improve in uniformity due to offsetting axial and distance loss (Figure 6).
The next measurement (Figure 7) is from an actual installation that I measured during a consultation. The first row was 32.2 feet (9.8 meters) from the loudspeaker, while the last row was 65 feet away. This is a nearly ideal 2:1 ratio.
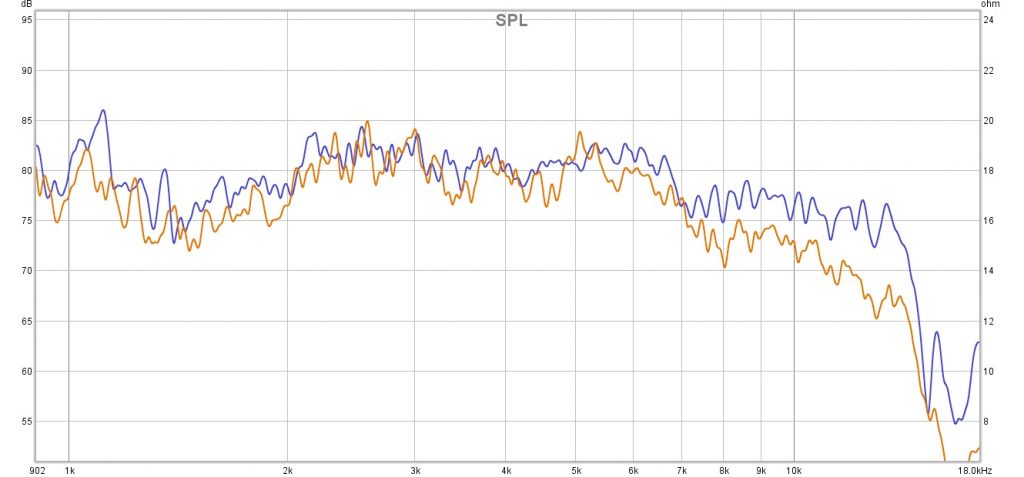
In theory, there should only be a loss of 6 dB front to back. But in reality, there’s less than the inverse square law states inside a room due to reflections and modal build up. The blue trace is the first seat in that section and the gold trace is the last (again, Figure 7).
If you’re interested, here are the formulas used in these calculations: Ratio = higher number divided by lower number; the answer is :1. SPL Drop (Free Field) = 20*LOG (lower number divided by the higher number); the answer will be negative. Power Factor = (10^ (SPL drop in dB/20)).