
As with many types of cable, you can save some money by purchasing Ethernet cable and connectors and assembling/terminating them yourself.
Of course, keep in mind that putting together cables of any type requires time, patience and some know-how. Without these essential ingredients, you’ll be much better served by buying pre-terminated cables.
That said, let’s get started.
First, to attach any Ethernet RJ-45 connector ends to the lengths of cable, you’ll need an RJ-45 crimping tool.
Start with a good quality cable, and cut a piece to the appropriate length. For the best result, choose a size that is at least 3 feet (about 1 meter) long, but not more than 325 feet (about 100 meters). A cable that is either too long or too short can cause transmission problems.
Next, use wire strippers to remove about 1 inch of the cable jacket, taking care not to nick or cut the wires.
If the wires are damaged even slightly, cut off the stripped section and start over—even minor abrasions can lead to crosstalk between the wires within the cable.
Then separate the individual wires, arranging them in the order of the desired configuration, either straight-through or crossover. Be careful not to untwist the wires down into the jacket; doing so will cause the cable to be out-of-spec and can also cause crosstalk.

Select the right connector for your cable. They’re available for solid or stranded conductors, but are not interchangeable.
Flatten the wires into a line, the way they’ll be inserted into the connector, and cut them to a length of half of an inch with reference to the jacket. Make sure that all ends are even with each other. (And don’t strip the wires!)
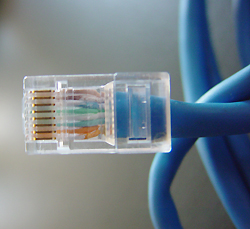
Next, insert the group of wires into the connector. By holding the RJ-45 connector with the clip facing down and the connector front facing away from you, pin #1 will be on your left. Be certain that each wire is inserted all the way so the tips of the wires at the front of the connector can be seen.
The cable jacket should extend into the RJ-45 connector end by about a quarter of an inch, because there’s a secondary mechanism that will also clamp the jacket. Inspect the cable to verify that all wires are in the correct order and are fully inserted into the connector.
Then use the crimping tool to crimp the connector to the cable. The tool presses the connector in at the two points to make a connection with the wires and to secure the cable jacket.

Check the completed cable to verify once again that the wires are in the proper order, that the connector is solidly attached to the cable, and that all wires are fully inserted up to the front of the connector.
Use a cable tester that supports RJ-45 connectors to check your work. If the cable doesn’t work, you’ll need to cut off the connector and start over again, and you will not be able to re-use the connector. (It’s a “one shot” deal!)
And voila! Your connector should be properly terminated, and you can move on to attaching the next one.
May the bandwidth be with you…
Chris Bushick is an electrical engineer and sound engineer based in Austin, Texas.div class=


