
Even with today’s inexpensive recording systems, it’s possible to achieve a dynamic range of over 90 dB—in other words, the loudest sounds you record can be over 90 decibels louder than the background noise.
Managing all of the “area” between these two extremes, for each and every sound you record, is a skill that’s critical to making a good-sounding recording.
Fortunately, there are expanders, compressors, and limiters (collectively called dynamics processors) that help in this task. We’ll start here with expanders, and in a subsequent article, move along to the others.
Using An Expander
Of the three types of dynamics processors, compressors are probably the most familiar—but let’s begin with expanders, because they’re a bit easier to understand. A lot of people record without using an expander in the signal chain, and I think that’s a shame, because effective use of an expander can do an awful lot to clean up the tracks that you record.
Expansion refers to the process of increasing a signal’s dynamic range—making it bigger. Isn’t 90 dB a large enough dynamic range, you ask? Certainly—but that number refers to a system’s potential dynamic range, not necessarily the range you’ll get if you plug in a mic and start recording.
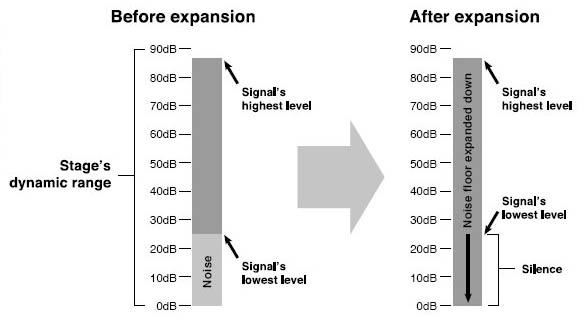
An expander is important in optimizing the actual dynamic range you get out of a system. An expander operates at the low end of the dynamic range, where signals are at their quietest, or perhaps nonexistent. In other words, when audio is coming through the signal chain, the expander may be doing nothing at all.
But when that audio stops coming through, the expander goes to work by lowering the signal further, expanding the background noise floor downward so that there’s a larger dynamic range overall (Figure 1).
Not surprisingly, this is called downward expansion. There is such thing as upward expansion, but you don’t really need to know about it. To understand this better, consider what happens when you plug a microphone into a mixing board and crank up the gain. If you talk or sing into the mic, you’ll hear yourself coming through the headphones loudly. (Careful—you might also get a feedback shriek if it’s too loud.)
But if you stop singing, odds are you won’t hear silence—especially in a bedroom or den Guerrilla studio. You’ll hear the heating or air-conditioning system, planes going overhead, street traffic, or your kid brother’s video game down the hall. This is all stuff that doesn’t belong on your recording!
Sure, domestic sounds are charming—if it’s 1970 and you’re Paul McCartney recording your first solo album. But we Guerrilla recordists are going after a slick, clean sound, and part of “clean” means not having anything on your tracks that you don’t want there.
Here’s where expansion comes in. You may have encountered a device called a noise gate, which is a crude form of an expander. In a noise gate, once the signal falls below a certain threshold, an electronic gate closes and no sound is allowed to pass through (noise or otherwise). However, when the signal begins to rise above that same threshold again, the gate opens up, allowing the signal to pass through once more.
Naturally, this also allows unwanted noise to pass through along with the signal, but the idea is that noise is less troublesome when signal is present to mask it. Like faint starlight in the night sky, noise is most noticeable when it’s by itself. Mix in a little signal (or sunlight in this analogy) and you’re less likely to notice the faint background stuff.
An expander works on the same principle as a noise gate, but an expander is a bit more subtle: it’s not as obvious to the ear when it’s doing its thing. Here are the parameters that you’re likely to find on an expander, or the expander component of a compressor/expander:
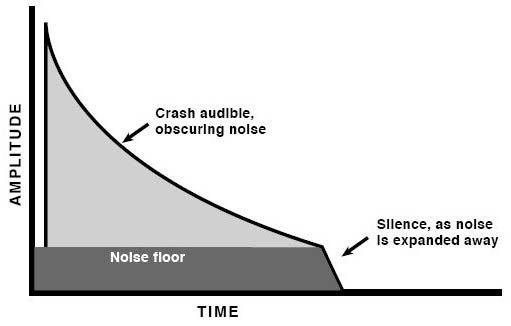
Threshold: This control sets the level at which the expansion effect begins to set in. Imagine a cymbal crash that begins at 0 dB (the top of the dynamic range) and slowly decays to –_dB.
At a certain point in its decay, the sound of the cymbal will get so quiet that you’ll hear background noise mixed in with the cymbal, and at a still-later point you’ll hear only background noise, as the noise masks what’s left of the crash (Figure 2).

If you were miking this cymbal by itself (perhaps to sample it for a collection of drum sounds), you might want an expander to kick in toward the tail end of the decay in order to take the background noise out of the sonic picture (Figure 3). The threshold control determines when this happens.
If you were to set the expander’s threshold to –30 dB, the expander would begin to shut down the signal when the cymbal decayed 30 dB below its initial peak. In this case you could get away with a lot more noise happening in or outside your studio without worrying about these sounds making it onto your cymbal sample.
But if you wanted to make a long, realistic sample of the cymbal and capture a lot of its decay, you’d probably want to set the control lower—perhaps –60 dB—and record it at a time when your studio is at its quietest, such as late at night. (Bummer for your sleeping housemates!)
Since the expander is set to a low threshold, the signal chain will be more susceptible to noise coming into the mic or created by the mic preamp.
To learn how to set the threshold control, here’s an exercise. Pretend you’re about to record a fairly loud electric guitar part using a miked amp. Set up your signal chain, with your mic in front of the amp, and gain-stage the chain so you’re exploiting the full dynamic range of all the stages without unwanted distortion.
Next, put the expander into the signal chain, ideally by way of your mixer channel’s insert jack. If the expander has compressor or limiter sections, bypass them by pressing the appropriate bypass switches or turning those sections’ threshold controls all the way up.
Turn the expander’s ratio knob (which I’ll discuss in a moment) all the way up, turn the threshold knob all the way down, and let your guitar sit on a stand with the amp running and the mic picking up the amp’s background noise.
Now put on the headphones, slowly turn up the expander’s threshold knob, and listen to what happens. At a certain point in the knob’s travel, the sound of the idling guitar amp will cut out—this is the point you’re looking for. Set the threshold slightly above this point.
Now, if you so much as touch the guitar’s strings, you should hear the gate open up, with the amp sound (and perhaps some string noise) coming through.
That’s what you want—the expander is gating out the noise, unless some signal is present as well (you touching the strings), at which point the gate opens to let both signal and noise pass through. The expander’s threshold is properly set, at least for now.
Ratio: In the exercise above, you probably noticed that when the expander’s gate closes, no sound is let through—the gate closes completely. That’s okay, but it isn’t ideal.
Setting an expander’s ratio control properly allows the circuit to close more gradually as a sound decays, and it allows the expander to stay slightly open after the sound has decayed below the noise floor.
It’s a bit like leaving a bedroom door open a little when you sleep: doing this lets in some of the light from the hall (similar to the background noise in this analogy) so you aren’t in complete darkness (total silence).
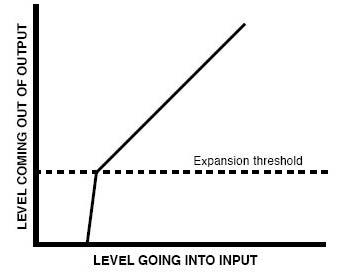
Figure 4 is a graph showing how an expander reduces the level at the output when the input level is below the threshold.
Depending on the recording situation, setting up an expander to work like a noise gate—where it slams shut, resulting in sudden silence—can sound unnatural. This is particularly true with a gently decaying sound such as a crash cymbal, which would be abruptly cut off by noise-gate-like expander action (Figure 5).

A hard-closing gate can mess with the sound in even worse ways, for instance chopping off consonants at the ends of vocal phrases. We need to set the ratio control to avoid these problems, while still allowing the expander to clean up the sound.
With the guitar from the previous exercise still on its stand and the threshold control properly set, start turning down the ratio control and listen to what happens. At a certain point, you’ll start to hear the sound of the idling guitar amp coming through—that’s the gate opening up slightly. When the ratio control is all the way down, the amp noise should be exactly as loud as if the expander weren’t in the signal chain at all; in other words, the gate is all the way open.
When you record a track, look for a happy medium between these points. When the signal chain is idling, the gate should be closed enough to quiet the track signifi cantly, but not closed so much that passages with no playing sound unnaturally silent next to played passages (unless, of course, that’s the effect you’re going for).
You also shouldn’t be able to hear the gate noticeably opening or closing when you start or stop playing. As much as possible, it should simply sound like your system is a lot quieter.
The trick to using an expander effectively is to find suitable threshold and ratio settings based on the sound you’re about to record, as well as the song you’re recording.
You want the expander to be responsive to any sound you make during the performance—in other words, to anything that you actually want recorded on your track—but not necessarily anything else.
Play lightly and let some notes or chords decay. Think about the performance you’re about to record: Will you be playing full-out through the whole track? Is there a point where you’ll need to hold a chord for several seconds? Will you be playing any passages very quietly?
Test out any such critical performance moments and listen to how the expander reacts. If the expander seems to be too sensitive to what you’re doing, turn up the threshold control a little.
Adjust the controls one at a time until the expander is doing its job cleaning up your signal chain, without calling attention to itself. You may need to compromise—one pair of settings may be good for one part of the song while another is good for a different passage.
Try to find settings that work as well as possible across the whole performance. If necessary, you can always punch in certain sections that require very different expander settings.
Attack & Decay: Most (if not all) expanders have these controls. You’ll recognize these terms if you have experience programming synthesizers: attack specifies how fast something rises, and decay specifies how fast it falls afterward.
In the case of an expander, attack determines how fast the gate opens when its threshold is suddenly exceeded, and decay determines how fast it closes again when the signal suddenly goes away. You can usually set these knobs and forget them.
Normally you want a very quick attack (so as not to cut off the beginnings of sounds) and a medium decay—perhaps around 200 milliseconds—to make sure the ends of sounds don’t get truncated.
The two sections of an integrated compressor/expander unit may have only one set of attack and decay controls but separate ratio and threshold; that’s okay. Having the same settings for both sides usually works fine.
Indicator LED: This is a handy visual element that you can use in conjunction with your ears. One LED, or a series of LEDs indicating a range of levels, may light to show that the device is actively expanding the noise downward.
When the gate begins opening, the LED may go dark, or a series of LEDs may progressively turn off as the gate opens wider. Indicator LEDs aren’t really that necessary on the expander side—they’re much more useful in compression—but they’re nice to have anyway.
Editor’s Note: This article is excerpted from Karl Coryat’s Guerrilla Home Recording—2nd Edition, available here.