
After many years as a front of house and studio mixer, I find myself these days as a monitor engineer, where I’ve had the honor of working with many amazing and talented artists such as Enrique Iglesias, Gwen Stefani, Christina Aguilera and Tears For Fears.
Even though these artists cover a vast variety of styles and genres, they all have one thing in common: The desired vocal sound in their in-ear monitors (IEMs) is very similar. The goal is to protect my artist’s hearing while giving them a “balanced, clear mix.” Louder isn’t better.
About 15 years ago I remember going to the opera for the first time, “Madame Butterfly” if memory serves me right. I was on a balcony with great seats, eagerly awaiting the start of the show.
When it began, the first thing that came to my touring engineer mind was how quiet and far away everything sounded, but within seconds my brain and ears had a meeting and I realized that I could indeed hear everything clearly. This blew my mind! I was able to hear the breathing of the vocalists as well as the smallest details of the orchestra, including the faintest notes of the glockenspiel, winds and strings. All of this as clear as water. My ears zoned in as if I was listening to a hi-fi version of it.
Keeping It Down
I use this as an example every time artists and musicians I’m working with want to listen to their IEMs at a loud volume. If you start loud you can only go louder as the show progresses. Not good.
But if you start low and then turn up the volume a bit if needed it will seem like a lot. This is hard to get used to but incredibly efficient when trying to protect your ears and have a great experience with IEM mixes on stage. “Start low…you can always go a bit louder if desired. If you start loud…” – well, you get the picture.
The question of why an artist like his/her vocal so bright, and/or, way too loud has a relatively simple answer. But to start, we need to understand that what we listen to at monitor world is not what the artist is listening to. Their perspective is completely different.
Although I’ve been a mix engineer for over 20 years, I’ve also had the experience of playing in bands where I’ve worn IEMs as well while singing and playing instruments. I believe this has helped me understand what singers and musicians might need on stage while wearing IEMs. (Plus they’re the best tool to protect our hearing.)
First, they’re the ones performing, which means they can hear themselves (via resonance) through the bones near and around their ear canal, where we as monitor engineers do not. We only hear the end result of what we send to their IEMs (EQ, compressors, ambience).
Second, they’re wearing plastic earpieces that block sound from entering their ear canal. Although you can still feel vibration and hear low frequencies, mid and high frequencies levels are very attenuated, to a point that often feels as if you’re 100 percent blocked from the outside world. (The “muddy” sound of LF buildup that occurs when the ear canal opening is blocked is called the Occlusion Effect.)
I actually consider them “ear plugs with sound coming out,” which as noted earlier, is great for ear protection when used properly. What does this mean? Well, normally when we listen to a vocalist through studio monitors, a PA or stage wedges, we search for a clear but warm vocal sound, and as an IEM mixer, we can also achieve that with no problems at all.
Making The Connection
The difference is when the singer is wearing IEMs, there are many additional factors to consider, such as the volume of the bodypack IEM receiver, the EQ curve of the whole mix, and more importantly the EQ curve and compression settings for the vocalist’s channel itself, regardless of the microphone being used.
Understanding how the human body reacts to sound, especially when plugged up with some “plastic things” molded to the ear canals, is key to understanding this process. I always tell my artists: “Imagine that you just put in ear plugs, and now turn up the volume slowly until you can hear yourself clearly – but not loudly.”
In addition, the plain and dry (nearfield) sound that happens by having drivers (miniature loudspeakers) so close to the ear drum and not receiving much natural acoustical information doesn’t help either. My EQ settings usually include a large amount of air (anything above 12 kHz) on a shelf, as well as a wide band around 3 to 5 kHz.
Of course, this makes it very clear but sibilant, so if needed I add a mild de-esser in line as well; again keeping in mind that the amount of high frequencies I hear is louder by comparison than what my artists hears. At a glance, they may seem super bright (Figure 1), but as mentioned above the key is the level of the bodypack.
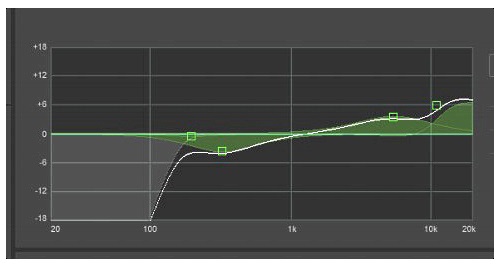
My next step EQ-wise is engaging a high-pass filter (HPF) at about 160 Hz. Then (most importantly) I cut a considerable amount of low-mids (usually around 400 Hz) and some lows (in the 180 to 200 Hz range). This cut is way more than you’d ever do if you weren’t wearing IEMs, but listening through loudspeakers or headphones, especially when singers are right on the mic, the result is a lot of proximity effect.
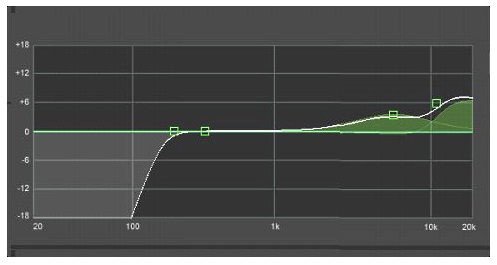
If the singer stays right on the mic, then a fixed EQ with these settings works perfectly. However, with singers who tend to back up from the mic more often than not, we don’t want to lose those warmer frequencies while the mic is farther from their mouths, considering the fact that as they back up the sound gets thinner. In these cases, I apply a multiband compressor just enough to suppress certain low-mid frequencies produced by the vocalist being right on the grille of the mic, and I leave the fixed EQ untouched in that range (Figure 2).
Compression settings can vary, but a rule of thumb (at least for me) is to never have the gain reduction go below the sound that they hear from the bone resonance. Allow some gain reduction, but just enough to keep it from becoming overwhelmingly loud while remaining right above their resonance level.
Putting It Into Practice
How do I gauge this? I spend some time singing and/or checking the vocal mic at
the proper level and in all areas of the stage as the band is performing sound check and the house PA is on. This way I can experience what the artist will experience during the show.
In fact, if you’re standing next to me at the monitor position during a show you might hear me singing or humming the melody along with the singer, as this helps me get the closest sonic blend of their vocal as they might hear it. Why?
Let’s try a quick exercise: Plug your ears with you index fingers, and then say “Hello, I enjoy reading Live Sound International.” You’ll notice that the sibilance or clarity has gone right away and that, all of a sudden, it sounds as if you added lots of lower frequencies, or it appears “muffled.”
The goal is to protect our hearing while still being able to find that “sweet spot” or crossover point between the volume of the bodypack and the resonance traveling through the head bone structure and ear canals. This technique has proven to work for me in helping to keep my clients from experiencing ear fatigue. Of course, not only does it apply to vocals but also to horn players, drummers, etc.
Another aspect of this technique is to keep in mind the summation or coupling of low-end frequencies onstage from the house PA. This is also a key factor to consider when handling certain instruments in artist IEMs, i.e., bass guitars, synths, kick drums, and more.
Next time I’ll address this aspect further along with detailing additional IEM mix concepts and approaches.