Parallel Compression For Attitude
Threshold: Bring down the threshold so the compressor is almost always in a state of compression, with only the very quietest passages passing by without triggering the compressor. You’ll be expecting to get something like 5 to 7 dB gain reduction.
Attack: Start with something similar to what we have used in previous examples – around 20 to 50 ms. You don’t want it too short, it’s important we set the compressor to allow for the transients hits to pass before it responds.
Release: Setting the release should be approached in the same way as discussed in Part 1. Zone in on the rhythm, get the compressor moving in sync, responding to the heavy RMS energy of the lows and contributing to the fatness.
Ratio: Set to taste but don’t be shy, get that compressor moving, as if it’s under the kick and bass-line’s spell! Perhaps start with something like 4:1, or may be 5:1.
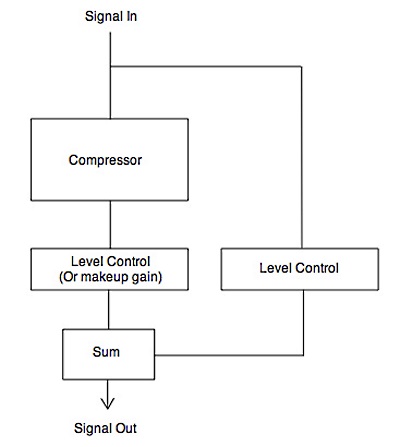
With downward compression, once you’ve got your compressor moving with the rhythm, you would pull back on the threshold to achieve the desired amount of compression. For parallel compression, you keep that threshold right down, heavily compressing the mix, then simply introduce the dry signal into the chain which has just bypassed the compressor.
This is how you determine how much compression you want. Now you can leave your compressor’s settings and alter the amount of compression by simply adjusting the difference between the wet and dry signal.
Wet and dry levels: Between 3 and 5 dB gain reduction will require something like a 50-50 blend (both wet and dry faders at the same level). With larger gain reductions, you should expect to need more dry signal to wet. Remember that you’re adding two signals; be sure the combined result isn’t going into the red and clipping.
Compressing in this way is much more rewarding for all the hard work of getting your compressor moving with the rhythm. This is because you don’t have to pull back on the threshold to decide on the amount of compression; the compressor is pretty much always in a state of compression, imprinting its fattening character across the mix, all of the time.
I can’t tell you how incredibly useful this is when you have a very nice compressor at your disposal – an analog compressor for instance, or a software version of a nice analog compressor.
You can drive your compressor really hard to reveal its wonderful character (curvature of attack and release), while retaining a suitable amount of compression and transient impact at the same time. This is when your skills of getting your compressor to move with the rhythm really come into play.
Here are some good settings to dial in when you require transparency (compression that sounds uncompressed); very useful for delicate recordings – classical guitar for example.
Parallel Compression For Transparency
Threshold: As before, you need to pull the threshold right down only this time you want the compressor to be in a constant state of compression – the very quietest passages must still be triggering the compressor. Expect quite a lot of gain reduction, more than the previous technique.
Attack: As fast as it will go. For this technique, you want the compressor to bite down hard on the transient hits (don’t worry, the dry signal replenishes the lost transients).
Release: This should be approached a little differently to previous techniques. We still want the release to compliment the natural rhythm of the track but be careful not to have it set too fast as this might take away the transparency. Typically, fairly slow release settings work best for this technique, 2s or more.
Ratio: Set to taste.
Wet and dry levels: Suitable wet and dry levels are likely to be similar to the previous technique.
The parallel compression technique can be used anywhere, not just in mastering; you can use it on vocals or guitars for instance. Compressing the drums in this way is very effective. It’s probably the most useful way of using compression. Enjoy!
Go here to download a copy of The Audio Mastering Blueprint.
In addition to being the author of The Audio Mastering Blueprint, David S. Eley owns TGM Audio Mastering and operates the website MasteringTuition.Com.