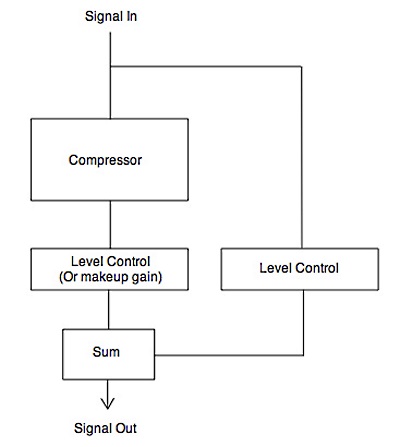
Typically, you’ll be driving your compressor harder for this than you would for downward compression; in fact it’s a good idea to set up your compressor so it’s in constant gain reduction – bring down the threshold until it is.
By applying compression in this way, the louder passages give you more dry signal compared to wet (compressed) signal at the compressor’s output than when the music is quiet, and it’s the dry signal that has all the punch because the transients have not been squashed by a compressor.
Try to visualize how the amount of compression changes with the level of the signal – as the signal level into the parallel compressor increases, the dry signal increases more than the compressed signal at the output.
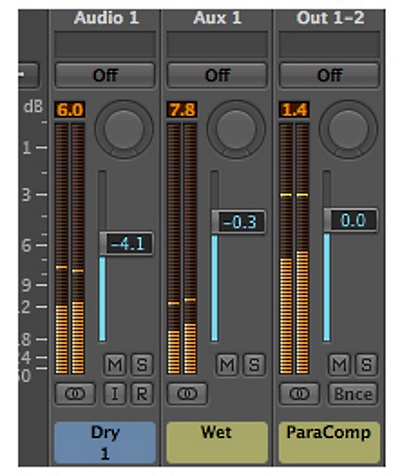
To help you visualize how the signal levels change in respect to each other, I have set up a manual parallel compression network inside my DAW by duplicating the signal using an aux send (similar to setting up mid and side to be used on separate channel strips), then took a snapshot. (Figure 3)

The first channel strip – Audio 1 (or “dry” as I’ve named at the bottom) – is the dry signal. The second channel strip – Aux 1 (or “wet” as I’ve named it at the bottom) – is the wet (compressed) signal. The third channel strip is the summed output of the other two channels; this is where we experience the parallel compression effect. I’ve named it “ParaComp.”
Notice the level of the dry and compressed wet signal. During the louder passages there is significantly more dry signal. The output signal (ParaComp) is mostly made up of uncompressed audio during the louder passages.
During quieter passages, the dry signal’s level comes back down significantly, whereas the compressed signal’s level is only marginally different as it was restricted from becoming louder by the compressor in the first place – see Figure 4.

The difference between wet and dry is much less during the quieter passages. The signal at the output (ParaComp) is now made up of more compressed signal than before.
You’re still compressing the audio and reaping all the benefits of doing so, only now it’s the quieter passages that are more compressed than the louder ones. So we’ve compressed from the bottom up instead of from the top down.
Another way to help you visualize this effect is to see the signals as waveforms. I’ve bounced the dry signal, the wet, and the combined output (ParaComp), then loaded them into an empty project and took a snapshot. Here it is in Figure 5.
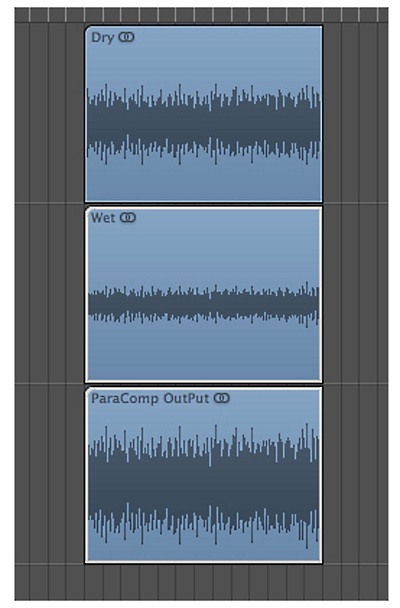
Notice how the peaks actually look more intact than they would when using a similar amount of compression in a downward fashion. You get all the benefits of the increased RMS from the heavily compressed signal, along with the transient qualities of the uncompressed signal.
To adjust the amount of compression, adjust the output gain of either the wet or dry signal. The more compressed signal you have along side the dry, the more compression. In the snapshot below, I’ve offset the level of the dry against the wet by around -4 dB, resulting in a more compressed signal at the output in Figure 6.
This way of compressing is fantastically useful when you need some attitude in your results, or even if you need transparency; parallel compression does both very well.
On the next page are some settings to dial in for achieving attitude and punch, just when you need it – when the mix has gotten loud.