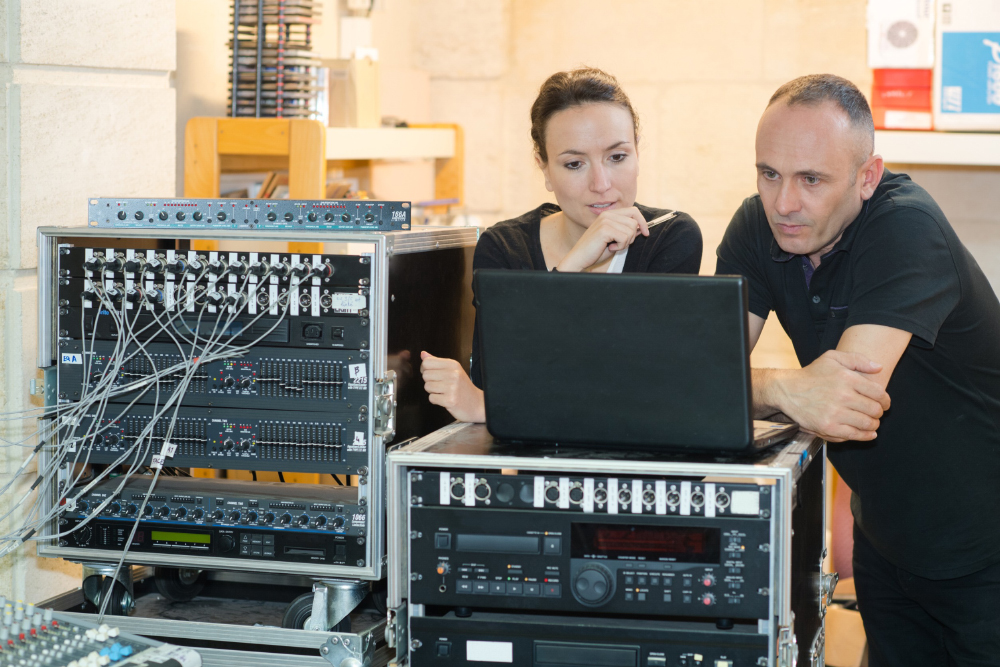

Audio engineering never ceases to offer interesting and exciting challenges. Wherever you’re at in your audio career path, there are always new skills to practice, new knowledge to learn, and new experiences to enjoy.
For those new to the craft, the learning curve can be steep, but gradually, through the investment of time and hard work, newbies slowly evolve into experienced professionals. Even then, the learning continues.
As an audio educator, I regularly consider the different areas students need to focus on to become well rounded, effective, and employable. From my vantage point, there are a few major categories of expertise every audio engineer, regardless of experience level, should regularly work on. Signal flow, critical listening, troubleshooting, equipment operation, interpersonal communication, and computer fluency are just a few of the areas deserving continued study.
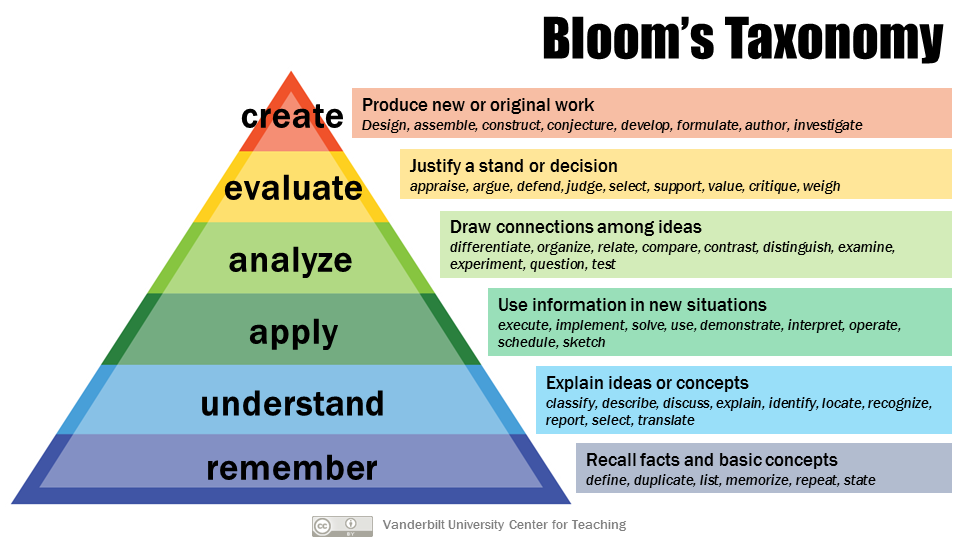
Some abilities are more difficult to acquire than others. For example, knowing microphone specifications only requires that a learner memorize facts. Effectively selecting a mic for a specific instrument, however, requires a more complicated and time-earned combination of knowledge, experience, listening skills, and personal opinion. Through an educational lens, the learning of specs and the task of selection can be differentiated by their cognitive levels.
Cognitive levels, as mapped in Bloom’s Taxonomy, describe the thinking processes through which people acquire and work with knowledge. Being knowledgeable in mic specs requires someone to only remember facts. Choosing a mic, on the other hand, necessitates that a person analyze a situation and apply remembered knowledge in a unique setting. In comparison to simple remembering, analysis and application are higher forms of cognition.
Troubleshooting
In terms of cognitive level, troubleshooting a sound system is one of the most demanding activities required of audio engineers. To effectively troubleshoot, they must first understand the role and signal flow of the various system components, know how to operate the equipment, and understand the pitfalls that can prevent parts of a system from interconnecting effectively.
Once these differing sets of knowledge are acquired, engineers must then apply a troubleshooting strategy that can evaluate the system, analyze its components, and apply a solution to the problem.
Because of its difficulty, over the years I’ve struggled with teaching troubleshooting. Despite my relative lack of success, it remains an essential engineering skill in which study and practice by all audio engineers is necessary. It seems that every day, every system, regardless of size, requires some modicum of troubleshooting. Murphy and his law guarantee this. Audio professionals can’t just know how to operate a console – they also need to know how to fix it.
Essential Knowledge
So, what skills do you need to acquire to be a master of audio system troubleshooting? First and foremost, an understanding overall system signal flow. You don’t necessarily need to know how to operate every piece of gear in a system, but you should be able to recognize an individual device’s role, position in flow, and whether or not the item is passing signal as expected.
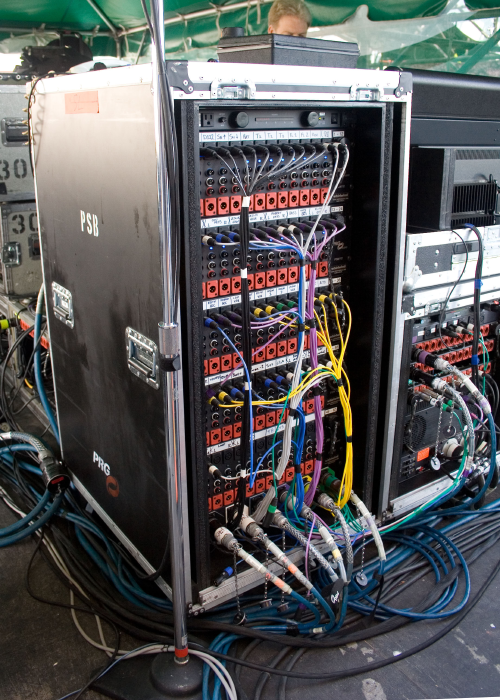
Today’s sound systems differ greatly in design, with digital technologies allowing components that used to be separate to be combined into smaller packages. That said, all sound systems are essentially constructed from five building blocks: Sources, Console, Loudspeaker Processing, Power Amplifiers, and Loudspeakers.
In many systems, some of the above listed building blocks are combined together. Digital mixers are one example of this, as their built-in graphic EQs put console and loudspeaker processing blocks in a single component. Another example is a powered loudspeaker in which separate amplifiers are not required. Regardless of how the building blocks are deployed, audio troubleshooters must understand system signal flow and be able to logically follow each device in order from microphone to loudspeaker.
They must also understand in-console signal flow and be able to perform basic functions on both analog and digital desks. Effective troubleshooters don’t necessarily need to be console experts or amazing mix engineers, but they do need to be able to follow signal flow from preamp to fader to master to output, and know to check phantom, mute switches, bus assignments, and output routing along the way.
Knowledge of computer networking is often essential as well. While smaller systems will probably continue to be analog, Dante, AVB, and other networking protocols have recently become the norm in many systems. The addition of computer networking to the list of required troubleshooting skills is relatively recent, and older engineers, well versed in the ways of analog problem solving, can be challenged by these newer technologies.
Analog and digital interfacing is the last major category of prerequisite troubleshooting knowledge. Many system problems come down to broken or inappropriate cabling and connections, and thus a troubleshooter should be acquainted with phantom power, balanced lines, matched/bridged impedances, reference levels, grounding issues and solutions, and other interfacing technologies.
Admittedly, these interfacing subtopics are relatively advanced, and deep knowledge of them is not necessary to perform most day-to-day audio tasks. That said, in-depth understanding of analog and digital interfacing can greatly assist in the troubleshooting process.
In The Heat Of The Battle
Regardless of your own personal experience and knowledge level, there are a few basic tips that can aid troubleshooting. First, when called upon to fix a broken system, try to keep your stress level under control. Start with a big breath, as freaking out will only make the situation more difficult. Being calm, cool, and collected will help you logically work through the system.
Second, ignore other people’s useless suggestions. It seems there’s always an “expert” around to provide troubleshooting suggestions, but unfortunately, well-intentioned ideas from others usually distract and push the process in a haphazard direction. Be kind but do your best to ignore unknowledgeable “assistants.” As with an orchestra, complex troubleshooting works best with a single conductor in charge.
Third, start the process with a quick look for obvious problems. Often a power cord has been unplugged, a piece of equipment has been turned off, or a computer has crashed. These sorts of issues don’t require a lengthy and organized troubleshooting strategy to fix. A cursory survey of potential trouble spots is worth a couple minutes of investment.
E.D.T.C.
If an easy fix is not found, it’s time to employ an organized, logical, linear, and repeatable troubleshooting strategy. After years of informally teaching troubleshooting, I combined personal experience with the wisdom of others to create the E.D.T.C approach. E.D.T.C. implies a specific order to follow when troubleshooting a complex system:
• Establish stable monitoring
• Divide in the middle
• Troubleshoot in order of signal flow
• Change one thing at a time
Establishing stable monitoring means to first create a way, separate from the system-under-test to reliably hear an audio signal. Grabbing a small powered loudspeaker is an easy approach, though any device in which you can plug into and listen with your own ears will work.
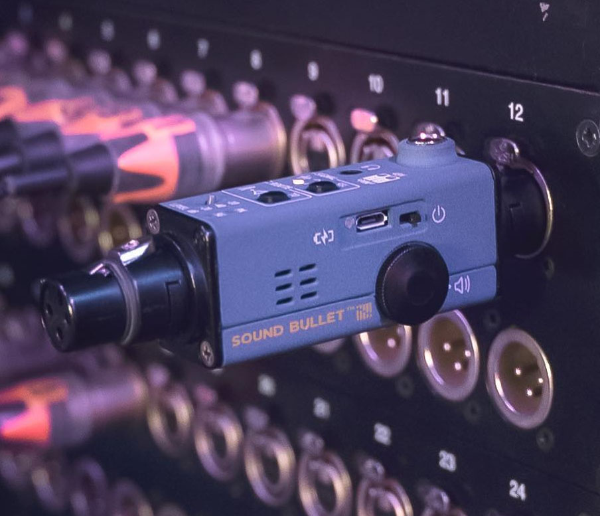
A classic troubleshooting tool is the Whirlwind QBox, which combines a variety of tools, including tone generator and loudspeaker, into one handy battery powered package. My current favorite troubleshooting device is the Sonnect Sound Bullet that combines a variety of testing tools, including a loudspeaker and tone generator, in a tiny package.
To establish stable monitoring, you also need to procure a sound source that will produce a stable signal. Talking into a mic will work to test preamps, but mics can’t be plugged into line inputs. A smart phone with an aux cable with music or a tone generator app playing is an obvious answer, but phones can be unreliable.
Phones sometimes disengage playback when a cable is unplugged, stop playback when a call comes in, or stop playback after a song has ended. This is why I suggest a more purpose-built tone or noise generator, such as an NTI MR-PRO or the aforementioned Sound Bullet or QBox.
The role of meters in establishing stable monitoring should also be addressed. Meters, present on many audio devices, are useful as they inform you of the presence of signal at various steps through a system.
While I encourage meter usage, be cautious and don’t rely solely on them to confirm device operation. Always use your ears via a stable monitor to confirm signal. Meters don’t let you know a signal is buzzing, noisy, or compromised in frequency response. They won’t let you know you’re even confirming the correct signal. I’ve even seen meters move when no signal is present, so again, be sure to always use your ears as well.
The Great Divide
It’s always amazing when a sound system works the first time you power it up. Most of the time, however, something simple is overlooked and troubleshooting is required to get audio to pass from an on-stage mic all the way to the mains.
This brings us to the second step in the E.D.T.C. workflow: divide in the middle. Instead of starting troubleshooting with an on-stage source, first split the system in half and confirm that audio passes from the console to the speakers. This approach vastly reduces the number of steps in the first pass of troubleshooting.
Grab a stable sound source, patch it in locally to the console, and plug the mixer’s output into your stable monitor. Does the desk pass signal? If not, troubleshoot the console. Once the mixer passes audio, patch it into the rest of the downstream system and troubleshoot in order of signal flow, if necessary, until the loudspeakers produce sound.
Dividing in the middle of a system has an added benefit: it establishes stable monitoring for the rest of the troubleshooting process. Once you know the console passes signal to the loudspeakers, you can use the mixer to test a variety of input signals without needing to employ a test loudspeaker. The system now provides stable monitoring.
The Right Flow
With the system divided, you can look for problematic devices or connections before the console. To be efficient, it’s imperative to complete the troubleshooting process in a systematic manner.
Over the years I’ve witnessed many individuals troubleshoot randomly. Often this approach is unsuccessful, as problems are not discovered because of a whirlwind of haphazard and repeated guesses. To avoid this outcome, always troubleshoot in order of signal flow.
Following signal flow gives the effort a structure and direction. More importantly, the process of confirming each successive device as working avoids the possibility of you missing a hidden, non-functioning component or connection.
Here’s the procedure: start at a source and carefully follow the system’s audio path and confirm with your ears that each succeeding cable, connection, and device passes audio to your stable monitor. Once you verify a step in the system is operational, it can be scratched off the list of possible suspects and you can move onward in signal flow to test the next device or connection.
It’s worth noting that some audio specialists suggest an opposite approach to troubleshooting in which you start at the end of a system (loudspeakers) and move backwards toward the start (sources). This technique has validity, as it first establishes stable monitoring for the rest of the process.
E.D.T.C. modifies this approach by suggesting to first create portable and stable monitoring, then divide the system in half to ensure the console-to-loudspeaker path works, and finally troubleshoot in order of signal flow from source to console.
Change Is Inevitable
When a system doesn’t work, the issue is often caused by operator error, such as an incorrectly patched cable or a forgotten mute switch buried in a processor menu. Other times, a piece of equipment is broken and it must be removed from the system and replaced with a working alternative.
Because you don’t know what is wrong at the start of a troubleshooting session, the process begins with an investigation to determine what error has been made,or which piece of gear is “no-worky.” This is the heart of troubleshooting, and it’s completed through two time-honored techniques: scanning for mistakes and swapping out equipment and cables.
When swapping gear, it’s important to follow the final step in the E.D.T.C. workflow and change one thing at a time. I’ve witnessed a fair amount of disorganized troubleshooting over the years, and it’s been my observation that without a strategy, technicians tend to swap out multiple devices simultaneously, such as replacing a mic, its cable, and console input in one go. While this might quickly get things working, the approach does not inform you as to what has actually gone wrong.
Also, because the at-fault device is never accurately determined, this method often leads to a bad cable or funky sounding mic being thrown back into a road case only to cause problems again on the next gig.
To truly isolate a problem, change one thing at a time and then set aside any device that needs repair.
In contrast to E.D.T.C., there are situations in which its best to swap out multiple system components simultaneously. If you’re midshow, for example, and a vocal microphone fails, there’s not time to change out the mic, cable, subsnake, snake and input channel one at a time to find out what’s wrong. When in a time crunch, disregard E.D.T.C. and set up a new mic, cable, snake input, and console input concurrently and as fast as possible. Just be sure to test the funky equipment when the show is over or you might face the problem again at another event.
Example One
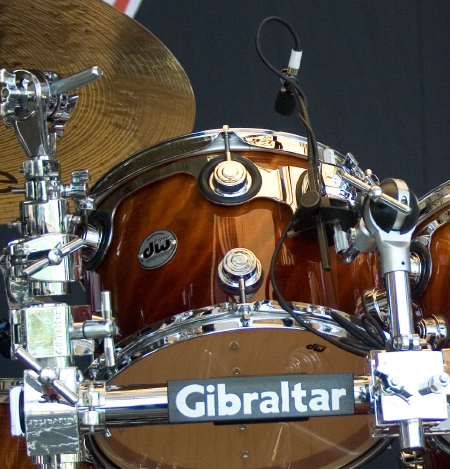
With E.D.T.C. now introduced, I’ll demonstrate the process through examples. For this first scenario, imagine you’re line checking inputs before an event. The left drum kit overhead mic, a condenser, is not passing signal. The first step is to look for easy solutions. First check to see if phantom power is engaged, and second, confirm the mic is plugged into the correct snake input. With these frequent operator errors eliminated, begin the E.D.T.C. procedure.
Since you’ve used the main loudspeakers to check other mics, you have already both established stable monitoring and divided the system in the middle. You know the console and the downstream system work, and therefore the issue is isolated to the overhead mic and its path to the mixer.
You begin to troubleshoot in order of signal flow, with the mantra of swapping one piece of equipment at a time. First, you swap the mic to another condenser of the same make, but the problem persists. Still believing that phantom power is the root of the problem, you swap the condenser for a dynamic mic and voilà, it passes audio!
So, what’s wrong? Most likely a shield is disconnected or broken in a mic cable or snake. Mic cable shields, also known as grounds, connect to XLR pin 1 and provide the return path in a phantom power circuit. Without a shield, phantom doesn’t work, though an audio signal will still pass through the hot and cold lines (XLR pins 2 and 3) from a passive dynamic mic.
Knowing this, you swap the mic cable and return to using the original condenser mic. It works! The mic cable is bad and should be clearly labeled and set aside for repair.
As a side note, there are handy tools that can test the presence of 48-volt phantom. I use a Sound Bullet for this task and it quickly informs me when phantom is present. Employing a tool like this usually eliminates the need to plug in and test with a dynamic mic or other non-phantom powered source.
Example Two
In this scenario, you’ve powered up a system to discover the subwoofers aren’t working. Looking for obvious mistakes, you quickly confirm the subwoofer feed is not muted on the system processor and that all amplifiers are powered up. With no easy-to-fix errors found, it’s time to dive into E.D.T.C..
You establish stable monitoring by confirming that the console’s stereo bus successfully drives the mains. This also divides the system in the middle. Since the console is able to feed the mains, you’re assured that the issue with the subs has nothing to do with devices or cabling that precede the console in signal flow.
Is the issue in the console or after? Swapping outputs can determine this quickly. You unplug the left main console output, which you know successfully feeds the left mains. You then swap the drive line to the subs so it’s fed by the console’s left out. The sub now works, informing you that the subwoofers are probably just fine.
Wanting confirmation, you plug the drive line to the left mains, which is currently unconnected, into the console output driving the subs. You hear what you expect: the left mains don’t work. Swapping outputs has confirmed that the problem is a console issue: the output to the sub is no-worky.
It’s time to troubleshoot the audio path to the subs within the console. Since you’re feeding the subs via an aux, start at the fader and troubleshoot in order of signal flow: Is the channel on and is its fader up? Is the aux post fader, on and up? Is the aux’s master on and up? Does the aux master’s meter show level? Is the aux patched to the correct output, the XLR jack on the rear of the console you currently have patched into the left mains?
You discover that the aux output is not patched correctly, fix it, and the left mains now produce the sub feed. With the console working as desired, you re-patch the drive lines correctly.
Example Three
In this last exemplar, you are setting up front of house and the PA isn’t producing sound. After not finding any obvious mistakes, you begin E.D.T.C., grabbing a QBox, which serves as a portable louspeaker. You patch your phone into the QBox, load a noise generator app, and make sure you hear pink noise exiting the QBox. This establishes stable monitoring.
You then disconnect the phone and plug it into the console, making sure it drives the stereo bus. Dividing the system in the middle, you patch a local (on-console) output of the stereo bus into the QBox and hear pink in the loudspeaker. This confirms the console is working and there’s no need to test the upstream path.
Troubleshooting in order of signal flow, the next thing to check is the on-stage I/O rack. The console connects to the I/O via Dante, and analog outputs from the rack drive the amplifiers. You head to stage, and disconnect the lines feeding the I/O’s outputs to the amps.
You then patch the left main output from the I/O into the QBox. No sound is heard from the QBox. You check the right main, sub, and front fill outputs as well, and they also don’t output noise. The problem has been narrowed down to the stage box, as it’s not passing signal from the console to its outputs.
You need to double check the Dante connections between the mixer and I/O. One method to do this is to open Dante Controller on a laptop, and connect the computer to the Dante network formed between the I/O and console.
Luckily, you placed an Ethernet switch and a few spare EtherCon jacks into the I/O rack when it was assembled. The switch and its ports allow easy connection of new devices to the network.
With the computer connected and Dante Controller open, you check routing and notice the console is not patched to the I/O. This makes sense, as the desk was last used with another I/O. You make the appropriate Dante subscriptions connecting the console and the I/O.
You then recheck the drive lines with the QBox and smile when signal is heard. You return to the console, lower the noise and then patch the outputs of the I/O back into the lines feeding the amplifiers. Congratulations, everything now works as expected!
Tacos & Coronas
Troubleshooting is one of the more challenging tasks audio engineers face, as it requires significant prerequisite knowledge and a high level of mental cognition. Thankfully, since introducing E.D.T.C. to my students, I’ve seen an improvement in their troubleshooting abilities. The strategy organizes their efforts and provides a map to fall back on when they’re frustrated and/or stressed out.
To help them learn the method, I offer to them a couple humorous E.D.T.C. acronyms: Eric Demands Technical Competency and Eric Desires Tacos y Coronas. Humor aside, it’s important that all engineers develop a tactic to tackle complex troubleshooting, and I suspect many readers of this publication have already honed their unique approaches to systematic problem solving.
If you feel I’ve missed an important step in E.D.T.C., send me an email, as I’d love to improve the process further. Happy troubleshooting!


