Let’s step through a common method of “ringing out” these choir mics. First, turn off your choir microphone channels in your front of console and flatten the EQ section of each.
Go ahead and turn on whatever hi-pass filter is available on these channels. If it is just a switch, engage it. If it has a variable frequency control, set it to some reasonable starting place, such as 100 Hz.
Now, with the fader down, turn on ONE choir mic. Carefully and slowly raise the fader (your EQ is flattened now, feedback may come earlier than expected) until just the first ring occurs at a modest level. Hold onto the fader and pull back before the ring “takes off.” It sounds like a pure tone.
Determine by listening whether it is a low, mid, or high-frequency ring (an RTA or FFT analyzer can be a wonderful visual aid by helping “see” exactly what frequency is ringing). Let’s say it is a high-mid frequency ring. So we turn down the hi-mid EQ control maybe 6 dB or more to stop the ringing.
Then we push the fader a few dB higher until the next ring occurs. Let’s say this is now a low-mid frequency ring. We turn the low-mid frequency control down several dB to stop the feedback. Now, we push the fader further a third time until it begins to ring once again, and this maybe a midrange ring.
So, you guessed it—we turn down the mid frequency control until the ringing stops. (By the way, continuing to do this “ring, cut, push higher” will eventually find a point where the ringing is no longer a single tone, but several tones together—a chord of sorts).
Awesome, we just increased the GBF on the choir microphone by doing three rounds of ring-and-cut, right? Maybe awesome, maybe not… This method can certainly work and sound good, but only with the right type of EQ filter, applied correctly. Let’s look at why.
The first single ring looked something like this:
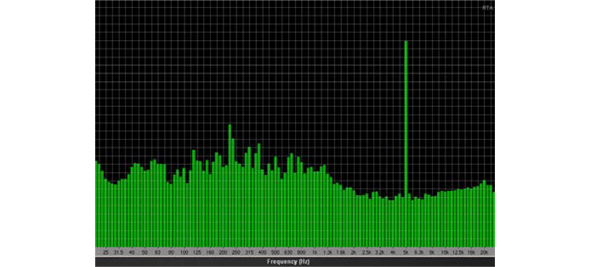
Note the ring is extremely narrow in frequency—centered right at about 5 kHz, in the high-mid frequency range. And when we turned down the high-mid frequency control on the mixer channel, we achieved something like this in the equalizer response:

Hmmm… So we just cut the feedback and stopped it from ringing. Cool, but we also carved out an octave or more of this mic’s high mid range because the filter we cut has a fairly wide “bandwidth” (called Q). But we did meet our goal of stopping the feedback.
The next ring (low-mid frequency) looks like this:
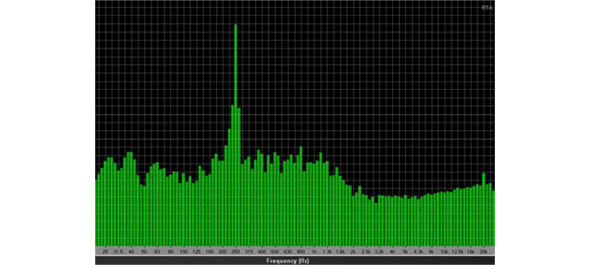
Again, the ring is very narrow, right at 250 Hz. That’s in the low mid frequency range, and we turn down the correct low mid frequency control on the channel EQ.
Here’s what we’ve done to the mic signal at this point:

So, we just reduced that low-mid frequency feedback maybe 7 or 8 dB, and we see the results of our EQ efforts thus far—a significant dip around 5 kHz and another at 250 Hz.
But what else happened, again? We also reduced the gain of a much wider low-mid frequency range than the actual feedback spike at 250 Hz, because the filter we used is wider than the narrow feedback tone.
That third midrange feedback ring was at, say, 1 kHz:
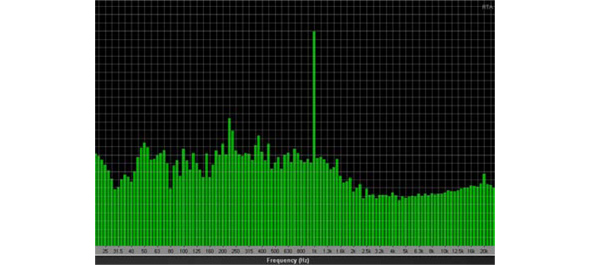
So we turn down the midrange control on our channel EQ. This is the result of what we’ve done with our EQ at this point:

Note the three dips, centered at 250 Hz, 1 kHz and 5 kHz. Our mic can be turned up louder now with no feedback.
Great, but how does it sound? By “carving up” this choir microphone with medium bandwidth EQ filters, we have DRASTICALLY changed to the tonal characteristic of the choir sound in the process of increasing GBF. We’ve taken away big chunks of the sound we would probably like to hear! Yes, it is louder (without feedback), but it may sound really rough.