Reverb Elements
A sophisticated reverb will have many parameters, but few people know how to optimize these parameters for specific recording situations. So, let’s discuss how the various parameters affect your sound.
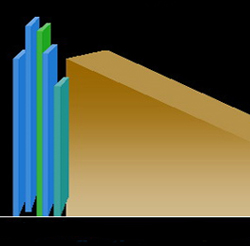
Reverb has two main elements (Fig. 3):
The early reflections (also called initial reflections) consist of the first group of echoes that occur when sound waves hit walls, ceilings, etc. These tend to be more defined and sound more like “echo” than “reverb.”
You can often adjust the level of early reflections. Decay, which is the sound created by these waves as they continue to bounce around a space.
This “wash” of sound is what most people associate with reverb, and is often called the reverb tail.
Another parameter, Pre-Delay, sets the time for the first sounds to travel from the source to the first set of reflections.
The larger the space, the larger the pre-delay because it takes more time for the signal to arrive at a wall or ceiling and start bouncing around.
Advanced Parameters
Following are some of the parameters found in higher-end synthesis-based reverbs; less expensive reverbs will have a subset of these parameters.
Convolution reverbs generally have fewer parameters, but in the past few years, engineers have figured out how to make convolution reverbs more editable.
Algorithm. We’ve already mentioned hall and room algorithms, as well as algorithms that emulate “vintage” synthetic reverbs.
But you may also find algorithms like cathedral, gymnasium, small room, closet – anything is possible!
There are even “reverse” algorithms where the decay builds up from nothing to full volume rather than decay from full volume to nothing, and “gated” algorithms that abruptly cut off the reverb tail below a certain level (this effect was very popular in the 80s, particularly with Phil Collins’ albums).
With convolution reverbs, the equivalent concept is called an impulse. Impulses may capture the sound of specific rooms (like particular concert halls), or even the sound of spaces like guitar cabinets.
It’s even possible to create impulses of older reverbs, so there could be an impulse that sounds like an old Lexicon PCM-70. Here are some examples of different room types.
These examples all use a single percussive hit to excite” the reverb, as this provides an easy way to compare the effects of different reverb types and settings.
Small Room – Plate – Cathedral – Bright Chamber
Room size. This affects whether the paths the waves take while bouncing around in the “virtual room” are long or short. Just like real rooms, artificial rooms can have “standing waves” and resonances.
If the reverb sound has flutter (a periodic warbling effect), vary this parameter in conjunction with decay time (described next) for the smoothest sound.
Decay time. This determines how long it takes for the reflections to run out of energy. Remember that long reverb times may sound impressive on instruments when soloed, but rarely work in an ensemble context (unless the arrangement is very sparse).
The spec for decay time is called RT60, which means the time it takes for a signal to decay to –60dB of its original amplitude. For example, if RT60=1.5, then it takes 1.5 seconds for the signal to decay to –60dB or its original level.
Damping. If sounds bounce around in a hall with hard surfaces, the reverb’s decay tails will be bright and “hard.” With softer surfaces (e.g., wood instead of concrete), the reverb tails will lose high frequencies as they bounce around, producing a warmer sound.
If your reverb can’t create a smooth-sounding high end, introduce some damping to place the focus more on the midrange and lower frequencies. Listen to these two audio examples to hear the difference.
Much Damping (Dull) – No Damping (Bright)
