3: The EQ
Equalization should only happen after we listen to the natural tone of the snare and consider the mic(s) we’re pairing with it.
Here’s an example: take a snare tuned high and pair it with a mic that has a large high-end boost. Want to cut the highs in the mix? It’s not going to be easy as you’re mixing against what is being sent, not mixing with it.
At this point, you can be as simple or as creative as you want. How do you want to mix a dual-miked snare? How do you want the snare to sound for the song?
It’s not a matter of “how do I use the equipment?” but rather a matter of “what would sound right and how do I get there?” By having the right snare and mic combination, you’ve got the hard part out of the way. (I know this isn’t always within your control.)
I like a single-miked snare. That’s not to say I won’t fall in love with a dual mic setup next week. But a single mic setup is a good place to start. By establishing a good single-mic sound, when moving into two mics, you already know how to get a good sound from one. Make sense?
Sum Of The Parts
The ideas that follow are based on my experiences and can serve as a starting point in capturing and mixing a snare. All of the sounds of the drum kit (and the whole band for that matter) have to be considered. The right sound for the snare for a particular song might be really flat on its own.
High-pass filtering. A mic like the SM57 has the low-end rolled off, and I’ll roll off a bit more if I notice a positive impact on the sound. I’m not going to roll off more just to then flatten the snare sound. If you’re running an analog board, hit the HPF switch and listen for a difference.
It’s a good idea to remove low-end frequencies from all mics that aren’t focused on a low-end instrument. For instance, use an HPF on vocal mics. Snare and cymbal mics, which aren’t focused on low-end kit pieces, are another good place for applying an HPF.
Gating. I’ve never been quite happy with the results of gating snares, at least as it applies to general snare sound. I’ve gated the snare for a song to get a specific sound, but for all-around mixing, I tend to skip it. (Your mileage may vary.
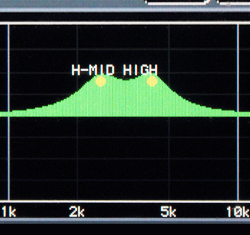
Out with the bad. I sweep the mid-range with a 6 dB cut and find the area of offending frequencies. You know, that area where you make the cut and suddenly think, “now that sounds much better.” In the case of my “frog EQ,” I didn’t find that spot but rather found a huge boost was needed. Some days it’s like that.
Sculpt To Fit
It’s of real benefit to have a sound in your head that you want the snare to match. It’s that internal reference sound. You know what sounds good, now make it a reality. Is there too much snap? Not enough? Perfect the way it is? (This is where that snare/mic pairing pays off.)
There’s no magic formula for exactly what to boost or cut and where to do it. It all depends on the snare and the mic and the drummer and the room and…eh, you get the point. That said, here are a couple of places to start:
—Snap and presence, 3 kHz to 12 kHz. The higher you go, the less presence and more snap.
—Body, sub-500 Hz. If more substance is needed.
The take away is to do the homework: know the tone of the instrument, pair it with the right mic, and then step behind the mixer. A good snare sound is the very likely result.
Chris Huff is a long-time practitioner of church sound and writes at Behind The Mixer (www.behindthemixer.com), covering topics ranging from audio fundamentals to dealing with musicians – and everything in between.