Output Parallel Compression
The previously mentioned technique works pretty well when you only have one or two inputs you want to work with.
However, what if you have a bunch of them, say a drum kit? Doubling all your inputs eats up channels (not to mention comps if you’re in the analog world), and clutters up your surface.
A better option in that case is to use bus compression. In this case, you would assign all your drums to two groups. If your console/mixer doesn’t have groups, you may be able to get it to work using a couple of matrix mixes or auxes, but that can create a challenge getting those back to the left and right mix. But I digress…
The first group gets no processing (unless you want to do a little bit). The second would have a compressor inserted into it with a fair amount of gain reduction. How much you use will again depend on the effect you’re after. If you’re in the analog world, you could save the unprocessed group because latency won’t be much of an issue; at that point, just assign your drums to the L&R mix and your smash or spank group.
If you’re using an (Avid) Venue with delay compensation on, it’s also not required to burn two groups for this technique. On most digital boards, however, you really want to keep the processing path the same to avoid phase issues cause by minor time delays. If you turn up the smash group and your drums suddenly get thin, adjust your bussing to get them lined back up.
In Use
I started by using group-based parallel compression for the most part, and then added the input channel method as well. Here’s how we do it.
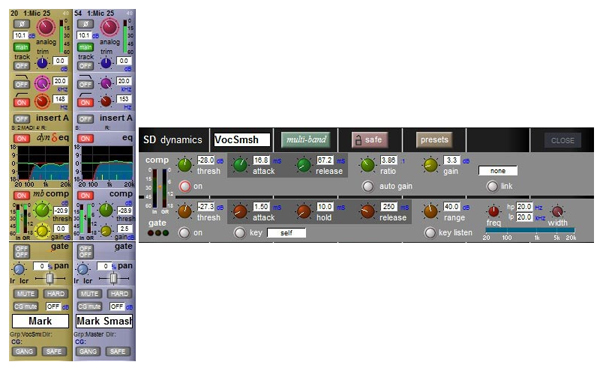
For our worship leader I’ve double patched his input to two channels. You’ll see on his “normal” channel I have some EQ (one band of which is dynamic) and a multi-band comp. I use the multi-band to keep some of the low-mid stuff under control when he gets into his lower range.
On the “smash” channel, I have a single band comp set to be pretty aggressive with gain reduction. I’ll typically have that set for 6-9 dB of reduction (I’m only hitting the “normal” multi-band with 2-4 dB of reduction). Depending on the song, I’ll bring up his smash channel to bring his vocal forward or down to set it back in the mix. It’s almost like having a Z-Axis control (if you’re familiar with 3-D rendering); he doesn’t so much get louder as more present.
If you look closely, you’ll see a slight bump in the EQ of the smash track to put back some of the clarity lost in the comp process. I’ve also set my processing chain up so that EQ comes after the dynamics (because I can). If my EQ had to stay ahead of the dynamics, I would probably add more HF boost.
I also use group-based compression on my drum kit. Some of our drummers are pretty loud so I don’t use this every week, but we have a few who are pretty sensitive and benefit from the extra boost of parallel compression.
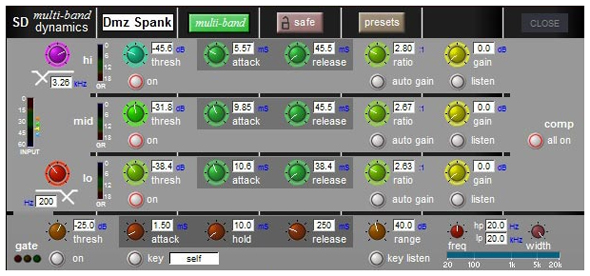
In this case, I simply route all my drum mics to two groups; Drums and Dmz Spank. Both of those groups then route to the main L&R group. Drums gets no processing at all, it’s there just to keep everything in time. Dmz Spank gets a multi-band comp applied to it. Multi-band comps divide the signal up into multiple bands (hence the name) based on frequency.
Once you have these bands (typically 3-4 of them), you can apply different compression settings to each band. This works great on drums because you have multiple bands of frequencies represented. I have my comp set up to split into basically kick & floor tom, snare and rack toms and cymbals bands. I’m then free to tweak my settings for each group of drums. This way I can dial in just the effect I want.
Again, when using this group, it brings presence to the mix without getting a lot louder. Sometimes a song will break down into guitars and kick and it’s nice to really push the kick out there; slide up the Dmz Smash. Other times, the cymbals need some help; slide up Dmz Smash.
Getting this set up can take a fair amount of time and experimentation, something that virtual soundcheck comes in really handy for. I’ve been known to grab a section of a song and set the DAW to loop through a drum fill while I tweak on the settings. You can surely do it live, though it will likely take a few weekends worth of playing with it to get it sounding right. Be patient with yourself and make small adjustments to get it dialed in.


