Make-Up Gain/Volume/Output Volume: This carries various labels on different compressors, but they all mean the same thing. Let’s use the example of the kick drum again. Make-up gain will bring up lower sounds and make them more audible, while the threshold will keep the louder sounds compressed. This in turn levels out the signal and makes it more consistent and even.
It’s very common to turn up the make-up gain to the same amount of decibels that the compressor is compressing. So if the compressor’s gain reduction meter shows -3 dB, you can adjust the make-up gain to boost 3 dB on the output.
Knee: Only some compressors offer this function. The knee tells the compressor how soft or hard to compress the signal once it compresses. It’s called a “knee” because of the slope the signal will take towards compression looks kind of like the bend of a knee.
Just know that a hard knee is typically better for a bass instrument like a kick or bass guitar, whereas a softer knee would be great for vocals, strings, or cymbals. The lower the register an instrument produces in the frequency spectrum, the harder the knee can be set. (There are some cases where this is not necessarily true, such as a hard compressed “spitty” vocal or a trashy sounding drum overheads track.)
The softer the knee, the more gradual the instrument will compress when it reaches the threshold, whereas with a hard knee, the signal doesn’t gradually compress but rather goes straight into compression.

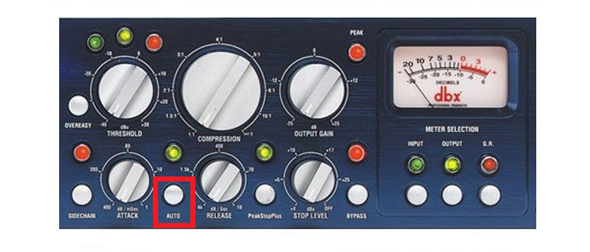
Auto: Many (but not all) compressors offer this function. It adjusts the attack and release times according to the source material it “sees.” This is pretty handy if you’re a beginner and are unsure about attack and release times, but note that it can yield less than stellar results on some material. Some compressors have an auto button for the release time only. The dbx 160sl is a compressor with an Auto button:
Practical tips for beginners:
• The “magic” attack time is 12 ms. This works for a variety of instruments in the mid and treble range.
• When just starting out in learning how to use a compressor, adjust the threshold where you’re only compressing 3-4 dB on the gain reduction (GR) meter.
• For bass type instruments, like electric bass guitar and kick drum , use higher ratios, i.e., 6:1 or even 20:1/Infinity depending on the player and what you’re going for.
• Lower ratios for mid-range and treble instruments, i.e., 2:1 to 4:1
• Any time when compressing strings (like violin, viola, cello, etc), use lower ratios for a more “transparent” response.
• The faster the release time, the less audible compressor artifacts are—meaning the “squishy” sound of a compressor.
• Limiters are great for bass instruments and sub-groups.
• When turning a ratio to its maximum setting, i.e., 20:1, you essentially create a limiter.
• Turn up the make-up gain (output) the same amount of dB the compressor is compressing. For example, if you’re compressing to -4 dB, turn up the make-up gain the same amount.
• The slower the attack time, the more initial “hit” or “pluck” you will get from the instrument.
• For more punch on a kick drum, set the attack to around 15 ms to 20 ms. This will let the initial transient through.
Ratio times (very general guidelines):
1. Kick—6:1 for rock, 3:1 to 4:1 for jazz or country.
2. Snare—2.5:1 to 4:1 for rock, 2:1 to 3:1 for softer music.
3. Toms—3:1 to 4:1
4. Overheads—2:1 to 3:1 Typically it’s best to go light on compression of overheads.
5. Percussion—2.5:1 to 4:1
6. Bass Guitar—4:1 to 20:1 (Infinity) depending on what you’re going for and how consistent the bass player is playing.
7. Keys—2:1 to 4:1
8. Acoustic Piano—Same as keys. And be careful.
9. Rhodes—2.5:1 to 4:1
10. Organ—3:1 to 6:1, depending on the type of organ and how aggressively it’s being played.
11. Electric Guitar—2:1 to 4:1
12. Acoustic Guitar—2:1 to 4:1
13. Contemporary Vocals—2:1 to 3:1
14. Rock Vocals—2.5:1 to 6:1
15. Strings (Violin, viola, cello, etc)—2:1 to 4:1
16. Harmonica—2:1 to 4:1
Final notes: When first starting out, it’s better to gravitate toward lower ratio settings, only compressing 3 to 4 dB. If your compressor has an “Auto” button, there’s nothing wrong with using it until you understand how to set attack and release times. If you have a dbx compressor, feel free to use it’s “Overeasy” function for “softer” compression, unless it’s being used with a bass instrument of some sort.
Casey Campbell is an audio educator who heads up Sound Instruction (www.soundinstruction.net), a website dedicated to live sound training.