If an air compressor isn’t available, cans of aero-duster will work, but they don’t last long.
If the plan is to clean a couple/few consoles, an air compressor is a worthwhile investment, and it helps do the job right because you don’t need to be worried about running out of air.
In addition, the compressor will offer higher pressure.
Most canned air provides about 60 psi, with this dropping as the can is used.
With the compressor, I’m able to set pressure at a consistent 80 psi, which works very well. (And I found out the hard way that 100 psi will blow some faders and switches apart!)
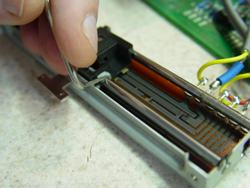
Level 2
If the initial “blowing out” process didn’t offer the desired results, it’s time to move on to use of chemical contact cleaner.

Some faders have lubricating grease applied by the manufacturer, while others employ a self-lubricating Teflon-type of plastic.
If used sparingly, chemical contact cleaner shouldn’t impact the self-lubricating type, but it will invariably wash away lubricating grease.
The goal is to avoid adding any more lubrication than is absolutely necessary – dust tends to fall away from dry surfaces, but it sticks to oily surfaces.

After spraying contact cleaner, exercise the fader and then quickly blow out the excess cleaner.
This helps to spread the cleaner over the entire fader surface, while the excess cleaner carries away additional loosened dirt.
I’ve tried several types of contact cleaner since canned Freon was banned from the market.
There are a lot of good choices – my preference is Contact Cleaner II made by Techspray. It’s about $30 per can and worth the price. Note that I also invested another $30 for a screw-on trigger nozzle so that I can be precise and cut waste.