Equalizing On A Console
It’s the EQ section of a console that will allow us to tweak or correct timbre. Depending on the model, the EQ section is more or less sophisticated and offers different possibilities of adjustment.
We won’t be dealing with simple high/low EQ knobs or switches that you can find on hi-fi amplifiers or entry level mixers which are only meant to adapt a sound to a specific listening area.
We’re more concerned with the EQ controls that are found on small modern digital models or part of most major recording software. Keep in mind that EQ is mainly used for one reason to correct, and not in the hope of improving the recorded signal: you can never turn a mediocre recorded sound (due to bad placement of the mic or even the quality of the mic itself) into a great sound by just using EQ.
Equalizers split the audible frequency range (20 Hz to 20 kHz) into many sub-ranges. Thus one generally talks about highs, medium highs, low mids, and lows.
The first thing to do, then, before tweaking any knobs, is to determine in which frequency range the problem lies, then after that, the nature of the problem. Is it due to too much coloring that wasn’t detected during the recording process, a parasite due to the environment, or a masked effect due to the presence of other instruments?
What Does It Look Like?
Equalizers are harmonic and partial filters. Their specificity lies in the fact that they not only can get rid of component frequencies, but that they can also amplify chosen frequency zones. Of course, if there isn’t anything in the signal in that range, only hiss will be added!
Good EQ sections generally have 4 bands, and each offers at least 2 controls: frequency adjustment and gain. These are called semi-parametric. There’s often a third setting called the bandwidth or “Q” which has the purpose of enlarging or tightening the frequency range (bandwidth) of the filter.
When this third control is present, the EQ is then called a parametric equalizer. Frequency adjustment will be tweakable between the upper and lower limits of the sub-range of the filter (with software these limits no longer exist!)
The gain knob defines, in dB, how much the filter will effect the chosen frequency. As we can see here in Figure 8, borrowed from Cubase, this gain can be positive or negative. We can also see that the curve of the bandwidth can be wider (hump shape) or narrower (peak shape). This shape corresponds to the bandwidth which is adjusted by the Q setting.

How To Modify Timbre
Keep in mind that all EQing on an instrument will be destructive with respect to the recorded sound, just as the latter is also, in many cases, an imperfect copy, of the original. So one must be careful!
Before touching anything, think about what you want to accomplish with EQing, i.e., “I want a warmer’ sound, I want to cut the bass, I want my instrument to stand out in the mix, I want to get rid of that annoying resonance that came from the studio”
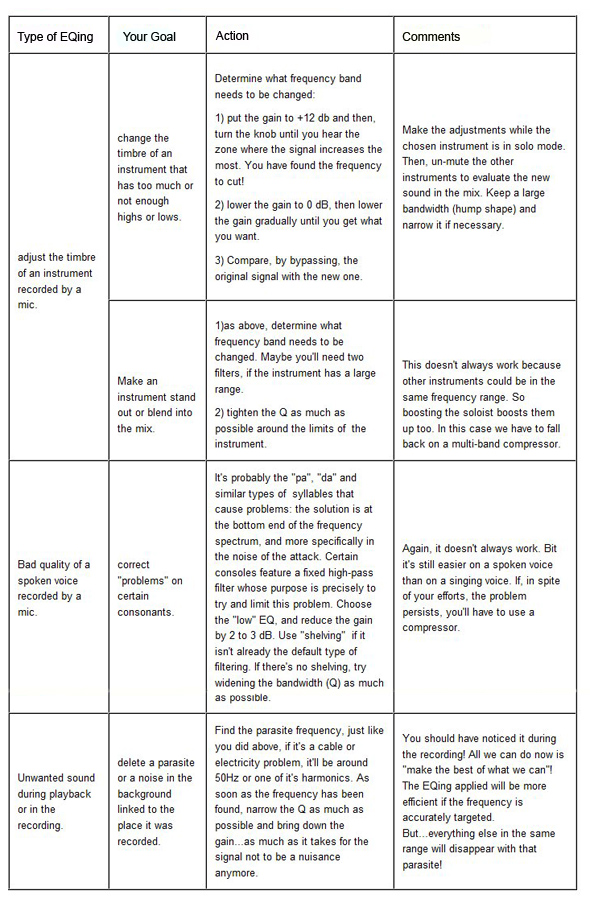
The spreadsheet below is offered as a sort of “quick guide” chart. Don’t forget, however, to listen: your ears are the ultimate judge.
Los Teignos is a “rveur; temps partiel” and contributor to Audiofanzine.
For more audio/sound related content and resources, go to Audiofanzine.