Hi-Hat
While obviously a cymbal, the hi-hat is often used more as a rhythmic element than a tone color like some of the other cymbals in a drum kit.
Making sure it has its own sonic space and speaks clearly without being too loud and distracting is what EQ and compression are about in this instance.
For EQ, I’ll again use a shelving approach at around 200hz that will effectively clear out low-end information that is non-essential to the hi-hat sound.
If I’m interested in bringing in a bit more high-end shimmer and sizzle, I’ll boost between 1-3dB between 6k and 8k again using my ears to tell me what’s working.
In general, I tend to stay away from compression on the hi-hat as it tends to find is own dynamic range without too much additional help.
Low (Floor) Tom
A well-mixed set of toms can make all the difference between drum fills that are exciting and those that go by without catching the listener’s ear.
Starting with the low tom, I tend to look for the places in the frequency range that bring out both the boom and the snap (similar to the way I approach the kick).
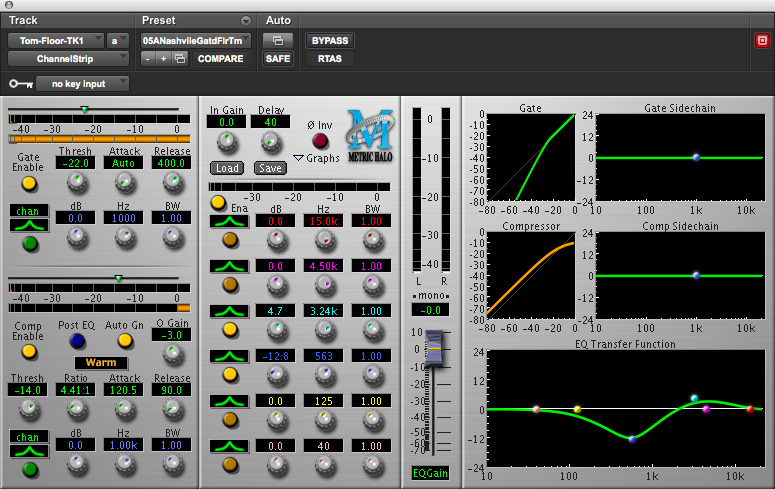
In order to accentuate the low quality of this drum, I’ve found that a dramatic cut (12dB) at around 500hz allows the drum to speak clearly. Also, to add the high-end snap, a semi-aggressive boost of between 4-6dB at around 3k will do the trick. Compression also adds a lot to this equation.
A ratio of around 4.5:1, a slower attack of 120ms and medium slow release of around 90ms will help the sound remain full and resonant. For the threshold, I simply adjust until the tom rings properly.
Gating is another major factor for toms as the large diaphragm mics placed on these drums tend to pick up a lot of the extraneous sounds from the rest of the kit. I set the gate with the quickest “auto” attack and a slow 400ms release and then adjust the threshold until I’m hearing only the low tom come through when it’s hit. For the “tweak heads” among us there’s a slightly more accurate and labor-intensive way to do this.
By going into the actual sound files in your DAW and deleting all but the tom hits themselves, you can create a perfectly gated tom track.


