The IEM Rack
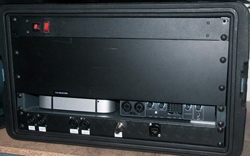
On the other side of the stage, we use the vertical rack on wheels pictured below for our IEMs.
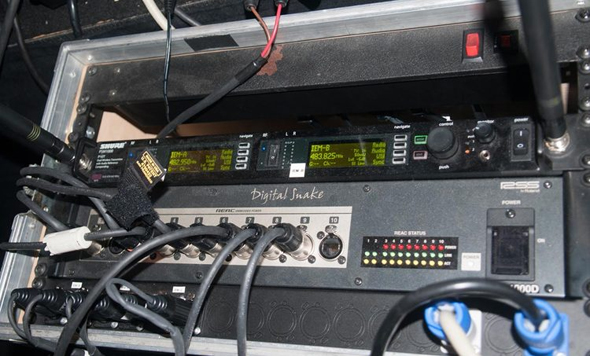
A (Shure) PSM1000 and PSM900 are mounted herein (well, the 900 is out right now, sorting out an antenna issue), along with the S-4000D M-48 distro, and our input panel.
If you remember our M-48 snakes I talked about last time, this is where they end up. The Ethercon plugs into the S-4000D, while the XLRs plug into the appropriate jacks on the input panel. The input panel simply routes down to the inputs of the PSMs.
We also have a PowerCon In connector on the rack to make it easy to plug and unplug the whole system. We used to roll it on and off every week, but decided to leave it out. The PowerCon Out powers our drum box (see below).
There’s nothing fancy here; it’s pretty utilitarian. At some point, we’re going to need to expand this as we will be adding more PSMs. When we do, I’ll probably just build a new one.
I like the vertical orientation, as it is very easy to see everything when standing. However, it’s a bit of a mess, cabling-wise, so the new version will likely be horizontal with better cable management.
And that’s what’s fun about custom rigs like this; I put this together out of found parts to fill a need.
After we’ve used it for a while, the need becomes clearer and we’ll build v.2 to be even more of what we like.
The Drum Box
Someday we’ll come up with a better name for this, but for now, it’s The Drum Box. The box is simply that; a box. We used to have this weird, ugly step-turned-sideways thing that supported the (Roland) M-48, with a short stool next to it for the MacBook Pro we use for tracks and the click. I hated it, and decided to fix it.
This is a v.2 product, so it’s designed to do exactly what we needed of it. The M-48 is mounted on a slide-out shelf for two reasons. First, it slides out for easy access by the musician; second, it slides in so we can lock it up.
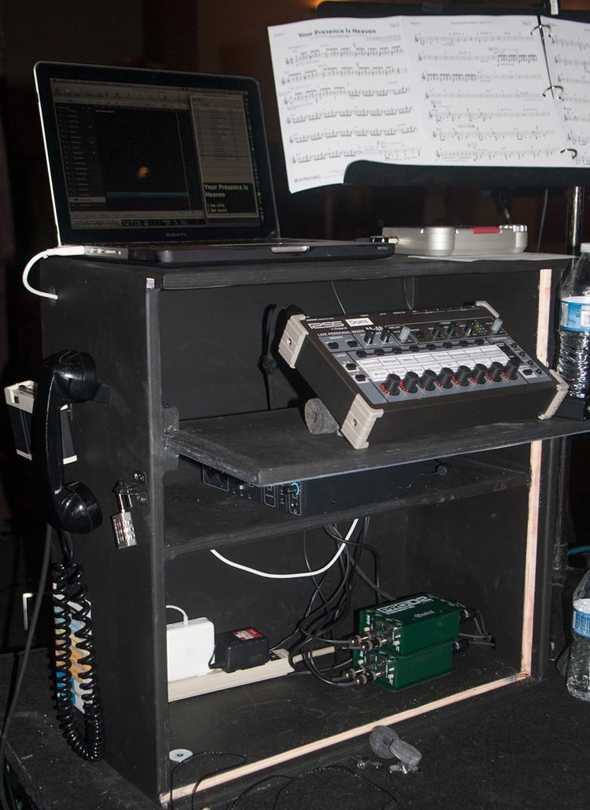
The top is sized to accommodate a 13- to 17-inch MacBook Pro, plus our Yamaha metronome. We drilled holes for MagSafe power and FireWire on the side, plus a right angle 1/4” and power on the top for the click.
Below the M-48 is another Focusrite Saffire interface, and below that are two more Radial ProD2s. One D2 is for L&R tracks, the other is used for the clicks (track and metronome). We have both 4-channel and 6-channel Saffire’s available, so if we ever want to do more than a stereo click, we have room to add DIs.
It’s all pre-wired and power comes from the IEM rack. The light-colored groove you see around the front accepts a slide-in cover, that locks in place for security.
The box also makes a nice place to hold spare felts and other drum hardware, a drum key and the occasional iPhone. We will probably add a cup-holder to the other side at some point. And, as you can see, we also have a com unit there for communication with front of house.
None of these units are particularly fancy, but each one saves us a lot of time each week. We used to spend several minutes dragging out DIs, interfaces and the M-48 for the drum riser. Now, we open the box, set the laptop on top, bring out the click and we’re done. The Ivory rig takes 30 seconds to cable and power up, and the IEM rack just is.
Individually, these aren’t deal-makers; but combined with the other steps in our process, they help make an efficient set up go even quicker.
Next time, we’ll cover the final installment, baseline show files.
Mike Sessler is the Technical Director at Coast Hills Community Church in Aliso Viejo, CA. He has been involved in live production for over 20 years and is the author of the blog Church Tech Arts. He also hosts a weekly podcast called Church Tech Weekly on the TechArtsNetwork.