EQ’ing for tone
As we said earlier, each mic boosted the bass due to proximity effect.
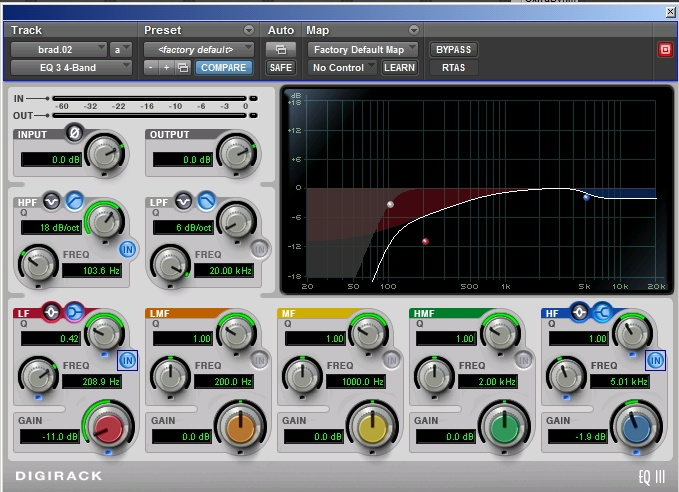
So we inserted an equalizer in each mic channel, set to -12 dB at 100 Hz, Q = 0.44.
That compensated for the proximity effect and resulted in a natural tonal balance.
It also reduced leakage by the amount of the rolloff.
Adding reverb for ambience
We wanted the singers to sound like they were performing in a church, so we added some digital reverberation.
A reverb time of 2 to 3 seconds worked well for slow pieces, while a 1-second reverb time was better for uptempo songs.
Play the audio sample below to hear the finished mix with Perfect Space convolution reverb, using a “Chapel” impulse wave file.
Play the audio sample below to hear the finished mix with Lexicon Pantheon reverb (1.9 sec RT60).
Editing to improve the performance
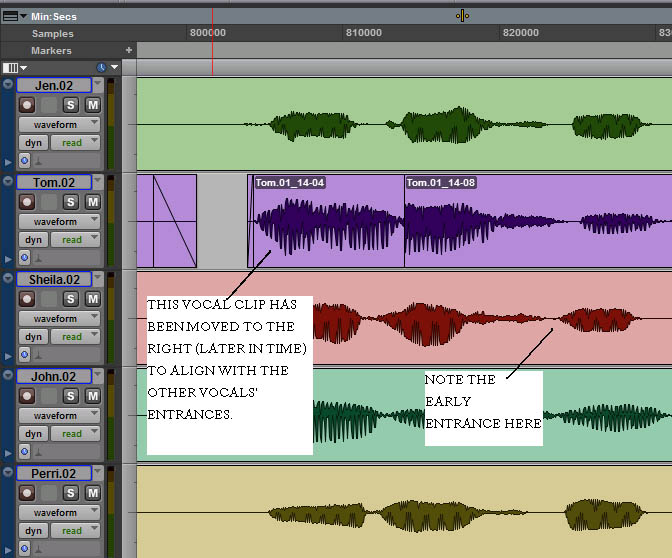
Because the singers had no timing reference except each others’ mouths, timing errors were common.
We needed to tighten up entrances and sibilants at the end of some musical phrases.
To do that, we highlighted certain phrases in each track and slid them left-or-right in time to align them with the phrases in other tracks.
Sometimes the singers voiced “s” sounds at different times, resulting in a flutter of sibilants.
So we deleted the “s” sounds from some of the tracks until the problem disappeared. Some choir directors employ this technique during live performances.
We corrected some musical phrases by punching in, others by pitch shifting. Thanks to the good isolation between tracks, these fixes created no artifacts.
The musicians loved this all-in-one-room technique because it felt natural.
They could focus on musical challenges rather than technical ones. They could see each other for cues, and could hear each other well without having to wear headphones and to set up a cue mix.
Choosing the best clock
An unrelated problem was digital pops and clicks. We were recording with Pro Tools LE.
The mics were plugged to a PreSonus Digimax audio interface, and a Digidesign Digi Rack provided the master clock which the PreSonus followed. Occasional clicks and pops showed up in the recording.
I suggested that we use the PreSonus clock as the master instead.
The effect was not subtle! The sound became much smoother, less edgy and “digital”, and the glitches stopped. This improvement affected the mix as well as the recording.
Generally it’s good practice to use the clock in the interface that amplifies the mic signals. There’s less jitter and fewer clock errors, resulting in audibly less distortion and no digital clicks.
To sum up…
To achieve excellent isolation between mics in the same room without using baffles or isolation booths,
• Mic very close with directional mics angled apart to reduce leakage and phase interference.
• Sing with lips touching a foam pop filter to reduce breath pops.
• Use a highpass filter to reduce breath pops.
• Roll off low frequencies to compensate for each microphone’s proximity effect.
Then add reverb to restore some ambience, and use the clock in the mic’s audio interface to keep the sound smooth and glitch-free.
Thanks to Jack Gregory for the session photos, screen captures and audio samples.
A member of AES and SynAudCon, Bruce Bartlett is a live sound and recording engineer, microphone designer (www.bartlettmics.com), and audio journalist. His latest book is Practical Recording Techniques, 6th Edition.


