It’s actually pretty simple, especially with just a bit of practice.
Essentially, as the cable is being picked up with one hand, it should be gently coiled into like-size loops that are collected in the other hand, which is positioned up/out.
This motion is gentle, and intuitively will follow the way that the cable “wants” to be wrapped. It becomes a natural feel, the hands work to guide the cable where it wants to go, but in an organized fashion.
What’s actually happening is that picking up the cable always introduces a certain amount of twist, and this is countered by (again, gently) a twist in the opposite direction.
Now, let’s be more specific. If right-handed, start with one end of the cable in the left hand, then grab the cable about 18 inches down and pull it straight, holding this section horizontal to the floor. Make a clockwise loop with the right hand, gently twisting the cable between your thumb and fingers also in a clockwise direction. Right and left hands should meet at the top of the loop facing each other in a mirror image.
Most microphone and smaller loudspeaker cables should be looped roughly 12 inches in diameter, depending on the length, material and thickness of the cable. If it feels like the loop should be bigger, then it probably should.
The next step is to create a loop that twists in the opposite direction to counter the twist of the first loop. Again, use the right hand to grab about 18 inches of length, away from the loop, and twist this length counter-clockwise, bringing the right hand in to meet the left.
This causes the cable to create a loop that falls on the back of the hand – the “under” portion of the wrap. The first and second loops cancel each other’s twist.
Continue wrapping the rest of the cable this way, but keep in mind that it doesn’t have to be exact. Sometimes the cable will want to go in one direction a couple of loops before taking an opposite twist. If a cable has been abused in the past, it may take a while for it to develop a new “memory.” It also helps to run the entire cable out straight and then remove any twists.
(Go here for more information on this technique.)
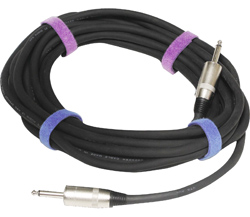
Once the wrap is complete, the loop can be secured with a Velcro fastener. These are available in a variety of sizes and colors from numerous vendors, and they can even be silk-screened with your company logo.
Note: when a cable is wrapped this way, first, always say “abracadabra!” Seriously, it’s important to always unwrap the cable end from the side of the loop that it ended on. Pulling the end through the loop to the other side can create a series of half-hitch “pretzels” down the entire run.
If this starts happening, stop immediately and get the loop back together, then try again. Hey, it beats dumping the whole thing on the floor, thinking a snake-pit mess will be easy to untangle, because this is even more time consuming. Not to mention the damage the cable could incur from undue strain.
And now, for my next trick…
Paul LaPlaca has been working with sound for more than 20 years and heads up Stentor Productions in New York, specializing in the corporate audio market.