In my previous article (here), I covered some of the foundations of how Wi-Fi works, including some of the equipment involved, the differences between the 2.4 and 5 Ghz spectrums, and some of the basics of the various channel options to avoid overlap and interference. This time let’s dive more into the deeper points of different channel widths, best practice for signal levels, and some other configuration details that will help optimize Wi-Fi systems for the best experience.
Channel Width
In part 1, we discussed how there are three non-overlapping 20 MHz channels in the 2.4 GHz spectrum and nine non-overlapping (Non-DFS, but that’s another article) 20 MHz channels in the 5 GHz band. Channel width is simply how wide of a segment of the RF spectrum is used by the channel.
While wider channels allow higher data rates, each time you double the channel width you essentially double the noise to the signal giving you a lower signal-to-noise ratio (SNR). This can cause client devices to take longer to transmit, which can affect Wi-Fi performance, which is really what we care most about. Typically, the data rate requirements for Wi-Fi are low enough that the benefit of more available channels and higher SNR is a worthwhile tradeoff.
In 2.4 GHz, there’s almost never a reason to use anything other than 20 MHz wide channels, and with 5 GHz, it’s generally best to stick with 20 MHz wide channels. With 5 GHz, this provides nine non-overlapping, non-DFS channels. In smaller installations with less access points, you might consider using 40 MHz channels (twice the width,) but you’ll be limited to four unique channels. So, best practice is almost always to stick to a channel width of 20 MHz unless there’s a low number of access points in a small area and can get away with fewer channel options.
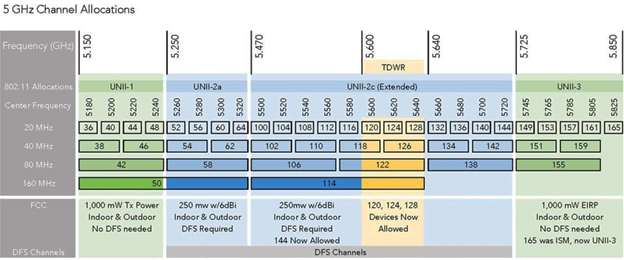
To illustrate this concept, Figure 1 is an illustration of the 5 GHz spectrum with the channel options. The blue area is the DFS range which has some unique considerations such as device compatibility and local things like weather radar or other systems that use that spectrum. The green sections are fully available to us. As you can see, there are nine 20 MHz channels, four 40 MHz channels, or two 80 MHz channels.
Application
So now that we’ve covered some of the basic differences and principles of 2.4 GHz and 5 GHz Wi-Fi, let’s look at how to practically apply them in audio/video/lighting (AVL) systems. In these systems, Wi-Fi is mostly used for controlling equipment, not for actually transmitting audio and video data.
For example, you can use Wi-Fi to connect to a Dante network to configure Audinate’s Dante Controller, but it will not allow audio transmission over Wi-Fi. Most of this control data is pretty low bandwidth, so our main concern is a solid signal level and reliable data transmission.
Another use case might be iPad control of an audio console. Again, no actual audio is traversing the Wi-Fi, just some really lightweight control data. Even though most of this is lightweight traffic, it’s important to have Wi-Fi systems optimized so this critical data can arrive quickly, reliably, and efficiently.
If your church already has a campus-wide network with Wi-Fi, you’ll likely be able to create a new virtual local area network (VLAN) for the AVL systems and create an additional wireless network on the existing access points that connects to that VLAN. Doing this would make the Wi-Fi channel planning simple, as it doesn’t add any new frequencies to the RF environment, it just rides on the existing system.
Most non-consumer grade Wi-Fi gear can support multiple wireless networks connecting to multiple VLANs. Since they’re all on the same radio, there are no added radios causing interference.
If you’re in a position where your church’s Wi-Fi network isn’t quite up to snuff to be reliable or is using home or small office-grade equipment, do your best to configure things to cause the least amount of interference as possible. This may mean your own Wi-Fi router/access points for the AVL systems.
Let’s say a church Wi-Fi is being served off of a consumer-grade Wi-Fi router on channel 6 in 2.4 GHz and channel 159 on a 20 MHz channel in 5 GHz. Referencing the illustration above to see the channel options, we can go ahead and configure the AVL Wi-Fi for channel 1 or 11 in 2.4 GHz, and channel 38, 46, or 151 in 5 GHz. All the Wi-Fi will be free and clear of each other for strong, reliable, and fast connections.
Scanning A Wi-Fi Environment
In the world of wireless microphones, there’s often outside interference. Microphones (transmitters) can be set on separate frequencies some of them may still drop out or experience other problems. For example, you might look up a list of local TV station frequencies or use some sort of scanner to find open frequencies to use instead.
Wi-Fi can experience similar problems.
For example, you might have the Wi-Fi channels all planned out to not interfere with each other but then experience problems due to Wi-Fi from nearby businesses. The church I work at has a location in downtown Kansas City, and the Wi-Fi environment is always changing due to coffee shops, businesses, and outdoor city-wide Wi-Fi. That place is a challenge to manage…
So what can we do about it? My approach is to use a program called WiFi Explorer on my Mac. It shows the details of the existing Wi-Fi environment and helps me make good decisions on our configuration.
Figure 2 provides an example of a WiFi Explorer scan from the coffee shop I’m writing in right now. We can see the channel usage of both 2.4 GHz and 5 GHz. In the 2.4 GHz range, channels 1 and 6 are already pretty busy, so any new equipment should go on channel 11. If there’s already stuff on all three channels, simply use the one that has the lowest signal levels on it.
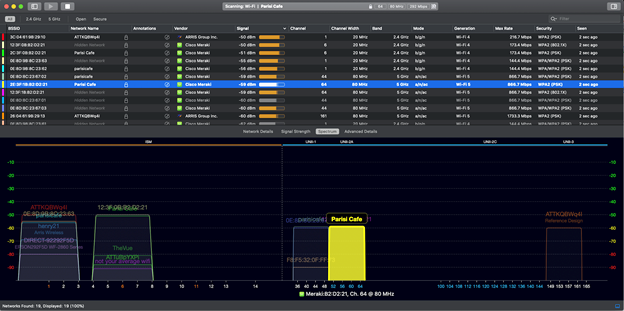
In 5 GHz, it looks like all of our non-DFS channels are used by 80 MHz wide channels. This isn’t ideal, but we can stick a 20 MHz wide channel on 165 since that’s available. Again, if there’s nothing open, just use the channel that has the lowest level of interference.
Signal Levels
To put it simply, the louder the signal you’re connected to, the better the connection will be. The lower the signal, the more time a device needs to transmit its data, and eventually, you may start experiencing dropouts. My general rule of thumb is to set my signal at -65 dBm at the lowest. In the WiFi Explorer scan in Figure 2, I can see that I’m connected at -59 dBm, which is right in the acceptable range.
Adding Access Points
Let’s say you’ve set up a Wi-Fi router at the tech booth, you’ve connected the audio console, you’ve set the Wi-Fi channels and channel widths, and everything’s working great for controlling the console with a tablet. Then you walk up on stage to help the musicians with their monitors and the tablet starts dropping its connection.
It might be necessary to add another Wi-Fi access point. You can use an actual “Wi-Fi access point” or simply buy another router (making sure to turn off DHCP and any other unnecessary settings) and configure the Wi-Fi portion to use the same SSID name (Wi-Fi name) and password settings. If both of these are wired to the same network, the tablet or other device will hop between them.
As a result, one can be placed in the tech booth and the other on stage. You can verify the signal levels with something like WiFi Explorer, or if you’re on a Mac, you can hold the option button and click the Wi-Fi icon and find the level you’re connected at under “RSSI.”
There are a few other tools out there that can help as well. As long as the overlap point is at a decent signal level, you should have no trouble. Just be sure to use separate channels in order to avoid interference.
In areas with congested 2.4 GHz, I almost always recommend disabling that band all together for AVL networks. Especially if you’re only connecting things like iPads and other 5 GHz capable devices, there’s no sense in using the muddy wasteland of 2.4 GHz when the cleaner 5 GHz spectrum is an option. This comes in handy when there are consumer devices in the same area such as TVs, hotspots, and even some wireless microphones that use 2.4 GHz and cause interference.
Speaking of 2.4 GHz wireless microphone transmitters, it’s important to remember that interference happens both directions – transmitters can potentially cause performance issues with Wi-Fi, and Wi-Fi can potentially cause performance issues with transmitters. This is why generally recommend not using 2.4 GHz for wireless microphones, communication systems and other non-Wi-Fi technology.
As I mentioned in part 1, Wi-Fi can be infinitely complicated and there can be a lot of considerations outside of the “rules of thumb” that I’ve mentioned, or even outside of best practices. But hopefully this gives you more firm grasp on the foundations that can help with troubleshooting and making better design decisions in working with your AVL systems and/or collaborating with IT folks.