On The Strips
Here I’ll describe the cleaning of one strip. Starting at one end of the console, simply do the same thing over and over until reaching the other end.
Invariably there comes a point where you find you’re cutting corners and doing a less than thorough job. Stop immediately, take a break. Walk away and do something else for a while. Each strip is equally important and a halfway job on any of them won’t do.
I prefer to clean the faders before taking the strips out of the console, because they’re easier to handle in the frame. First, blow them out with compressed air. If still sticky, apply just a touch (small amount) of CaiLube lubricant.
Some faders can easily be taken apart for further cleaning and lubrication, while others cannot. In the case of the latter, sometimes the best solution is to install replacement faders. And certain faders, like those found on Midas Siena consoles, are self-cleaning and thus may not need as much attention.
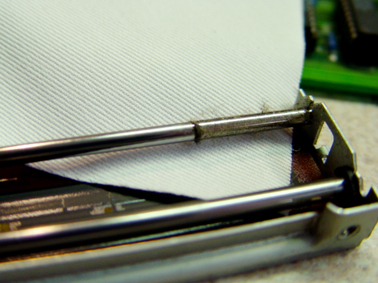
O.K., time to extract the channel strips. Pull the first one up by its knob posts and the rear of the strip. Release the ribbons by flipping the latches on each side out. Be gentle – these can’t always be replaced!
Using pliers, pull the ground wire off the rear rail. Fingers can also be used for this, but trust me, the thumb and forefinger can become quite sore. Spare the pain, use the pliers.
Some strips in the master section will have additional multi-pin wires attached. Release and remove these as well. Remember which ones came off which strips, or better, tag the wire with a reminder note. After becoming familiar with a console, this isn’t an issue.
Lay the strip in your lap, solder side up. If the strip has a paper curtain, make sure it is securely in place. Use the dusting brush and be thorough. Turn the strip over so that the knobs are facing your body, and dust the circuit board.
Sweep, Wipe, Brush
Understand that the circuit boards are covered with a fine film of dust even if it can’t be seen, and electronics don’t like dust. Brush off the entire circuit board, paying extra attention to the tops of large objects like caps, transistors and the ribbon connectors. Also sweep out the rear rail.
Next lubricate the switches – what we call “buttons” on the top are known as “switches” underneath. You’ll see a small device under the location of each “button” with a spring on it. Dirt collects around these springs, so blow them out with compressed air.
Then spray a tiny amount of Deoxit on the post of the switch. Exercise the button up and down 10-12 times to completely lubricate the switch. Do this to each switch on the strip, then blow them out with compressed air to remove any excess lubricant. Until you get the knack of spraying lightly, check your circuit board and wipe off any extraneous lubricant. (It will attract dirt.) Some of the lubricant will seep up onto the surface of the strip, but cleaning the surface is next on the protocol anyway, so don’t worry.
Spray window cleaner on a rag and wash the surface completely. This is where you remove not only the stray lubricant but also the raindrop rings, bits of lunch and whatever else has accumulated there over the past year. The strips are probably black or gray so the dirt may not easily seen, but clean it anyway. Then take look at your rag – disgusting!
Don’t forget to clean in between all of those little tiny, oh-so-close-together buttons, as well as the sides of the rails. Any dirt here will eventually trickle down into the chassis as fine powdered dust on the circuit boards. Finally, reset the knob posts to the zero position so once the strips are back in the chassis, re-knobbing will be easier.
The last step is cleaning the 1/4-inch jacks. Pour a small amount of alcohol into the remaining container and get out the artist paintbrush. Turn the strip around so that the rear of the rail is on your right.
When you insert a cable into the first jack, notice that the inside of the jack is forced open. Dip the paintbrush into the alcohol and jam it into the opening of the gap 10 or so times. This will strip out any dust or other debris that has accumulated there and will clean up the signal remarkably. Do this to each jack.
What about the XLR jacks? They probably don’t need attention unless there’s a specific problem you think might be caused by a dirty jack.
But if so, pour a small amount of contact cleaner in a cup, chop the cotton ends off some wooden Q-Tips, dip the stick in the contact cleaner, and work it in and out of each hole. Don’t jam it in. The residue, or lack thereof, on the stick will tell you when you’ve gotten it clean.
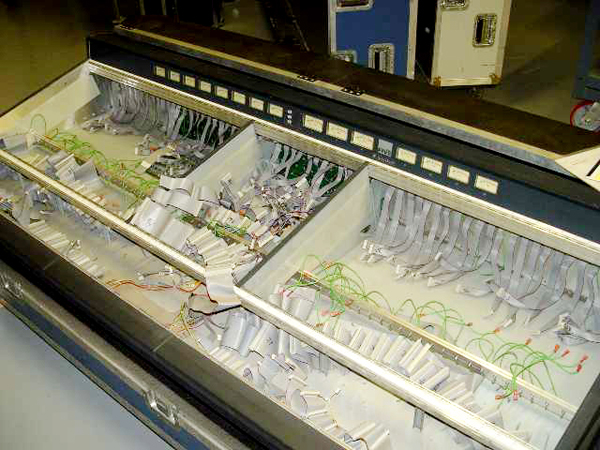
Now the console frame should be empty, or at least two-thirds empty. First, dust the ribbon, and if it’s attached to the frame on the left side, release it. With the paintbrush, begin dusting on the end closest to the still-installed strips, working toward the other end.
Then turn it over and dust the other side, and lay the ribbon up on top of the remaining strips so that it’s completely out of the way. Use the vacuum cleaner, with “crevice attachment” (the long. skinny thing) on the hose, to remove the larger chunks of debris and cobwebs that have collected. Then replace the crevice tool with the dusting brush (the round, brushy thing) and go over the entire inside. Move the vacuum cleaner out of your way and spray the inside with the window cleaner, using a rag to wipe the dirt off.
Just keep reminding yourself where the dirt will eventually end up if you don’t get it out. You’ll also be amazed at how much liquid has apparently collected on and in the desk.
Back Together
Everything should now be sparkling clean and ready to be put back together. When I do this, I start with the left side input strips, then remove four or five of the right side strips before re-seating the master section, so that it’s easier to get all the extra cables re-attached in the master section.
Set the first input strip into the frame, reattach the ribbon connector(s) and plug the ground wire into the rear rail. It’s helpful to place a few strips in, screw them in place, then put the next bunch in, etc. It also helps break up the physical position you’re standing in to do this, thereby saving your back.
Warning: Periodically make a count of how many ground wires and connectors are laying in the chassis. You really won’t like getting to the end and discovering that you’re one short. It’s very easy to skip a wire or connector, because they can slide up under the strips. I’ve had this happen, and besides being extremely annoying, it’s embarrassing.
Retrieve the bags of knobs out and replace them on the posts. Be careful to position them accurately so they’re actually useful when the console goes back to work.
It doesn’t do much good to clean a console if it’s going to be put into a dirty case. Remove all the trash from the tray (paper, lost Sharpies, stray screws, etc.). Vacuum it out, and use the upholstery attachment (the wide, flat thing) for the foam bed.
Make repairs to the tray or doghouse, such as replacing bumpers or anything else that may have come loose. Turn the lid over and spray the casters with WD-40 lubricant, and also do the same on the latches, then exercising them to work in the lubricant. Replace any wheels that have outlived their use.
Congratulations! You’re done. Now, take a nap and dream about doing it all over again next year.
Console Troubleshooting
Many things that can go wrong with a console are actually maintenance issues, not factory issues. Here are some of them.
Problem: Scratchy sounds in a channel.
Try: Cleaning the insert jacks. As a temporary fix until the strip can be removed and fully cleaned, spray Deoxit on a 1/4-inch plug and work it in and out of the jack several times.
Problem: A signal that can’t be sent to any of your mixes.
Try: Cleaning the pre/post fader switches. The strip doesn’t have to be taken out to do this. Pull the button out of the top, stick the straw into the opening and spray it from there. Put the button back on and work it up and down.
Problem: A switch that won’t latch into position, or is stuck in the locked position.
Try: Taking the button off, turn it upside down and press the switch in. Does it latch or release now? Try loosening the nearest post nut. These nuts aren’t put on with any particular accuracy, and if they’re too tight, they can place too much tension on the frame, affecting the shape of the button cutouts.
Problem: Any anomalous problem involving inability to send or receive signal.
Try: Removing the strip and checking the seating of the ribbons.
Problem: Lack of time and/or too lazy to clean a console.
Try: Identifying a qualified company such as Creation Audio Labs, to do it for you. Now that you know just what a full cleaning entails, you’ll understand the price to be for it.
Editors Note: For more information on console maintenance, check out Properly Cleaning Mixing Console Faders.