
The line check. It’s one of those things that most sound techs know they should do, or at least would like to have time to do, but often fail to get around to actually doing.
Getting a line check done before the band arrives has saved us on several occasions. Not getting it done has cost us time (and when I say us, I mean the tech team, the band, the producer and everyone else in the room).
So, what is a line check? Just like it sounds, a time to check each line from the stage to the console (and back, if you have wired stage monitors).
There are many ways to do it, and I’ll outline a few here. What’s really important is to check each line from its beginning – be that a microphone, DI (direct box) or instrument cable – to the end, the console.
Check not only that signal is passing correctly, but that each line is appearing where you expect it to on the board. In larger systems, or for those with digital consoles, this is important.
Line checks are always easiest when performed with two people (with one über-geeky exception, noted below). When we finish our setup each week, normally either/or our front of house engineer will go the board, while the other stands on stage. We typically work from one side of the stage to the other, checking everything in our path.
Where It Starts
For us that means beginning with the drums. I get down on my hands and knees (hey, I didn’t say doing a line check was glamorous) and shout into the kick drum mic. Then I shout into the top snare mic, bottom snare mic, tom mic, hi-hat mic, and so on.
I say shout intentionally because we have gates on all our drum mics. Simply talking often won’t pass a signal, and it’s tough to see if they’re working or not.
Normally, I use the name of the mic I’m shouting into to double check that we’re dealing with the same mic. We don’t often patch the snare mic into the kick channel, but it’s happened, especially with when working with newer techs.
So, while I’m yelling, “KICK, KICK, KICK,” the engineer is cuing the kick channel and hearing my voice. All is well. Testing vocal mics is easier, normally I just say (in a normal voice), “worship leader, worship leader.”
Testing DI lines can be a bit tricky, and we often short-cut it. Because DIs rarely go bad (although I did throw a bad one away two weeks ago…), we normally just check the line. I unplug one of the vocal mics and plug it into the mic line coming out of the DI. (And make sure to plug the cable back into the DI when you’re done.)
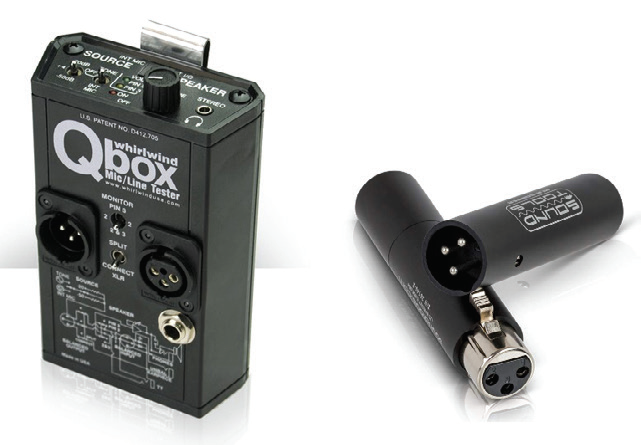
If you want to be extra thorough, you can acquire a Whirlwind Qbox tester (or the like) that has a built-in tone generator. Plug the 1/4-inch cable into the output of the tester and generate some tone. This tests not only the cable, but the DI as well.
Going Solo
So, that’s the easy way to do it with two techs. However, if you’re the only one around, you can do it yourself.
Resist the temptation to open up all the channels at once – put them in the house and check the mics. You’ll find out if you have signal but you won’t necessarily know where it’s going.
If you have a really simple setup, you can get away with this, but throw in a snake, a sub-snake, some cross-patching, and you can quickly find yourself chasing a fox through a cornfield.
Plus, think of all the exercise you’ll get running back and forth between front of house and the stage to check each line. Or you can do them in groups of two or the, then at least you’ll be close.
Now, here’s the “super-geek” way to do it. I’ve used this method in the past – I was mixing and also tech directing, which meant I had no one around to help with line check. Since the front of house position was up in the balcony, I didn’t relish running to the back and upstairs, then back down 18 times to check all the lines. Call me lazy. So I got my geek on.
A few things are needed to make this work: a digital console you can control via software on a computer, tablet or phone, a wireless connection for the console, and something along the lines of a SoundTools Sniffer/Sender cable tester.
To put this in play, unplug each line from it’s mic, plug in the tester and use the laptop or device to turn on phantom power for each channel. If it’s normally on, turn it off. The sniffer picks up on phantom power and will tell you if you have a cable fault. When you turn on phantom, the lights will light up and you know you’re in business.
Plug the line back into the mic and move on to the next one. Work your way to the end, and you’ve done a line check without making a sound. (Make sure to set phantom back to the correct state for each channel when you’re done). Sure, you could use the laptop to turn on each channel and shout into the mics, but where’s the “geek cred” in that?
Using this method, I had the whole stage checked in just a few minutes, all by myself, without making a sound and without breaking a sweat. As my daughter would say, “Geek Squad…”
Now get out there and check those lines.