Microphones
Mics are very difficult to compare because they must be placed identically in the room and in relation to the sound source. Further, we usually compare mics not to see if they sound the same – because most do not – but to decide which model sounds better subjectively with a given source.
But blind tests are still useful, if only to discover that you like the sound of a particular modern $100 import you already own just as much as the $8,000 vintage model from the local shop. If the mics are different sizes or have different fixed pickup patterns, it’s difficult to capture sounds exactly the same even if the mics are placed identically in the room.
Mic output levels also vary greatly, so that too needs to be accounted for. One solution is to record multiple takes in order to average the inevitable performance and positional variations.
First, connect one mic and set a reasonable record level. With something as variable as a live performance it will be difficult to match volume levels later during playback. So just do the best you can. Now record someone singing or playing an instrument several times in a row onto different tracks. I suggest recording the same short vocal segment six times through microphone A on tracks 1-6, then again six times through microphone B to tracks 7-12. This way, levels only need to be set once. Be sure the performer stays the same distance from each mic and moves as little as possible from one take to the next.
Now there are 12 tracks in the DAW, clearly labeled mic A or B. Slide the recorded clips left and right if needed so they all start at the same time. Assuming you’re the tester, play the clips by soloing tracks one at a time, ensuring that the subject can’t see which track is playing. (It’s also best if the subject can’t see your face either.)
It’s OK to play the same track two or three times in a row, with your subject choosing which mic she thinks sounds better at least 10 to 20 times. After each playback, ask the subject which mic she thinks she’s hearing. Note each choice, and also note which track was actually playing. After playing all 12 tracks a few times each, in random order, show the subject your notes so she can see how many times she was right.
Loudspeakers
It’s even more difficult to compare loudspeakers because their placement in the room has a huge effect on their sound, especially at low frequencies. And at mid and high frequencies, untamed reflections from nearby surfaces create comb filtering, which further skews the response. Further, all rooms have numerous peaks and nulls that vary the response at low frequencies at different places in the room, even locations only inches apart. (For more on the variables that affect loudspeaker listening tests, see Part 1 of this article.)
Treating a room with plenty of bass traps reduces the low-frequency response variation, but it’s still present, and much larger than the response differences between most models.
Harman (makers of JBL loudspeakers) built a special listening room with a “loudspeaker shuffler” that uses a custom conveyor to put different sets of loudspeakers into the same physical locations in the room. A visually opaque but acoustically transparent curtain between the shuffler and the listeners hides which set of loudspeakers is currently playing, making the comparisons truly blind.
You probably won’t want to duplicate that Herculean effort, so the next best thing is to audition loudspeakers in mono. Place the two models being compared adjacent on a table that puts the HF drivers at seated ear height. Books or similar will probably be needed under one or both loudspeakers to ensure that both tweeters are at exactly ear height. Of course, both should be aimed at the subject’s head for the flattest on-axis response.
Then match levels by placing an SPL meter (or small-diaphragm omnidirectional condenser mic) at HF driver height, two to three feet away and centered as best as possible in order to not favor either loudspeaker. (This is where the bl-noise.wav file mentioned in my previous article is needed.)
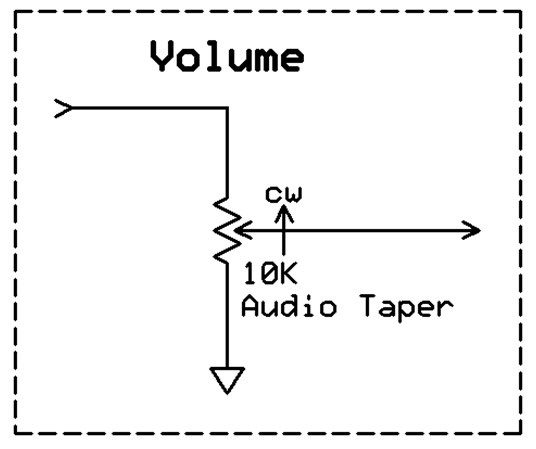
If you feed mono music into both channels of a stereo receiver, with one receiver channel driving each loudspeaker, the receiver’s balance control can set both speakers to read the same on the SPL meter. If you don’t have a receiver with a balance control, there needs to be some other way to ensure that both loudspeakers are outputting the exact same volume. If all else fails, the passive volume control in Figure 1 will do the trick, patched into whichever receiver or amplifier input is driving the louder loudspeaker.
When doing the actual comparisons, I suggest sitting close enough to the loudspeakers to minimize hearing room reflection but not so close that the woofer and HF driver outputs are too close to “blend” properly to sound like a single source. It will be obvious from the source location which is which, unless the subject enters the room literally blindfolded and is guided to the seat. One loudspeaker will still be on the left and the other on the right, but at least the subject could choose a preference.
A way around this, which I’ve done with some success, is to put one loudspeaker on top of the other with the top one upside down. This puts the HF drivers even closer together, which helps reduce their apparent physical separation.