

Suppose you bought the best subwoofer that money can buy. Its response is amazingly smooth and extends down to 20 Hz.
You hook it to your power amplifier with automotive jumper cables, and warn the neighbors to make sure that small children and pets are indoors, because you are about to do some serious low-frequency listening.
You fire the system up and insert the DVD test disc, the one with low-frequency sweeps that allow the smoothness of the system’s bass response to be evaluated. As the sweep track plays, you are shocked to hear the huge variance in the sound level as the sweep progresses from low frequency to high. Must be the jumper cables, right?
Wrong. You’ve just experienced room modes. Room modes are frequencies whose wavelengths “agree” with your room’s dimensions. They are unavoidable in enclosed spaces of any geometry.
The Need To Know
Audio practitioners need to know about room modes, because they dramatically affect the system’s bass performance. I have outlined a little experiment that can be done to get more familiar with how these work.
All you need are a few cardboard boxes and a high-resolution measurement system (you DO have a high resolution measurement system, don’t you?). I used (Rational Acoustics) Smaart for this example. You will also need a small loudspeaker and a small microphone.
Because low frequency sound waves are big (that’s why they’re a problem), we can make this easier by scaling everything up by a decade. I don’t mean “wait 10 years,” I mean that you can do your testing at high frequencies (shorter waves) and scale the results to what would happen at lower frequencies (bigger waves). This is a neat trick—it works.
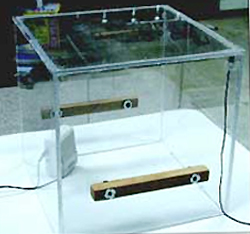
Therefore, 250 Hz on your analyzer display becomes 25 Hz in a real room, and 2,500 Hz becomes 250 Hz. A 1 decade scaling factor was selected for convenience, but others will work. I used Plexiglas boxes so that we can see what’s happening inside.


In your “box” room, the modal frequencies will be integer multiples (1, 2, 3, 4, etc.) of 175/D, where D is the space between each set of parallel surfaces in meters. Divide by 10 to “scale” the results to the bass region.
My 0.3 meter cubed (a 1 foot cube, approximately) box produced a fundamental mode at about 580 Hz for each set of parallel surfaces. The higher modes are multiples of 580 Hz. These are axial modes between two room surfaces.
Other modes exist between combinations of room surfaces. (Can you find them on the plots?) Modes get too complex to accurately calculate once the sixth order is hit. Therefore, our model is good up to 6(58) or about 3,400 Hz. Divide by 10 to scale this to a real room.
This process reveals why scale models have been used for many years to aid in selecting favorable room geometry prior to construction. However, is there a better way?
Let’s predict the room response with a computer model.


