
There are a number of ways to “wire the stage,” and as long as the methodology produces a reliable result, along with being both safe and efficient, then it’s all good. Over three-plus decades, I’ve developed and refined a consistent approach that my company employs, which I’ll detail here.
First up is AC power for the main and monitor systems. On larger shows, there’s probably a primary feeder cable delivering power via a venue’s company switch or a generator that runs to a power distribution (PD) unit. Make sure a qualified show electrician puts together the AC infrastructure, and always test the power before connecting any gear to the PD (even if the electrician says it’s a go).
On smaller shows, the PA and stage might need to be powered via electrical outlets in the venue. If it’s an unfamiliar venue, first locate the breaker box and determine the connections. It’s not uncommon for multiple outlets to be linked a single breaker.
A tool called a circuit breaker finder can be used to identify the circuits. This tool consists of two units – a transmitter that plugs into the outlet and a receiver that indicates the correct circuit as you pass it over the breakers in the box. No need to open up the breaker box. Make a chart of the outlets and their circuits in order to make sure than no outlets are overloaded. Again, test all power before plugging in any gear.
Usually, stage power for the band (and its instruments) is the audio department’s responsibility as well.
For gigs with a rider from the band, we run the power per the stage plot, while for non-rider (and festival) dates, we utilize a backline string with two to three circuits upstage so any amplifiers can easily plug in. It’s also a good idea to have at least two 50-foot extension cords with quad boxes on hand and ready to go if power is needed for things like guitarist floor pedals and/or keyboards set up downstage.
On outdoor gigs in our hometown (Reno), any stage power circuits are GFI circuits, which is required by local codes. Always check the local power codes in your area. Another thing to keep in mind: with corporate shows/events, always run power service to the podium and any client work areas backstage.
The National Electric Code (NEC) calls for Extra Hard Usage (SO) AC cables to be used areas where they may be subjected to physical damage, such as where people walk or carts roll over them. For locations where they’re not subject to physical damage, Hard Usage (SJ) cables can be used.
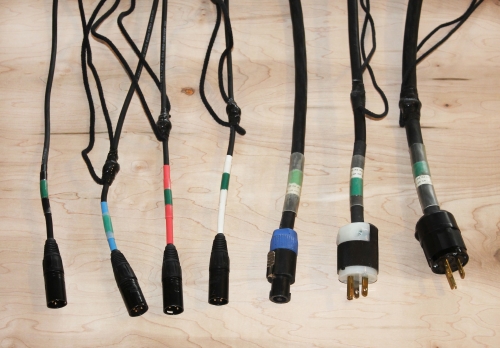
My company carries both types of cables in our inventory, and to make it easier for stagehands unfamiliar with the differences between the two, we have solid black connectors on SO cables and black and white connectors on SJ cables.
To make determining length of power cables easier on the job site, we mark each end with the actual length and cover the numbers with a piece of clear heat shrink so the numbers won’t come off.
In The Running
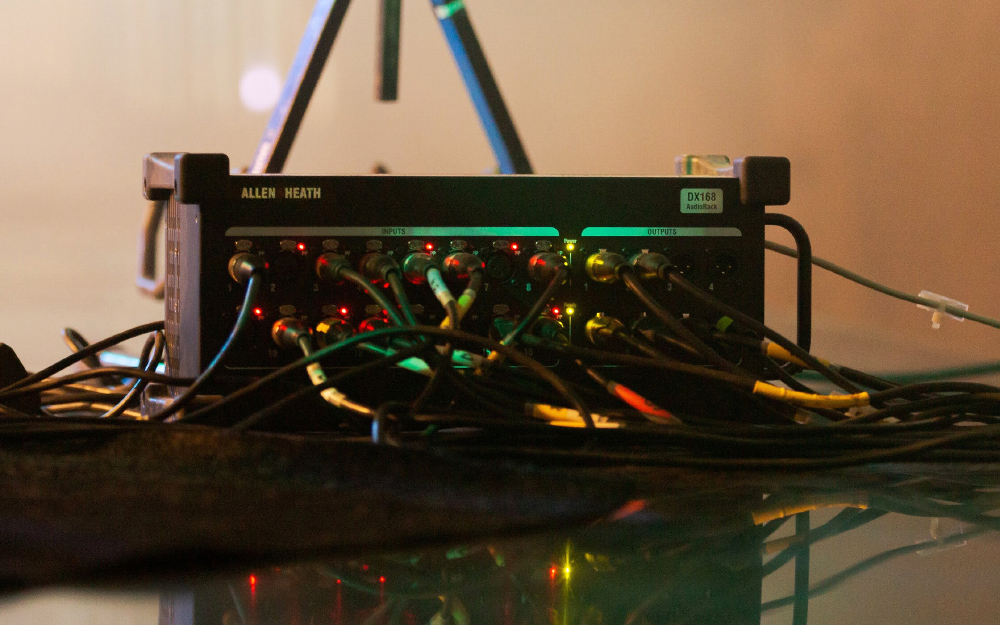
After all power is run, attention next turns to running the snake or digital network from the stage to front of house. If there’s also a monitor world, this is a good location for the stage box, helping to keep it out of the way. When there’s no monitor position, place the stage box on the side where the snake or network cable is run to FOH. On corporate shows, locate an out-of-the-way spot backstage to place the stage box that will still be accessible during the event.
If there’s a stage plot, we run 6- to 12-channel stage sub snakes to the areas onstage to minimize microphone cable runs. For gigs where we’re not quite sure what to expect, we deploy at least a 12-channel stage snake by the drums, a 6-channel snake to the center of the front of the stage for vocal mics, and a 6-channel (or larger) sub snake to the side of the stage opposite of the stage box. This way, all areas of the stage are covered with inputs, and again, means shorter mic cables. Our stage sub snakes are color-coded so it’s easy to keep track of inputs and wiring, i.e., telling a stagehand to plug a guitar mic into “SL red sub snake.”
Finishing up with snakes, attention next turns to monitor cables, particularly making sure that there’s enough cable slack to move the wedges after they’re positioned because changes are the norm. We route the monitor cables around the perimeter of the stage so the cables aren’t running across the performance area, minimizing trip hazards.
Now it’s time for signal input cables. To reduce clutter, we have a few different lengths of cables to work with. My company stocks lengths of 6, 15, 30, and 50 feet, and to make it easy to grab the right-sized cable at a show, colored heat shrink indicates the length of each one. We also only mark the male end so there are no colors at the mic end that would draw attention to the cable, especially when on camera. With larger diameter loudspeaker and power cables, there’s enough room to label them with their actual lengths.
In addition to needing 3-pin XLR cables for audio, the nature of a lot of the events that my company handles also calls for 3-pin XLR cables for digital AES and DMX lighting, and further, they must be 110-ohm as opposed to the standard 75-ohm analog cables. Because analog audio signal transmits well via 110-ohm cable, we now stock it exclusively for everything. (Note: while analog signal works fine on 110-ohm cables, digital signal does not work well on 75-ohm analog cables.)
Step By Step
On shows with a single band where there’s an input list that accompanies the stage plot, we may not actually label the individual mic lines to the stage boxes. However, on multi-act gigs, we place a piece of gaff or electrical tape around the male end of mic cables, using it for labeling to help avoid any confusion among the multiple techs that will be working the stage. Always label every signal input and return on corporate events because there may be different techs in the room on different days, and the labels will make troubleshooting any problems easier.
Unless all stage inputs plug directly into the console or a single stage box, we make a patch list of all inputs. It contains the input name, sub snake channel, main snake or stage box channel, and FOH and monitor console channels. On multi-act gigs, a patch list can be the difference between chaotic and organized set changeovers.
With mics, we usually start in the order of the console. Channel 1 is kick drum with bands, so we begin at the drum kit. Make sure any stands used around a performer will not get in their way, especially around the kit. We stock both round base and tripod mic stands so we can grab one that will fit easily into the clutter of drum and cymbal stands on the kit.
We also carry several clip-on mic mounts for snare and toms that can eliminate most mic stands around the kit. Before clamping anything to the drums, first get permission from the performer.
Over the years we’ve found that sandbags come in handy, so we always have at least a few on hand. They’re a useful source of ballast for mic stands that need to be fully extended, like drum overheads. They also work well for holding doors open at load in/out and can help position a monitor wedge at a more optimum angle.
Shorter XLR cables are used mike up the kit since we always locate a stage sub box nearby. Using shorter cables accomplishes two things: less cable clutter and less cable to wrap up at the end of the gig. When setting mics onstage leave some excess coiled at the bottom of the mic stand for easier repositioning if needed.
Finishing It Up
Bass guitar is next in line, and normally there’s a DI (direct box) involved. We label the DI and provide a short 1/4-inch jumper cable to the amp. Then come the guitars, where we prefer “shorty” stands for amp miking because they’re more compact or “cab grabber” mounts that eliminate stands altogether while still offering arms or goosenecks for better positioning of the mics.
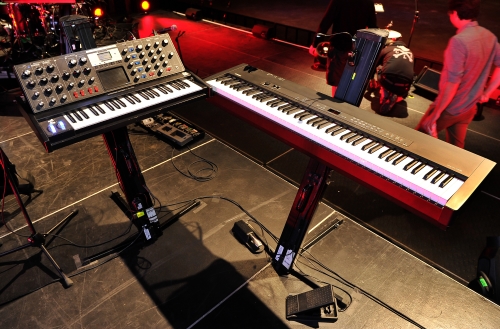
Keyboards (if applicable) are where multi-channel DI units can come in handy. We carry stereo units as well as rack-mounted quad units that help keep clutter under control with keyboard rigs.
The process usually concludes with miking/wiring any other instruments (i.e., percussion and horns). With horns we utilize tall stands with short booms so the back end of the boom doesn’t stick out too far.
We also carry a few goosenecks in case a performer switches between vastly different instruments and needs to reposition the mic quickly or if the player switches between seated and standing positions, a common occurrence with big bands for solos. The final aspect is deploying vocal mics, leaving a coil of cable slack at the base of the stands in case they need to get repositioned.
With everything in place, it’s time for line check. Note that this isn’t a full-blown sound check, but rather a quick test (if we’ve done our jobs right) to make sure all consoles are getting stage signals. This is easy with mics (just talk into them), while with direct feeds, either unplug the DI boxes and swap it with a mic to check signal flow or employ a signal generator like a Whirlwind QBox to test the lines.
Additional Factors
There are some additional tools that have proven quite helpful in this process. Small snakes combining both XLR channels and DIs are great as stage snakes for keyboard players, acoustic guitarists and even electronic musicians. On smaller gigs they can serve as the main snake for solo or duo/trio acoustic artists.
Snakes with return lines facilitate running powered wedges or wired in-ear monitors and coms (communication lines) to performers. Speaking of wedges, there are cables from a number of sources that offer both signal and AC lines in a single jacket, perfect for running a single cable to a powered floor monitor.
Another handy item are boxes that plug into standard Cat-5/6 cable and offer four mic/line channels of audio. Many of these units will also pass phantom power when used with shielded Cat cable. And, these are also great for when remote inputs are needed in another area and the facility already has an existing Cat cable infrastructure.
Digital networking has made audio routing easier, and while many digital consoles have stage boxes that can be interfaced with a simple run of Cat, coax or fiber optic cable as the snake, some consoles have even done away with the snake.
For example, the Mackie DL32R and PreSonus RML32AI (and smaller RML16AI) rack-mount units look like stage boxes with inputs and outputs on the face, but they’re really feature-laden mixers designed to be operated wirelessly via tablet. They eliminate the need for an FOH area and can be located on stage, also acting as the stage box for connecting inputs and outputs.
Speaking of wireless, Bluetooth can also play a role. Many manufacturers now offer Bluetooth DI boxes that can pair a device into a PA system without the hassle of trying to locate the often misplaced 1/8-inch TRS cords needed for the headphone output, a good choice for artists playing to tracks.
While there are several viable digital transport networking protocols, Dante (by Audinate) is the most popular and best supported for live audio, with numerous manufacturers offering Dante-enabled loudspeakers, consoles, amplifiers, processors, and even wired/wireless microphones.
These devices can be easily integrated into the network via off-the-shelf Gigabit switches, and Attero Tech has released the unDNEMO-BT, which allows the user to monitor a Dante channel with a Bluetooth headset or headphones.
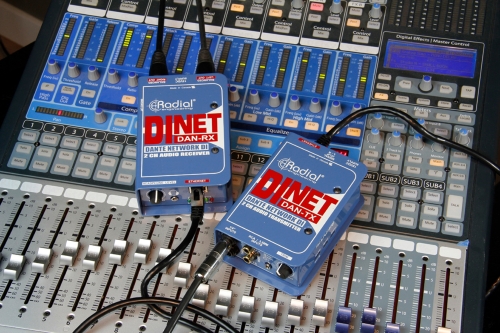
Two new units from Radial, the DiNET DAN-TX and DAN-RX, are DI-sized boxes that allow two channels of audio to be integrated into or output from a Dante network. ARX recently introduced the Network DI breakout box, offering two output channels from a Dante network.
This can’t be stressed enough: the biggest key to a successfully wired stage is organization. Label inputs and outputs so both setup and troubleshooting are a lot easier. Document routing with a patch list and input list. Label all cables so that’s it’s clear what signal is flowing through them, and finally, always leave a little slack so things can be moved around if need be.


