The day-to-day operations of a typical church have changed significantly in the past few months. Gathering large groups of people in the same space is not advisable, and houses of worship have had to find alternatives — quickly.
Thankfully, buildings and physical places of worship are irrelevant to the actual church, which is a community of those with faith in God and love for people. With today’s technology, churches can still connect and gather virtually, to keep carrying a banner of hope and rally needed help and support for those who might be in tough situations.
With social distancing, online streaming has fast become the most popular — and cost-effective — platform for churches. Most churches already have cameras and audio mixers, and streaming services can be very inexpensive, if not free. A basic web stream takes minimal personnel, know-how and engineering to pull off. Also, the real-time nature of live streaming lends itself to staying current and relevant minute to minute, an important quality for community leaders in a time of crisis. Finally, almost everyone has access to the internet in some form.
While some churches have previous, perhaps extensive experience with online streaming and broadcasting, most do not. If you’re in the majority, transitioning from a live-in-room format to a broadcast-style setup can be intimidating. Whether you’re mixing audio or handling lighting sets, there are big differences between a “live gig” and a “for-TV” production. The good news is that many basic principles are the same for both production types, and you may be pleasantly surprised at just how fast you can put together a clear, smooth, live web stream.
If you’re transitioning from front-of-house mixes to broadcast audio, I suggest you start by making sure your infrastructure supports a flexible broadcast workflow. First off, the ability to send and receive audio from different locations around your building or via internet with smaller, portable I/O boxes is a big consideration. Having the capability to easily record your audio inputs for post-production mixing and editing is important, and necessary if you aren’t broadcasting live. And if you are broadcasting live, having direct communication from a “producer” to “talent” via interruptible foldback (IFB) monitoring will give those on camera extra confidence and make your production much more fluid.

If your current system doesn’t support these functions and you don’t have the budget to upgrade your core infrastructure for broadcast production, consider adding to your setup a cost-effective utility mixer, like the Waves eMotion LV1. With this type of mixer in place, you don’t need to throw a bunch of money at getting your church web stream started. The bonus of Waves’ LV1 specifically, is that it can directly host all Waves plugins, giving you every audio tool you could possibly need to shape your broadcast mix. Also, with this system comes the capability of transferring all your settings directly into a post-production environment as “presets,” so you can pick back up right where you left off without missing a beat.
Once the infrastructure to support this broadcast style workflow is in place, the focus turns to mixing. Coming from a career spent at front of house, I can relate to anyone used to mixing on PA systems for an in-person audience. Having shared time between front of house and broadcast audio over the last few years, I’ll tell you this: you can get away with a whole lot more at front of house than you can in a broadcast setting. The same killer mix that you dialed in last week for an in-person audience will likely sound pretty average and possibly even disorienting on a sound bar or through AirPods.
When starting a broadcast mix, you want to focus on tidying up each individual input, removing as much low and mid information as possible without cutting the body or making the input sound thin. I find myself using high-pass filters much more liberally in a broadcast mix compared to a mix destined for a PA system. For example, for broadcast I’m setting the high-pass filter to 70 Hz on bass guitars and 200 Hz plus on vocals. I use a combination of equalization and dynamic EQ to remove lows and mids out of keys, bass, pads, synths, vocals, and occasionally guitars. The Waves F6 Floating-Band Dynamic EQ plugin does that for me.
With its high- and low-pass filters, six bands of fully adjustable EQ and/or dynamic EQ, and the benefit of a real-time analyzer window, the Waves F6 EQ is the Swiss Army audio knife in my broadcast mix. The F6 can be surgically precise, letting you fix and tidy inputs without gutting them. On a touch screen, it only takes seconds to fine tune.
If you have the time to get it right, the dynamic EQ in the F6 has attack and release settings and mid/side processing, so you can really shape and manipulate the sound of an input however you want. For vocals, I set the sixth band on the F6 EQ to a fast attack and a -5 range, to chip away at 7-8 kHz, before the sound hits the Waves Sibilance de-esser plugin, which handles the rest. For bass guitars, I have a few bands of dynamic equalization with a narrow bandwidth on standby to manage pronounced notes between 70-120 Hz, evening out the bass and improving the final mix.
The most important thing to monitor in broadcast audio is your final output level. On digital audio systems, volume levels are cut and dry, with an absolute maximum of 0 dBFS. You could read up for days on “loudness standards,” “perceived loudness” and LUFS or “Loudness Unit Full Scale.” What’s practical and relevant is this: the best broadcast mixes maintain mostly high, consistent output levels.
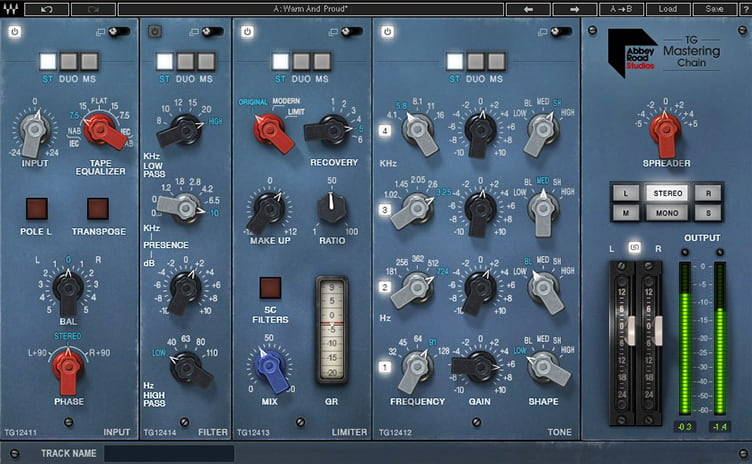
For our broadcast at Passion City Church (in Atlanta), we have a DiGiCo mixing desk coupled with the Waves SuperRack plugin host. On my main output bus I have Waves Abbey Road TG Mastering Chain meter bridge plugin, modeled after Abbey Road Studios’ EMI TG console. It has a big and beautiful loudness meter, and so I’ve pinned this plugin meter to the top of the SuperRack host screen for a constant visual of my output level. My target window is to stay above -10 dB for everything, and I won’t let the quietest, most dynamic moments fall below -17 dB. When driving and keeping levels this hot, it’s easy to hit 0, but you don’t want that. Digital zero means distortion — plain and simple.
To make sure I never have that issue, I’ve placed my final output faders on a separate layer so I don’t touch them. Those faders sit at -0.1 dB, and a Waves L2 Ultramaximizer or L3-Multimaximizer is the last processing point before the mix leaves the console, with the out-ceiling of the plugin set to -0.3 dB. That way, no matter how hard I push the mix bus, I always stay out of that no-fly zone, with at least -0.3 dB from any hardware related distortion.
Unless you’re normally mixing on an underpowered PA system, you might not usually reach and keep a high output level, especially with the dynamic nature of live sound. With the target levels you want to hit with a broadcast mix, I recommend you set your output levels and mix bus processing first, then mix into that. It will become a natural gauge as to where your mix levels need to be and should help create a more natural sounding mix overall. My mix bus processing is the Waves NLS Non-Linear Summer plugin for color, then an API 2500 compressor, then an Abbey Road TG Mastering Chain and an L2 or L3. The API 2500 handles the musical compression. It makes the mix feel great and provides an audible gauge of the mix volume. I’ve set the threshold to 6 dB, with an attack of 10 milliseconds and a release of 0.2. Having used this plugin with these settings for a long time, I can find the sweet spot of my mix levels pretty easily.
The Abbey Road TG Mastering Chain is a plugin I’ve fallen for. I’ve never heard a plugin create so much ‘glue.’ Once I’ve balanced a mix and it’s at the right level, I add a TG Mastering chain with a ‘glue’ preset I’ve tweaked, and everything is just locked in. The TG chain plugin is what started me down the path of mid/side processing. This is a bit more advanced and better saved for when you’ve already got things in a great place, but I’ve been able to find a lot more space in a mix by processing mid (or center) and sides of a stereo image separately.
Adjusting speech levels to match music or other content — without sounding unnatural or ultra-compressed — is harder than it seems, but the right tools will get you there fast. Put the Waves MV2 plugin on a speech input, choose the ‘Broadcast Wizard’ preset, and you’re not far off. A little tip: If you load ‘Broadcast Wizard’ and it sounds like something is going to explode, you’re on the right track! Ease off on the high-level compression until the input sounds loud but natural, and you’re done. I’ve come to love the MV2 plugin on speech and talking heads. It has a simple low-level compression setting that brings up soft, dynamic moments and helps mitigate rough mic placement or bad technique.
Another tool, recently launched by Waves, is the Playlist Rider — my choice for most helpful plugin of the year. Playlist Rider corrects inconsistent input levels in real time, keeping a consistent level non-destructively, using only the gain. Most video content in live production hits audio systems as a stereo input. If you’ve been around live production long enough, you know the pain of chasing video levels. The Playlist Rider on your stereo video input solves the problem of unmastered video audio by evening out inconsistent video levels to a target you specify.
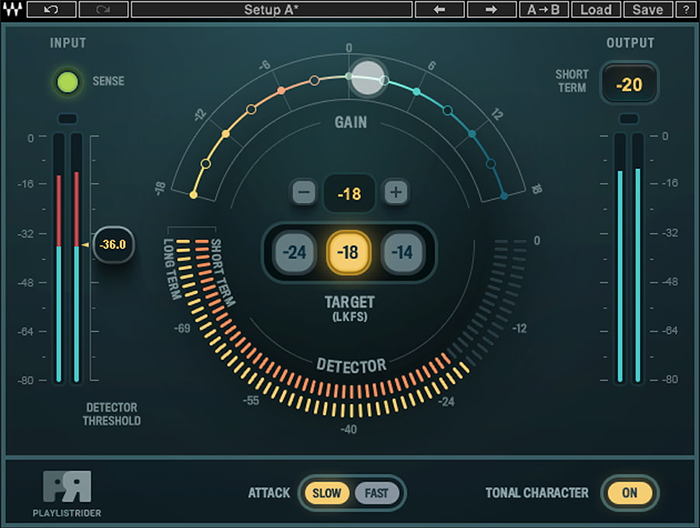
Playlist Rider also has a ‘Tonal Character’ feature that, when on, will essentially EQ the input signal for a new level of consistency across the board. Try experimenting with Playlist Rider on a speech group or pre/post roll music. It’s a plugin that automates some of my mixing and helps me get my head out of the desk to focus on the bigger picture.
If you haven’t seen Waves Dugan Automixer, I recommend having a look, particularly for broadcast. Waves have put Dan Dugan’s actual process into their live plugin host applications, with 64 instances of auto-mixing over three discrete groups. When two, three, or four or people are standing next to each other with live microphones, bleed always happens — and with it, phasing that can dirty things up. When you run those mics through an automix group, only the mic spoken into at that moment is at full volume. The others are muted, effectively, with no audible changes or artifacts. This is an extra process that really helps create a professional-sounding broadcast.
Finally, we now have real-time pitch correction plugins like Waves Tune Real-Time. When used correctly, pitch correction can provide that little bit of extra help while maintaining a very natural sound. The trick is to not use the chromatic scale, but rather use the correct key and scale for each song. Relax your tuning speed and note transition. And when the plugin is on, don’t forget you’re using it! Waves Tune Real-Time can track pitch exceptionally well even with significant stage noise, which cannot be said for other tuning plugins. Since broadcast mixes are more prone to live forever online, I want to give our artists and musicians confidence that they are always going to sound great. Waves Tune Real-Time is one of the best tools for live and broadcast audio — just handle with care.
Over years of mixing audio, I’ve learned there’s no right or wrong way to mix. Countless tools, products, schools of thought, and approaches to audio for live production are out there. What matters is the end result, and how it fits into the bigger picture of your ministry. Whether mixing front-of-house or an online broadcast in an unused closet-turned-studio, you have a critical role in how your church offers a message of life and hope.


