


If you ask a handful of engineers how they approach recording acoustic guitars, you’re likely to get at least a handful of different answers (provided they’re willing to divulge).
This is because so many factors play a part in capturing an acoustic guitar: the room, playing style, body size, recording environment, the player’s skill level, etc.
All things considered, however, most engineers will tell you the real secret to recording acoustic guitar is simple: stereo miking. Sure, you could record an acoustic guitar in mono and do some slick, stereo processing to give it that “spacious” quality.
Or you could always combine a microphone with an acoustic guitar pickup for added dynamic “texture.” But ultimately, if highly reliable, realistic, full-bodied acoustic guitar tracks with depth and accuracy are what you’re after, you’ll find that stereo recording with two microphones is the way to go. Let’s cover three of the most commonly used techniques for stereo miking an acoustic guitar.
All three of the following techniques have been used on countless hit records. Familiarize yourself with all of them and then experiment with each to achieve the desired tone.
In most situations, you’ll want to use a pair of unidirectional, condenser mics placed close to the instrument (approximately 6 to 12 inches away). Mics with a cardioid polar pattern are generally best for an acoustic guitar because they exhibit less “bass boost” from proximity effect than other directional types when placed close to the sound source. Acoustic guitars will exhibit a “boomy” sound if miked incorrectly. Experiment with different mic combinations to achieve the sound you’re after.
Technique 1
Two mics are spaced apart from each other at the same approximate height. My preference for the first mic is a small diaphragm condenser pointed at the 12th fret of the guitar to capture higher frequencies and string dynamics. For the second mic, I use a large diaphragm condenser aimed at the bridge or slightly behind it, to capture the lower frequencies and body characteristics of the acoustic guitar.
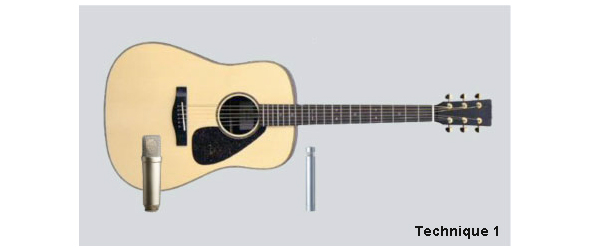
When using this technique, remember to follow the “Rule of 3:1,” where the distance between the two mics is at least three times the distance between each mic and the acoustic guitar. (For example, if Mic A is 6 inches from the 12th fret, Mic B should be at least 18 inches away from Mic A.) This will help keep phase cancellations to a minimum and provide a smoother sound that will translate well to mono should you decide to do that later.
Technique 2
This is primarily a variation on the previous spaced mics setup. The first mic is still a small diaphragm condenser pointed at the twelfth fret. The second mic, however, is positioned on a mic stand around the performer’s ear level, pointing down either at the bridge or at the strings just in front of the bridge.
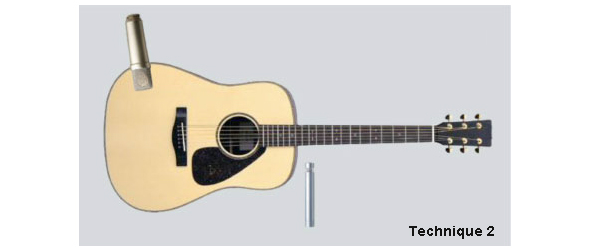
For a right-handed player, the mic will be positioned over the right shoulder. It should be placed out in front of the guitar and the performer and angled back towards the guitar (as opposed to pointing at the ground). This setup will yield a brighter sound that is thinner, but more open sounding than the first setup. Again keep the “Rule of 3:1” in mind, but experiment with the mic placement slightly to improve the timbre.
Technique 3
X-Y, also known as a coincident pair, is probably the easiest and most reliable method for recording acoustic guitar. It’s hard to get a bad or unnatural-sounding recording with this setup for several reasons.
First, the mics are positioned similarly to how our own ears hear an acoustic guitar. Second, you do not need to be as concerned with the phase issues apparent in the other setups because the capsules are so close to each other. And finally, because the sound waves arrive at roughly the same time to both mics, and phase issues are minimized, the resulting tracks will be highly mono-compatible, if so desired.
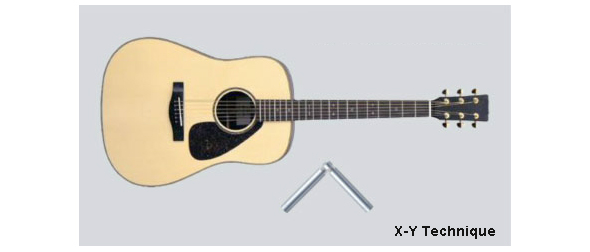
To start, place two small diaphragm condenser mics (a matched pair is ideal) so that one capsule is above the other (nearly touching) and the back ends are split apart roughly 90 to 120 degrees, forming a V-shape.
Keep the capsules focused on the 12th fret, but feel free to move the mics further away to capture more of the room, or slightly left or right of the 12th fret to emphasize particular frequencies. I find that about 7 inches back from the 12th fret often yields the sweet spot between the bass frequencies from the sound hole and higher frequencies from the neck, and in effect de-emphasizes the midrange frequencies.
This setup will create a narrower stereo image than the other two setups discussed, but will make up for it with a warmer, more natural sound.
EQ, Compression
While some engineers like to add compression and EQ to acoustic guitars when recording, others prefer to add those touches after the fact and only as needed. It’s hard to know just how an acoustic guitar track will sit in a mix.
In the end, and once again, there are no rules. Have fun experimenting with these stereo pair recording techniques for acoustic guitar.
This article is courtesy of Universal Audio.


