
Additionally, an empty channel might help a stereo pair fall on odd-even inputs or like-instruments reside within a fader bank. Placing a spare vocal mic somewhere on the list is also wise. The lead vocal is often the “money” channel, and failure is not an option. This is especially important when a star vocalist relies on a wireless mic, which is by nature, less reliable.
Although you and/or your artist might be attached to a boutique mic, it can be problematic to request uncommon models on an input list. Not every sound company or venue has a wide selection of mics. If something specific is required, be sure to travel with it, and mention on the list that it is provided by the artist so the local sound company doesn’t need to expend effort hunting down an esoteric model.
In general, I suggest input lists spec common, meat and potatoes mics. The easiest solution is to accept ubiquitous Shure models such as the venerable SM58. Better still, request the “fancy pants” mic on the input list but offer an easier-to-find alternative as well.
How sound sources are named is also important. While most input lists keep instrument and source names short, such as “Guitar 1” and “Guitar 2”, it can be helpful to include additional information as well. A more detailed source name, such as “Electric Guitar 1 – John”, can help local crew better understand the setup and show.
Other information is frequently included on input lists. Many engineers specify mic stand type and size. Sub snakes or other patching might also be mentioned, especially in festival situations. Also common is listing the mics requiring phantom power. For professional engineers this might be unnecessary information; I work regularly with student engineers, however, and the noting of phantom minimizes problems while simultaneously helping newbies learn their mics.
Although somewhat unrelated to inputs, I also like to include a list of monitor mixes as well as important monitor mix notes on input lists. Further, although sound system requirements are usually voiced in an artist’s rider, I place specific front of house needs on the list as well, as technicians are less likely to read a rider.
Getting Started: Stage Plots
Building an effective stage plot is more challenging than input list creation. While a simple word processor can effectively note mic requirements, a graphics program, inevitably with a learning curve, is required for constructing a stage plot. Any drawing application will work, but specialized software makes it easier. Programs and websites such as Stage Plot Pro, Stage Plot Designer, and Stage Plot Guru are inexpensive or free and worth experimenting with.
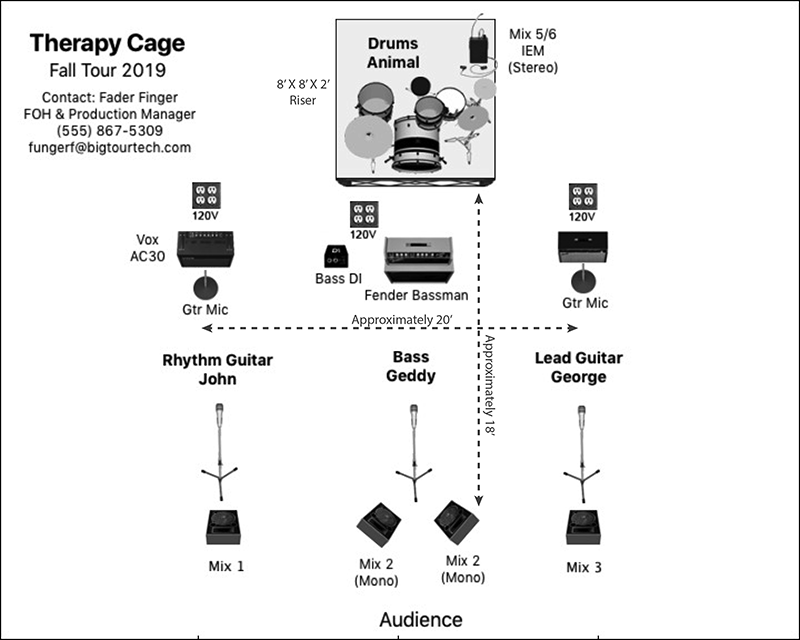
The first thing to consider is the plot’s perspective. I advise keeping to standard 8.5- x 11-inch paper size, but format it in landscape mode with the stage wider than taller. In this manner, the audience is at the bottom which is the norm for most stage plots.
Whatever orientation you choose, it’s best to label the location of the audience, so no one is confused of the position of this all-important landmark. Figure 2 provides an example stage plot that includes many of these suggestions.
Avoid graphics in mixed perspectives. While it can be creative to use random images from the web to build a plot, this can send mixed messages to the stage crew. If illustrations are not precise, a drum tech might put up the wrong drum kit. If a plot mixes top-down and from-the-front perspectives, equipment might be set up incorrectly.
If possible, draw plots to scale. I remember a gig years ago in which I provided a plot that was terribly out of scale. When arriving at the venue, I found the local crew had diligently set up the stage incorrectly. It was embarrassing and annoying to have the techs move and rewire everything again. If the plot can’t be drawn to scale, which is often the case, at least note this fact on the document so the crew will expect changes.