Are you getting the best possible sound from your mixing console or sound system?
By setting up your mixer and system for proper gain staging (gain structuring), you might be surprised how clean they can sound.
Gain staging is the process of setting the gain of each stage of a mixer, or of a sound system, to achieve the best compromise between noise and distortion.
The goal is to have every stage in the mixer (or the sound system) operating at its optimum signal level.
What’s optimum? The loudest peaks of the signal should be a few dB below clipping in each stage, even if you apply a boost in an equalizer, or makeup gain in a compressor. That way, the peaks are not audibly distorted, and the signal is well above the noise floor of the mixer.
In every stage, you want the signal level high enough to cover up the noise, but low enough to avoid distortion. Every audio component works best at a certain optimum signal level, and this level is usually indicated by a meter or LED built into the device.
When gain staging is correct, all the components in the system clip at about the same time.
Background
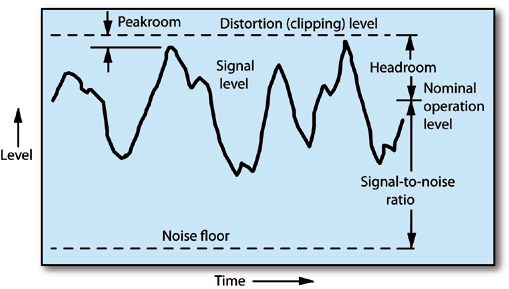
First, let’s review the concept of signal levels in an audio device (Figure 1).
At the bottom of the graph is the noise floor of the device – the level of noise it produces with no signal.
At the top is the clipping level – the point at which the signal peaks flatten and distortion become easy to hear. In between is a range in which the signal sounds more or less clean.
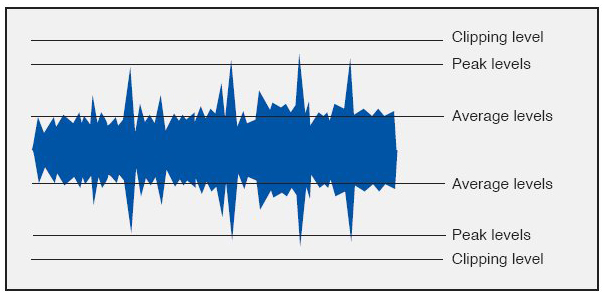
As shown in Figure 2, a musical or speech signal changes in level (voltage) continuously as it plays.
Imagine a musical passage with a low-level synth pad, but with high-level drum hits. The average level or volume of the passage is low, but the transient peak levels are high.
Peak levels may be up to 24 dB above average levels depending on the type of signal. Percussive sounds have much higher peaks than continuous sounds do (synth pads, organ, flute) – even if the two signals have similar average levels.
The meters in your console might show signal levels in two modes: RMS and peak. RMS (or root-mean-square) readings correspond to the average levels.
A VU meter approximates average levels. Peak readings, such as displayed on LED bargraph meters set to peak mode, show the level of peaks or short transients.
The average or RMS level indicates approximately how loud the sound is, while the peak level shows how close the signal is to clipping.
Generally you want the signal level to be as high as possible without the peaks clipping or distorting, but there are exceptions that I’ll touch on a bit later.
In Figure 1, signal-to-noise ratio (S/N) is the level difference in decibels between the average signal level and the noise floor. The higher the S/N, of course, the less hiss you hear.
The level difference in dB between the nominal (average) signal level and the clipping level is called “headroom” (Figure 1). The greater the headroom, the greater the signal level the device can pass without running into distortion.
If an audio device has a lot of headroom, it can pass high-level peaks without clipping them. SynAudCon instructor Pat Brown uses the term “peakroom” to mean the dB difference between signal peaks and the clipping level (Figure 1).
Headroom is the space between the average level and clipping; peakroom is the space between signal peaks and clipping.
You want to set your mixer controls so that, in every stage, the signal has some peakroom so that peaks don’t distort, and the signal is well above the noise floor.

