The More The Merrier
While a single floor mic can get the job done in many cases, sometimes more are needed. Here’s a guide to the minimum number of mics needed to pick up everyone on stage uniformly.
20-foot stage: 1 mic located center stage
24 to 30-foot stage: 2 mics located 12 to 15 feet apart
35 to 40-foot stage: 3 mics located 15 feet apart
45 to 50-foot stage: 3 mics located 17 feet apart
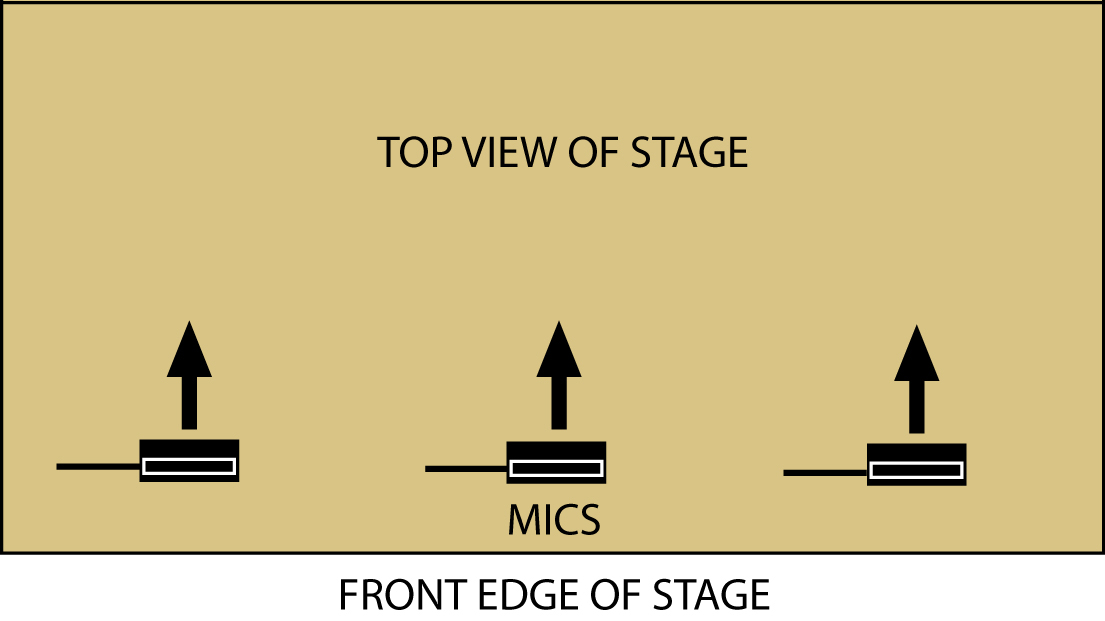
The floor mics should be placed in a row about 1 foot in from the stage edge (Figure 6), and/or to enhance gain before feedback, locate them as close to the actors as possible without getting in their way. If the floor mics can’t capture upstage action, consider adding boundary or hanging mics as needed.
Do floor mics pick up a lot of foot-step noise? Actually, no more than our ears do. Stand close to the stage with the sound system off. If you can hear footsteps when actors walk, any floor mic will “hear” them too. A solution, if possible, is for actors to wear rubber-soled shoes. Or carpet the stage floor and put the mic on an 18-inch-square, 1/8-inch-thick masonite or acrylic panel to prevent high-frequency absorption by the carpet.
It also helps to brace the stage from underneath so that it doesn’t creak. Application of sound damping material such as that offered by Fatmat can improve things as well. And, switch in a 100 Hz high-pass (low-cut) filter on each mic channel (200 Hz for child actors, who have both quieter and higher-pitched voices).
Can thumps be reduced by putting mics on foam blocks? No. In fact, lift a mic off the floor while it’s picking up footsteps and there should be no audible difference in the loudness of the footsteps. Unidirectional floor mics are not sensitive to floor vibrations because their diaphragms are perpendicular to the floor, so they don’t move in and out when the floor vibrates up and down. In addition, putting floor mics on foam pads raises them off the floor, causing dips in the upper midrange due to phase interference.
Another Puzzle Piece
Because floor mics are usually positioned several feet from actors, feedback can be a major issue. Fortunately, a PAG-NAG calculator can help us in formulating an approach that maximizes gain before feedback. (The PAG-NAG acronyms stand for “Potential Acoustic Gain” and “Needed Acoustic Gain.”)
Lectrosonics offers a free calculator in convenient app form (Figure 7) that can be downloaded at lectrosonics.com. The equations in the calculator approximately predict the gain before feedback of a sound system based on the mic placement, the number of open mics, and loudspeaker placement.
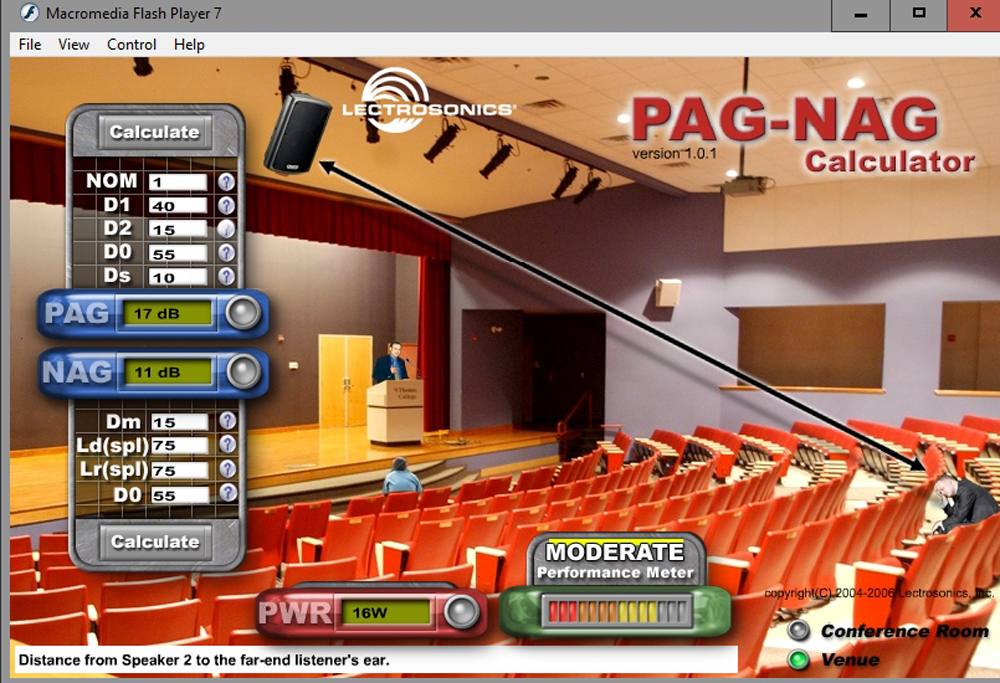
Note that the calculations are based on the use of an omni mic and an omni loudspeaker. Utilizing directional mics and directional loudspeakers aimed away from each other, gain before feedback can be up to 6 dB better than predicted. This can help create a “safety margin” so the system is not even close to the feedback point. The calculator also assumes that the system is in a free field (such as outdoors), so keep in mind that room reverb tends to reduce gain before feedback.
As shown by the PAG-NAG equations, loudspeakers over or near a stage tend to cause feedback with floor (and hanging) mics. That’s because the loudspeakers are relatively close to the them, and far from the audience. Both factors reduce gain before feedback.