Selecting the right preamplifier for a given microphone, or conversely, selecting the right mic for a given preamp, involves two major factors along with several minor ones. First, the two big ones:
1) Input headroom. Do you have enough?
2) Noise. What will the preamp add to your mic?
You need to determine whether the mic, under worst-case conditions, is going to overload the preamp input stage, and also whether the preamp is going to materially degrade the noise performance of the mic.
Actually, mics have relatively few specifications. Most are sold on sound, reputation and price. Specifications rarely enter into it. Even so, enough exist to make the right decision.
Another issue is proper input impedance. The trend has been moving toward higher input impedances, with many now rated at 2 kilohms and higher. Because the connected impedance (i.e., mic plugged into the preamp) determines the noise performance, and the mics are low impedance (150-200 ohms), then there is no noise penalty for providing higher input impedances.
Yet another aspect to examine is phantom power. Is it provided? Do you need it? Is it the correct voltage, and does it source enough current for your mic? This is an area requiring informed decisions. There’s a huge myth that mics sound better running from 48 volts, as opposed to, say, 12 volts, or that higher phantom power increases the dynamic range of a mic. For the overwhelming majority of microphones both of these beliefs are false.
Most condenser microphones require phantom power in the range of 12-48 VDC, with many extending the range to 9-52 VDC, leaving only a very few that actually require just 48 VDC. The reason? Internally, most designs use some form of current source to drive a low voltage zener (usually five volts; sometimes higher) that determines the polarization voltage and powers the electronics.
The significance is that neither runs off the raw phantom power; both are powered from a fixed and regulated low voltage source inside the mic. Increasing the phantom power voltage is never seen by the microphone element or electronics; it only increases the voltage across the current source. But there are exceptions, so check with the manufacturer, and don’t make assumptions based on hearsay.
Final selection details involve checking that the preamp’s gain range is enough for your use, that there are overload indicators or metering to help in set up, that the plumbing is compatible with your wiring needs, and that the color doesn’t clash with your tour jacket.
Finding The Data
Determining input headroom compatibility requires knowing the mic sensitivity rating and the maximum sound pressure level (SPL) allowed. The sensitivity rating is usually the easiest and least ambiguous number to find on the data sheet, rated at 1 kHz and expressed in millivolts per pascal (mV/Pa). One pascal is the amount of pressure resulting from a loudness level of 94 dB (written as 94 dB SPL). For example, a sensitivity rating of 20 mV/Pa tells you that when a sound equal to 94 dB SPL strikes the mic element, resulting output voltage is 20 millivolts.
The sensitivity rating provides a voltage level at one reference point; now all that’s needed is the mic’s maximum SPL to calculate the maximum output voltage. Then this is compared against the maximum input voltage rating of the mic preamp. The maximum allowed SPL is stated in several ways: maximum SPL often with a stated total harmonic distortion (THD) level; maximum acoustic input; and sound pressure level for “X” percent THD. All are variations for the same rating.
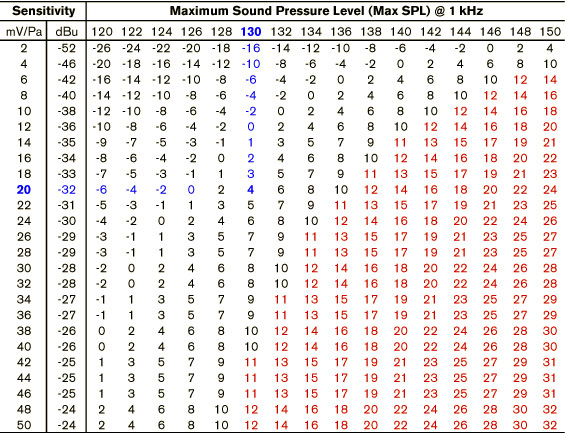
With these two specifications, it’s a simple matter to calculate the maximum output level in volts and convert that into the familiar dBu units found on microphone preamp data sheets. To make it even easier, see Table 1. To obtain the microphone maximum output level in dBu, find the mic’s sensitivity rating on the left side and then move right until directly below the mic’s maximum SPL rating.
As an example, for a microphone with a sensitivity rating of 20 mV/Pa and a max SPL equal to 130 dB, Table 1 tells us that the maximum output voltage is +4 dBu. You now have what you need to compare preamps regarding maximum input level.
Another example using Table 1: block out all possibilities that could overload a specific preamp. For example, the red triangle area represents all combinations that could overload Rane’s MS 1b Mic Stage. Its maximum input level is rated at +10 dBu, therefore all microphone sensitivity and maximum SPL combinations resulting in greater than +10 dBu are excluded from consideration. Used this way, any new mics can be quickly checked for overload threat.
Caveats. Remember that this output level only occurs under the worst-case condition of SPL equaling the maximum allowed by the mic, meaning that if an application has sources that cannot achieve the maximum SPL, then the input overload requirement can be relaxed accordingly. For instance, if you know your source is never going to exceed 110 dB SPL, and your mic is rated for maximum levels of 130 dB, then you can take 20 dB off the levels shown in Table 1, widening your preamp choices considerably.


