
Part 1 of this article (here) briefly focused on the history of timecode as well as how it relates to audio, the types of timecode, and the similarities and differences between timecode and wordclock.
Here, Part 2 expands on that and shows how to use timecode with a modern DAW, namely Pro Tools, to synchronize a tape machine to the Pro Tools transport for flawless audio transfer. Specifically, this discussion is focused on using Pro Tools hardware, the SYNC HD, and Pro Tools software. Note that this does not replace the documentation for usage of the SYNC HD device; rather, it’s an aggregate document to explain the usage of this device in a system.
Setup & Configuration
The SYNC HD device, when connected to a Pro Tools system, automatically goes into remote control mode when the session is opened. At this point, all the front panel controls are disabled and control is done through Pro Tools.
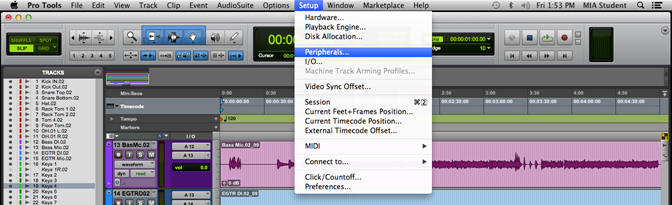
Hardware Configuration: Device Setup. The first thing to perform is confirmation that the SYNC HD is set up correctly. Figure 1 and Figure 2 show the process of opening the Peripherals Dialog. When the session is open, click on Setup->Peripherals.

This opens the Peripherals Configuration Dialog. Select the Synchronization tab. Ensure the “Enable SYNC HD” is checked. The other important setting to check is the “LTC Output Level” field.
Since SMPTE timecode is a square wave that, as mentioned in Part 1, is within the audible frequency spectrum, it’s very susceptible to distortion. Outputting an overly hot signal will cause issues of bleed onto other tracks.
The recommended level for a timecode track is roughly 10 dB below operating level; -9 dBu is a suitable level that is readable without being extremely hot. It’s also recommended that a guard track be placed around the track being used for the timecode in order to prevent track bleed. A guard track refers to keeping the tracks immediately adjacent to the timecode track free of any recordings. This will be discussed in greater detail shortly.
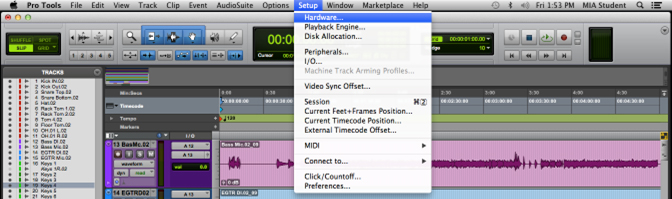
Hardware Configuration: Session Setup. The next step to check is the session settings that are associated with the hardware configuration. Figure 3 and Figure 4 show the opening of the Session Setup Dialog. Choose Setup->Session to enter the dialog.


This dialog box consists of three separate areas of interest. The subsequent sections will detail the important settings for each area.
Session Setup: Format. This area of the dialog dictates how the timecode is to be read and received. The important fields to note:
• Clock Source – This should be set to SYNC HD.
• Audio Format – Broadcast Wave should be set as default.
• Session Start – This can be set to zero, although it can be any other value. Note: If this is changed and audio is already recorded, you will have an option to move the audio to the new time or to keep it relative to that session start. If you keep it relative, this field will be set with the offset between the SYNC HD and the Pro Tools insertion marker.
• Incoming Time – When the SYNC HD is receiving timecode, you will see this field moving in time with the timecode read in from the external device.
• Timecode Rate – This should be set to 29.97 Drop Frame. Although many suggest 30 FPS for audio, it’s very regular for audio to be tied to video whether you initially plan for it or not. Using since broadcast in North America uses 29.97 as standard, it’s much better to start using this rate as practice.
Session Setup: SYNC Setup & Timecode Offsets. This area of the dialog allows you to ensure the SYNC HD is configured for proper timecode sending and receipt. Configure the following sections as follows:
• Clock Reference – Since the SYNC HD is the Clock Source, it should also be the loop master for the Pro Tools system. Set this to internal.
• Video Ref Format – This must be set to NTSC, as we’re dealing with North American SMPTE timecode.
• External Timecode Offsets – This can be left blank. The “SYNC” field may be adjusted to add a timecode offset if the SYNC HD is to be offset from the incoming timecode. Note that this allows you to either offset the system from the incoming timecode here, or you can use the Session Start value discussed in the previous section to offset the insertion bar from the SYNC HD. The external timecode offset setting is preferred.
Session Setup: Timecode Settings. This area lets you configure how the session behaves when timecode appears or disappears, including:
• Freewheel – This configures the session to perform sync lock, freewheel with a specified number of frames, or jam sync to the internal timecode.
• Audio Pull Up/Down – This can be left as is. These values become important when dealing with some other video formats or HD TV Genlock.
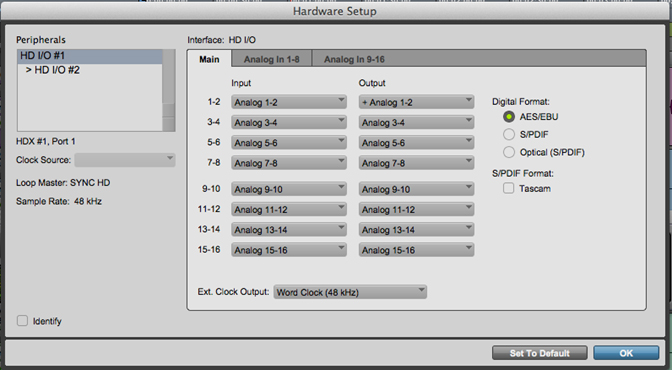
Hardware Configuration: Associated Hardware Setup. The next configuration item to check is the hardware setup of the Pro Tools HD I/O units. This is to confirm the clocking is in alignment with those settings just set for the SYNC HD. Figure 5 and Figure 6 show how to access the hardware dialog. Go to Setup->Hardware to access this menu. The main item to check is that the Clock Source is blank, and the Loop Master is labeled “SYNC HD.”
Making The Connections
As discussed previously, when recording with timecode, it’s important to ensure the level of the timecode sent to tape is strong enough to be read, but not so strong to cause burn and transfer to adjacent tracks. A level of 10 dB below operating is sufficient. (This was done in the configuration section.)
Another recommendation is to use a guard track to ensure that if timecode bleed to adjacent tracks DOES occur, it doesn’t contaminate important audio. For this reason, channel 24 on a 24-track tape machine will be used to record the timecode. As well, channel 23 will be deemed the “guard track” and no audio will be transferred to it.
To facilitate this, perform the following patch connections:
SYNC HD LTC Output -> Tape track 24 – and then – Tape track 24 Output -> Console Line In channel. All other audio connections to feed the tape and to monitor from tape are made as normal.
“Striping” The Tape
The process of applying the timecode to the tape is called “striping.” The preferred methodology is to stripe tape prior to any recording onto the tape.
Working on DAWs like Pro Tools is called a non-linear process; one can jump to whatever point in time to record, edit, etc. Sequential time is not a factor at determining how the process proceeds.
Tape, however, is a linear process. Everything has to be done in sequential order to achieve desired results. From this perspective, when striping tape, you must stripe tape:
a) before recording any material, and b) the tape striping must be as long as or longer than the length of the anticipated recording.
This act can be time consuming. In fact, one of an audio assistant’s critical tasks before any session was to stripe the tape and have it prepared well before the session started:
- Load the tape into the tape machine as per normal.
- Wind to the start of the tape and ensure to set this mark as 00:00.
- In the Pro Tools session, make sure you have set your session starting time. The SYNC HD uses this starting time as the seed point to start from. It’s normal in broadcast to see the start time as 01:00:00;00, as this allows pre-show headers, test tones and color bars to be applied prior to the show start. In audio, usage of 00:00:00;00 is fine.
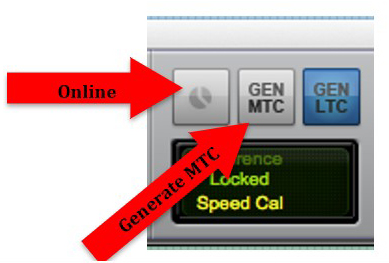
- Open the transport and ensure the extended transport is exposed. This is done by clicking the dropdown on the floating transport bar and selecting “Synchronization” as seen in Figure 7. The section shown in Figure 8 is exposed. This section contains the Online, GEN MTC, and GEN LTC buttons.
- Ensure the GEN LTC button is selected.
- Arm track 24 and start the tape recording.
- Wait 5 to 10 seconds to allow for tape pre-roll.
- Start the Pro Tools playback. Even though there is no audio recording, you are now sending timecode to tape.
- Gently turn up the monitor track to ensure you hear the timecode sound. Keep this going for the length of time it takes to either stripe the entire tape, or for the estimated length of the recording.
- Once the required amount of time has passed, stop the Pro Tools transport.
- Stop the tape recording.
- Disable the GEN LTC button in Pro Tools.
- At this point, the tape can be rewound back to 00:00. Record as needed, ensuring that all recording starts after the 5 or 10 second pre-roll point set previously.

Transferring From Tape To Pro Tools
After all recording is complete, the next task is to transfer the recorded tape tracks to Pro Tools:
- Wind the tape back to 00:00.
- Perform the following patch: Tape Channel 24 Output -> LTC Input
- Patch the required tape outputs into the Pro Tools inputs.
- Arm the required Pro Tools inputs.
- Turn on the “Online” button on the Pro Tools expanded transport. Pro Tools will be in a standby mode as it waits for the timecode to come in.
- Place Pro Tools in record ready mode.
- Start the tape. Once the timecode starts, you will see the Pro Tools transport jump to the starting time and recording will start.
Performing Subsequent Tracking
Now that the timecode has been used to record the initial tracks, it can be particularly useful in adding tracks to the recording using tape.
Traditionally, when using tape with digital platforms, the problem has been trying to resynchronize the new tracks with those already existing. That problem is eradicated now that timecode has been used to this point. The key is to send a few guide tracks BACK to tape as well as the timecode prior to recording the new tracks:
- Perform steps 1 – 5 from section “Striping” the Tape.
- Patch LTC Output -> Tape Channel 24 Input.
- Patch any other required tracks (guide tracks) from Pro Tools to Tape.
- Arm track 24 as well as any tracks that will receive the guide tracks (i.e., click, scratch guitar).
- Start the tape, allow for the pre-roll, and record the tracks from Pro Tools to tape.
- When the recording ends, stop and disable all armed tracks.
- Track your artist to tape as needed.
- When transferring the new tracks back to Pro Tools, follow the steps in “Transferring from Tape to Pro Tools.”
Conclusion
Using timecode is a very effective manner of synchronizing the location of audio for multiple digital devices. By using these functions created in the early days of color television, opportunities for synchronizing previously disparate devices are opened up. Timecode isn’t just for video anymore!
References
1. Wikipedia entry on timecode: http://en.wikipedia.org/wiki/Timecode
2. Wikipedia entry on SMPTE Timecode: http://en.wikipedia.org/wiki/SMPTE_timecode
3. Introduction to the basic principles of SMPTE-EBU Timecode: http://www.alpermann-velte.com/proj_e/tc_intro/tcintro.html
4. Philip Rees Modern Music Technology: Synchronization & Timecode: http://www.philrees.co.uk/articles/timecode.htm