

Are custom molded in-ears that easy to make? How do they sound?
I’d seen the how-to videos so I decided to give it a try. The results were surprising.
I use a set of Logitech Ultimate Ears UE600 IEMs on the road, good for what I need without being so pricey I worry about I losing them.
They sound pretty good and flat, with maybe a touch too much high-end. I busted a 10-spot out of my wallet and went shopping for the following items:
—Rubbing alcohol
—Q-Tips
—A Radians Custom Earplug Mold Kit (eBay) – available in blue, red, orange, and tan.
—Two mirrors to see the side of my head. You could stream video from a camera if you wanted to be fancy.
—Drill bit (1/8 inch)
—Non-latex gloves
CAUTION: Follow the directions included with the kit to a T! Otherwise you risk damaging your ear drums! Also, for goodness sake, don’t just jam stuff into your ears or yank it out either unless you want to be using a hearing aid for the remainder of your career!
The Radians kit comes in a plastic bag containing two containers of the goo, along with a storage bag for the molds, and the directions. Before doing anything else read the directions. (Image 1)

Notice the giant orange warning label? Let’s read it together:

Take the existing in-ears and remove the ear buds. In my case they’re silicone sleeves that pull off. (Images 2 and 3)


First things first. If you’ve gotten to the age where hair has decided that growing in areas that God didn’t intend it to grow would be hilarious, then invest in an ear hair trimmer and go to town with it unless you want your in-ear molds to look like Chewbacca.
Next, take a Q-Tip and dunk it in alcohol. Use it to clean your entire inside ear. DO NOT jab the the Q-Tip into your inner ear! Clean the area thoroughly.
Depending on your level of ear hygiene this might need to be done a couple of times. It will burn so be warned. If it takes more than a couple of times to get to a clean Q-Tip then in-ears may not be for you!
Open up each of the two containers one at a time. Put non-latex gloves on if preferred. If not, it’s only silicone. Divide the goo in the containers in two (one for each ear).
Take one of each color of goo and knead them together. Keep kneading for about 30-40 seconds until it’s all one color and make a nice round ball. (Image 4)

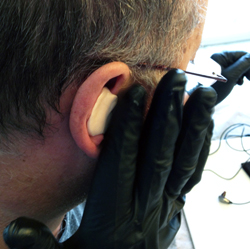
Place the ball of goo into the ear. Gently massage it into the ear until it fills the ear as shown in the picture. Don’t push it too far into the ear canal but enough to help it stay in place. Smooth it over. (Image 5)

Take the in-ear monitor (this is where it helps to have the mirror, assistant, phone/iPad combo, etc.) and gently press it into the goo where you’d normally have your in-ear monitor in your ear. Don’t push it in too far. Only get it in far enough that the sound canal is embedded in the silicone, not pushed through. Do the other ear the same way. (Image 6)

Sit for about 10-20 minutes while the silicone cures. During this time, try not to move around too much and do not talk.
If you’re a singer then keep your mouth slightly open and just find something to wipe the drool from chin – otherwise you’ll look like a St. Bernard that’s just come in from a long hike!
These 10 minutes will seem like an eternity since as the silicone cures it sounds like a Rice Krispies convention is going on in your ears!
After 10-20 minutes (I left mine in for 20 minutes just to be sure), s-l-o-w-l-y pull the top part of one ear away from the mold until it releases from the ear.
Do the same at the bottom of the ear. Then s-l-o-w-l-y grab an edge of the mold and pull it out. Do the same for the other ear.
If done right, you’ll not have sucked out your eardrums (remember, s-l-o-w-l-y) and you’ll have something that looks similar to these. (Image 7)

Don’t handle them. Leave them sit to cure for at least another couple of hours or longer. Trust me, rushing at this stage leaves fingerprints all over them – don’t ask me how I know this.
Now that the molds have cured, pop out the in-ears from the molds. This leaves an impression and a hole. Take the small drill bit and turn it by hand to go into the hole. Then drill through to the other side. You may have to tweak the hole somewhat to get it to be big enough for all the sound to come through.
Leave the new in-ear molds to sit overnight to fully cure. The next day, pop the in-ears back into the molds. Carefully, with some finagling, the molds will fit into your ears. Pulling up on the ear might be required for proper seating. In my case, I had to push a few times to get it to seal. Might have to do with the fact I was talking to my kid while the mold was curing in my ears! (Image 8)

How do they sound? Pretty good. They definitely seal better than my silicone buds and that makes the sound a lot clearer. For 10 bucks, it’s a worthwhile upgrade.
Radians Custom Earplug Mold Kit
Brian Gowing has helped numerous churches meet their technology requirements. He works towards shepherding churches, analyzing their technical requirements, sourcing the equipment, installing the equipment, and training the volunteer personnel. Brian’s now teaming up with Chris Huff at Behind The Mixer.


