Some worship music mixes are a real breeze – there’s no feedback, the instruments and vocals are well balanced, and the levels are comfortable for the congregation from front to back.
But other times, it can be an audio nightmare – the loudspeakers are belching pure feedback, the folks up front are sustaining permanent ear damage while those in back only hear only mud, the minister and/or music director are not pleased, and you’re in the hot seat.
These strikingly different scenarios can occur in the same church with exactly the same audio gear. What’s the difference? In the first instance, there is adherence to the basic best principles of loudspeaker placement, while in the second, there is not. The bottom line: violate those elementary rules and no sound system will perform optimally.
Most churches were never designed for the acoustic onslaught of modern Contemporary Christian music with big drums, big stage amps, and big stage monitor levels. Start with some hard walls, a linoleum or concrete floor, and a reflective ceiling, add a teen worship band blasting away in the corner, and it’s a recipe for audio mayhem.
Church leadership typically doesn’t like to spend a lot of time or money on acoustic enhancements, particularly in a 100-year-old church. They might approve of an 18-inch-high riser for the praise team with a few dedicated 20-amp AC circuits, but beyond that, we’re often on our own.

The more we understand about how sound reinforcement systems work, the better our audio quality will be. And the main point is that all of the advanced signal processors, compressors, and limiters in the world won’t help if loudspeaker placement errors lead to a system with inherent sonic errors. Here are a few simple loudspeaker (and microphone) placement rules that can transform a potentially horrible experience into an uplifting worship service.
Got Altitude?
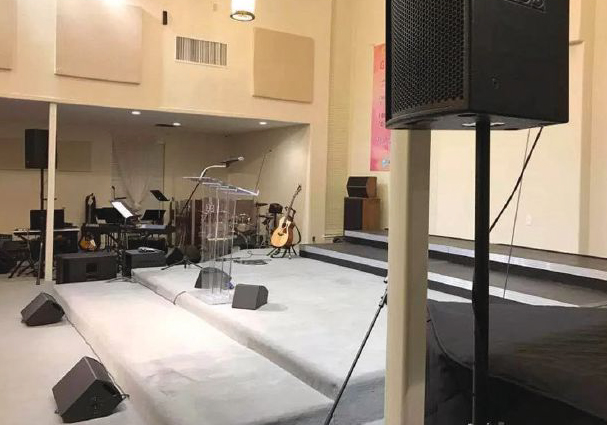
I can’t count the number of times I’ve seen smaller PA loudspeakers placed on the stage/platform floor, effectively putting their horns at waist level for much of the congregation. While bass frequencies behave a lot like water, flowing around most obstacles, the midrange and high frequencies emanating from these horns act more like light beams – objects in their path interrupt and absorb them.
When loudspeakers are placed down low, the people sitting in the front rows not only get an earful of mid/high frequencies but they also absorb and disperse them. Meanwhile, listeners in the back hear lows without the midrange presence and high-frequency sizzle that make vocals stand out.
What to do? Elevate! When possible, the cleanest way to do this is to suspend the loudspeakers, with the caveat that proper and legal safety practices must be followed at all times. In a lot of cases, though, all that’s needed are loudspeaker stands. Many loudspeaker cabinets include an integral stand socket to facilitate stand mounting, thereby raising those all-important horns above the crowd.
I like to place loudspeakers as high as reasonably possible, with the horns at least 7 to 8 feet above floor level. This has two desirable effects: it leaves high-frequency sounds unblocked, and it beams less sound directly at the congregation up front. So there’s less volume in the front of the room where it’s not needed, and more in the back of the room where it makes a critical difference.
However, keep in mind that only full-range loudspeakers belong up in the air. For example, a unit (or units) with a 15-inch woofer and a compression driver/horn should be elevated. But any separate subwoofers should remain at floor level, where they actually operate more efficiently (and get louder). Put subs in the air and there’s a loss of half of their output, and many times we need all of the bass we can get.
Caution: when elevating loudspeakers, always proper loudspeaker stands and mounting hardware. Be smart – don’t put heavy enclosures on folding chairs, light furniture or “rickety” structures.
Also be sure to properly splay the legs of stands, and never exceed load limits. Use sandbags or old gym weights on the legs so that wind (at outdoor events) or jostling from those passing by won’t tip the stands over. Tape down cables and route foot traffic away from stands to avoid injuries. You can never play it too safe.
The Right Direction
As with microphones, sound reinforcement loudspeakers have a directional pattern and tend to beam mid- and high-frequency sounds in specific directions at varying angles. These angles/patterns can be grouped into two general categories: longer and shorter throw.
Longer throw loudspeakers, which have horizontal projection patterns as narrow as 20 degrees, are usually deployed in concert sound systems targeting crowds hundreds of feet away. By comparison, most loudspeakers in church/worship applications are shorter throw, with dispersion patterns of (for example) 60 degrees horizontal (or wider) by 40 degrees vertical. This means that most of the mid and high frequencies project outward in a sphere approximately 60 degrees wide by 40 degrees high. If the audience strays outside this range, they’ll mostly hear booming bass sounds and miss much of the vocals.
As a very general rule, if you can’t see the throat of the horn, you can’t hear it. Try to aim loudspeakers toward the most important part of the room. And if, for example, there’s a group of listeners seated directly beside the platform/stage, additional loudspeakers may be needed to cover them (Figure 1). These loudspeakers don’t require a lot of bass response, but they should have a wide dispersion pattern if possible.

An increasingly popular option is column arrays, which are thin and portable columns that can deliver very wide horizontal coverage, more than 120 degrees in some cases. This, combined with narrow vertical coverage (30 degrees and less), helps focus output on the audience while keeping it from reflecting off of the floor and ceiling. For this reason, I regularly carry a set of RCF EVOX 8 columns in my production truck because they’re ideal for covering people directly to the sides of a stage.
Don’t Feed The Beast
Feedback is not just hard on our ears – it’s also hard on gear, capable of destroying components such as loudspeakers and amplifiers in just a few seconds. As a result, we need to do everything possible to avoid it, and fortunately, there are some basic rules of thumb that, if followed, go a long way in helping to avoid the problem.
Loudspeakers should be placed to the front of performers to eliminate the “loudspeaker to microphone path,” which is a primary cause of feedback. (The output of the loudspeakers is captured by the microphones, which sends it through the system and amplifies it, over and over, and thus the system is “feeding back” via what’s called a “feedback loop,” Figure 2).
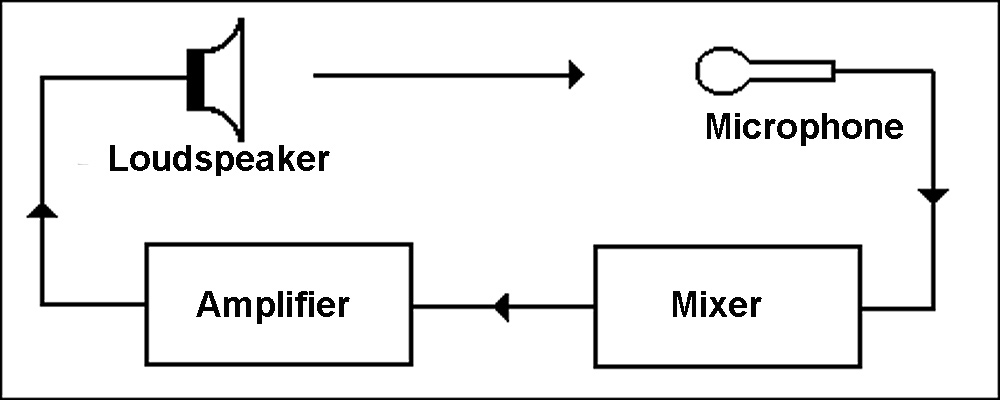
Further, all mics on a stage/platform should have a directional pickup pattern, typically called unidirectional or cardioid, so that they pick up sounds in front of the mic while rejecting sounds at the sides and rear.
A mic’s pickup pattern acts like a flashlight beam: any sound present where the pattern points is likely going to be picked up by the mic and amplified. Some mics have a wider cardioid pattern (think of floodlights, which have a wider pattern) while others have a more strict super or hypercardioid pattern (like penlights). Simply, narrower patterns tend to curb feedback because they pick up more direct sound (from the front) while rejecting indirect sound (from the sides and rear).

To further combat feedback, also try to place loudspeakers as far downstage as possible, with the mics pointed in the opposite direction. This puts more distance between the two in addition to aligning the cancellation portion of the mic patterns with the back of the loudspeaker patterns, where there are the fewest mid and high frequencies (Figure 3).
But Wait…
There’s an exception to the previous discussion: while it is indeed usually best to keep loudspeakers and mics out of each other’s paths, there is a cool (and effective) placement technique with columns like the aforementioned EVOX 8 cabinets. Because they don’t generate single point source that in turn creates a beam spot, they’re much less susceptible to feedback even if placed behind the performers (and therefore behind the mics).

I do this regularly with low to moderate volume musicians who are capable of adjusting their own instrument volume while listening to the house mix (Figure 4).
Note the lack of stage monitors, because the columns take care of monitoring. Of course this only works well if musicians can be trusted with their own mixes, so it may not be feasible in your situation. But still, I encourage trying it because it can help a praise team sound spectacular, particularly in smaller rooms/outdoor spaces.
Don’t Forget Monitors
Stage monitors (a.k.a., wedges) are also loudspeakers, so their placement can’t be ignored in relation to microphones or the result could be feedback. Because wedges should be aimed at the ears of performers, the most effective placement is directly in front of mic stands, pointing up.
Many modern wedges now provide two different cabinet angles: nearly straight up for location directly in front of a mic and a shallower angle that provides more coverage toward the back of the stage.
Whatever the case, point wedge horns right at the ears of the target performers while making sure this output is behind mic pickup patterns; this cancels out the sound of the wedges as much as possible.
Purists will note that hypercardioid mics like the first edition Shure Beta 58A offer a very narrow front pickup pattern, but keep in mind that this is achieved by sacrificing some of the rear rejection pattern.

Hypercardioid patterns are designed to work well with either a pair of floor wedges split 15 degrees off the center-rear of the mic or with a single floor wedge slightly offset from the rear of the mic. Pointing the back of a hypercardioid mic directly at a wedge makes feedback more likely than if it’s offset by 30 degrees or so (Figure 5).
Dead Sources Tell No Tales
Switch off extra sound sources when they’re not needed. Leaving an acoustic guitar “hot” while setting it on a stand next to a wedge can lead to a feedback disaster. The whole body of the instrument will tend to vibrate passively like a drum-head, channeling stage noise into the pickup, which then translate to howling feedback. Even if it doesn’t feed back, the extra sound from the pickup mixed into the house system can cause echo and phase-related problems.
Savvy acoustic guitar players use a “kill” switch on each guitar line, muting the instrument whenever it’s out of their hands. Also, always turn down main and monitor outputs on the console/mixer before powering up a system to avoid jarring (and unprofessional) feedback from an unexpected open mic.
Still, we simply can’t control everything at worship services – musicians who refuse to turn down, unforgiving rooms with hard surfaces and massive slap-back echo, old malfunctioning equipment, and so on. It’s a jungle out there!
But by applying the basic loudspeaker and microphone placement techniques discussed here, the result will be maximized system output, improved coverage, and reduced feedback, all of which add up to a cleaner mix. Other upsides include fewer complaints, more compliments, and a better overall worship experience for everyone – and that’s the bottom line.


