
Peaks & Valleys
Studying the interaction of sine tones is great for getting into the pure science of it, but very little actual music is produced from sine waves alone.
Most musical instruments produce a complex combination of many different waves at different frequencies interacting across the spectrum and within the envelope to produce a unique and complex timbre.
So when we use multiple microphones on more complex timbres, we get a complicated combination of constructive and destructive interference at different frequencies. This is known as comb filtering (Figure 7).
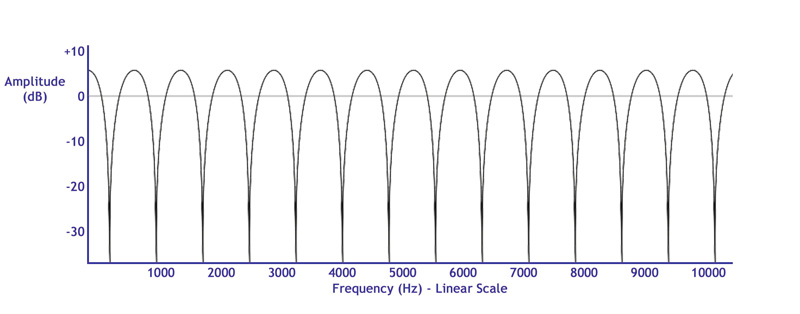
A comb filter is the result of combining a broadband (i.e., a wide range of frequencies) signal with a delayed version of itself. This produces a frequency response of regularly spaced spikes which, when plotted on a graph, resemble the teeth of a comb.
The width and depth of the spikes differ depending on the content of the audio signals and their phase relationship (Figure 8).
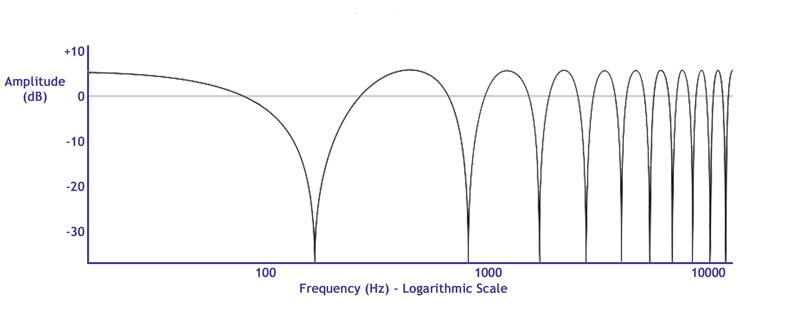
If we plot the same filter on a logarithmic scale (which better represents how we perceive sound) the most profound notch is a huge dip in the lower frequencies, which explains why one of the most noticeable consequences of comb filtering is a loss of the bottom end. It generally results in a hollow or thin sound that some people quite accurately describe as “phasey.” So how can we avoid phase issues and comb filtering?
There is a rule of thumb employed by many sound engineers called the 3:1 rule. It states that the distance between two microphones should be at least three times the distance of the closest microphone to its source. The idea being that tripling the distance of any additional microphones means the signal captured should be at least 9 dB lower than the signal on the first microphone (due to the inverse square law which tells us that sound generally loses 6 dB for each doubling of the distance). Therefore when the two signals are combined the level difference ensures any phase discrepancy is not noticeable as comb filtering.
My only issue with the 3:1 rule is that it assumes all microphone gains are equal; however, as soon as you start to increase the gain on the more distant microphones (in the interest of good gain structure), you run the risk of introducing noticeable phase issue, despite careful positioning.
It works well with choirs or orchestral ensembles and is invaluable in the controlled environment of the recording studio, but on the chaotic live stage the best solution is often just to get the main microphone as close as possible to the source. This invariably brings proximity effect into play (as most microphones used in live sound are directional) but a little high-pass filtering and channel EQ can easily deal with that.
Creative Vs Technical
There are a few instances where we choose to flout sensible microphone positioning in favor of creative methods that capture interesting sounds, so we need to be aware of potential phase and polarity issues.
The most common example of these is the classic snare top/bottom miking technique where one microphone is placed above the snare to capture the crack of the top skin and another is placed beneath to capture the rattle of the snares.
However, when these two similar signals are combined the result will most likely cause comb filtering and produce a thin sound. This is due to the fact that when the drum is hit and the skin oscillates up and down, it moves towards the top microphone at the same time it moves away from the bottom one. Therefore we have two signals of opposing polarity. This is something which is quite easily corrected by our old friend the polarity invert button (usually applied to the bottom microphone).
Another common dual miking technique is the kick drum in and out combination where a boundary microphone is placed inside the kick and a dynamic microphone is placed outside or in the hole of the front skin. In this instance we have an obvious difference in the arrival time at the two microphones, which is bound to cause phase issues. This might be fixed by flipping the polarity of one of the microphones, but in my experience this doesn’t always work and so I either move the microphones about or remove all of the bottom end from one of them (to prevent low frequency cancellation) and experiment with different levels to get the sound I want (exploiting the comb filtering in the process). This often results in me using one of the microphones for the low frequency thud and the other for the upper mid range click.
Recently it occurred to me that we now have digital consoles with the ability to delay individual input channels, so I did the math and realized that if the microphones are about 13.5 inches apart, a delay of 1 millisecond on the outside microphone will actually re-align the two microphones in time and obviate the need for attempting to correct the phase difference by flipping the polarity of one of them.
Dual miking the front of guitar amplifiers is another popular technique that can produce phase issues. A handy trick is to get someone to move one of the microphones around while you listen for the position where the amplitude of the combined signal drops the most then engage the polarity invert button on one microphone for a full and florid sound.
If the amp has an open back, I quite like putting one microphone in the back as it captures a fuller, less “toppy” sound that can be mixed in with the front microphone to produce a range of tones. Again these two microphones will capture signals of opposing polarity, as the loudspeaker cone moves towards one and away from the other, so the polarity invert switch should be used on the back microphone.
At the end of the day the sheer number of microphones we use on stage means we can’t completely eliminate polarity and phase issues, but a good knowledge of what polarity and phase are – coupled with intelligent placement – can help immensely in getting the sound you want. Like most aspects of live sound it’s all about using your ears and listening carefully.
Note: All calculations are based on the speed of sound at sea level at 65 degrees Fahrenheit being equal to 1,122 feet per second.