The Solutions
In the middle of the front wall of this new room I had a roughly 6-foot x 4-foot single-paned window.
Two problems with this: reflects sound within the room, leaks sound in and out.
A while ago I scored some free acoustic ceiling tiles from a store that was being gutted. When cut to size these are very effective at reducing sound transmission through the window. They are non-reflective so sound doesn’t bounce off and they also work well for blocking sun and therefore heat. The downside of these is that they’re fragile and crumble easily.
I cut six of them to size and stuck them in the window, two layers thick. I left room on one side to open the window for a fan. This is then covered with a curtain.
If you don’t want to go through all that, you should still cover all windows with thick curtains, which will not help much with isolation but will stop the reflection from the glass.
The RFZ
What tends to be a good, affordable plan of attack for most rooms, large or small is to create a “Reflection Free Zone” (RFZ) with a “Live End, Dead End” treatment concept, meaning the majority of acoustic treatment is positioned to the sides, ceiling and front wall of the room.
By installing the sound absorbing panels in this way, the flutter echo and early reflection problems are eliminated and the standing wave issues are greatly reduced, at least when in the mixing position. You only need to absorb on one wall to stop flutter echo. You can stagger the treatment on opposite walls if you’re short on materials.
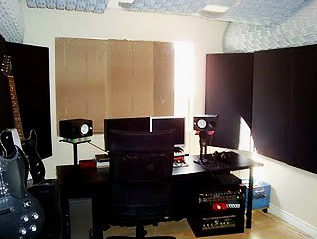
I have 64 square feet of 2-inch rigid fiberglass panels on the sidewalls and front corners and another 56 square feet of 1.5-inch foam on the ceiling. Likely this is more than most people will have available and it is probably slightly more than I need, but it makes such a huge improvement.
Rigid Fiberglass
Rigid fiberglass is the best bang-for-buck acoustic absorption material. It absorbs well down to the lower mids. A few years ago I built several 2-foot by 4-foot broadband panels with fabric covered wood frames that are mounted to walls easily by just hanging off a drywall screw.
In my new room I have two panels across the front wall corners, then three panels across each side wall covering the first 8 feet of the room. These are across the middle of the wall providing coverage for both sitting and standing listening. Mounting the corner traps is easy with a few hooks and a bungee cord.
You can increase the effectiveness of fiberglass absorbers by creating an air gap between the panels and wall of an inch or two. I have not tried this yet.
Foam
Foam is less effective than rigid fiberglass and is often not any cheaper and can be harder to work with. If you don’t have tools to build fiberglass broadband absorbers, then foam will still make a big improvement. I found a box on Craigslist for a good deal a year ago so I use it in the less critical spots in the room, where I need to kill early reflections or flutter only.
I have three panels hanging above the desk and mix position, this is called a cloud, and it helps focus the sound from the speakers. I have two more foam panels above the fiberglass sidewall panels squeezed into the corner between wall and ceiling. I’m not sure of the effectiveness of these in this position but it looks pretty cool at least.
Monitor Positioning
Monitor positioning can be tricky in a small room, especially if it is not symmetrical. When setting up a studio, have the short walls at your sides and speakers firing lengthwise. Don’t put the speakers directly in corners, as that will exaggerate the low frequencies coming from them.
Instead set them up with enough distance to walk beside and behind them if you can. Use the same measurements for each side. My speaker stands are exactly 27 inches from the closest sidewall, 21 inches from the front wall and 60 inches apart (measuring from the pole). I started mine a little narrower than that but it didn’t sound as good. 50 to 70 inches is where yours should be, not narrower than 4 feet.
Speakers should be “toed in” at a 30-degree angle towards you.
If you think of your pair of monitors and head as points of an equilateral triangle, then where your head is should be within 18 inches of that 3rd point.
The tweeters should be at ear level. Your speakers can be vertical or horizontal (I prefer horizontal) with the tweeters on the outside.
The Results
Having a dedicated space is great. At first I was worried that the small room wouldn’t sound as good but it turned out to actually sound better. I have better noise isolation, clearer sound from my monitors and still enough room to record acoustic and electric guitars and vocals here. Without all the acoustic treatment, this room would be a disaster.
With a more limited budget I could get by with two corner traps, four side panels and two foam cloud panels. The more absorption the better.
Acoustics Resources
Acoustics Crash Course 1 – Modes | Mark Wieczorek
Room Mode/Standing Wave Calculator | Mark Wieczorek
Acoustic Treatment and Design for Recording Studios and Listening Rooms | Ethan Winer
Haas Effect | Wikipedia
Jon Tidey is a Producer/Engineer who runs his own studio, EPIC Sounds, and enjoys writing about audio on his blog AudioGeekZine.com. To comment or ask questions about this article, go here.


