In the world of audio, one tends to wear many different hats from day to day. While you may be a Front of House guy, it’s not out of the realm of possibilities to be assisting with audio/video sound either in your free time or on a job.
Whether a seasoned soundman or a volunteer just getting your bearings, the following are some good hints on choosing the right mics for some common audio/video applications.
In most situations, there is no single “right way” to do it, but some ways may be better than others.
In some cases, you may decide to sacrifice some sound quality in order to gain some other, more important benefit, such as accommodating your subject’s refusal to wear a lavalier mic.
There are, however, some general ground rules that always apply:
1. Always place the microphone as close as is practical to the sound source. Every time the source-to-mic distance increases by a factor of two, the sound pressure level (SPL) reaching the mic decreases by a factor of four, making clear sound pickup progressively more difficult.
This is called the inverse-square rule, and it applies whether the distance increases from 6 inches to 12 inches or from 6 feet to 12 feet. This means that the talker-to-mic distance must be cut in half to cause a significant improvement in sound quality.
2. Use the lowest number of microphones necessary for the situation. People sometimes have a tendency to “over-mike” a shot, using three or four microphones when one or two would be sufficient.
Excess mics mean increased background noise pickup, greater chance of feedback or that “tin can” sound, and more levels for the operator to keep track of. If additional mics don’t make things sound better, then they will probably make things sound worse.
Situation #1 — The Standup Shot:
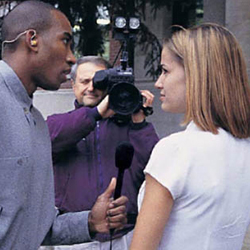
In this situation, a company officer or other speaker is either standing or sitting, speaking directly to the camera. If this takes place in a studio or quiet office, the best mic to use would be a lavalier, since the speaker’s hands would be free to gesture and we would eliminate the possibility of a handheld mic being positioned incorrectly or, worse yet, moved around.
The unobtrusiveness of a lavalier mic also tends to put the talker more at ease, resulting in a more natural look and sound. If the shot takes place outdoors or in a noisy factory, you will need a unidirectional mic to cut down the background noise.
You could:
1) Use a unidirectional lavalier mic
2) Have the speaker hold a handheld unidirectional mic (or put one on a stand in front of him)
3) Use a shotgun mic on a boom, positioned so that it does not appear in the video frame. This method also permits the talker to move around without getting tangled in a microphone cable.


