I was so tempted to give this piece a geeky marketing title or sub-header suggesting VR (virtual reality), AR (augmented reality), or AI (artificial intelligence). But the truth is, none of those modern terms are relevant. What is relevant: with a quality DSP engine and some good old-fashioned RPI (real person intelligence), we can create a complex microphone mixer that pushes way beyond the traditional boundaries of automixing.
Per Wikipedia: “An automixer, or automatic microphone mixer, is a live sound mixing device that automatically reduces the strength of a microphone’s audio signal when it is not being used. Automixers reduce extraneous noise picked up when several microphones operate simultaneously. Automixers are frequently employed in settings where it is expected that a live sound operator won’t be present, such as courtrooms and city council chambers.”
Wikipedia’s definition is limited in scope. It describes the earliest form of automixing algorithms called NOM – an acronym for number of open mics. A NOM automixer simply applies a noise gate to each input channel. Inputs that don’t receive a strong enough signal to cross a preset threshold – and open the gate – stay closed, or off.
A more elegant solution is gain-sharing automix topology. Per QSC’s Q-SYS “Help” page: “The Gain-Sharing Automatic Mic Mixer is primarily used for multiple live microphones operating in the same room together as a system, for example, in boardrooms, classrooms, churches, courtrooms, etc. The Gain-Sharing (GS) Automatic Mic Mixer controls the live microphones by turning up microphones when someone is talking, and turning down microphones that are not used. It is a voice-activated, real-time process without an operator. The Gain-Sharing Automatic Mic Mixer controls the additive effect of multiple microphones being on at the same time and adapts to changing background noise conditions. The gain of each microphone input is calculated as the ratio of its RMS level to the combined RMS levels of all inputs. This ensures unity system gain at all times.”
Traditionally automixers, be they NOM or GS topologies, are meant for voice reinforcement, excluding musical instruments. This article introduces automixing concepts that provide recall, management, and control of both voice and musical instruments, while documenting the idea of using a DSP engine to custom-build virtual digital mixing consoles, with or without a graphic user interface.
Needs Analysis
I hope most readers understand that automixers don’t actually “mix” input signals such as musical instruments and vocals. At best, they “manage” the overall output gain of the various microphone signals that are being controlled. Generally speaking, automixers are the wrong tool to use if you have to deliver a live, dynamic, musical production.
The digital signal processing (DSP) software described herein comes as close as currently possible to blending the features and convenience of an automixer, with the tools available from a physical, digital mixing console.
Houses of worship, corporate, government, institutional, and educational customers all have a need to consistently present good-quality audio. But all too often, these organizations haven’t the talent and/or budget to employ a staff audio person.
I’ve had many conversations that started with the customer struggling to figure out how to manage all their disparate audio needs, without trained sound operators to help. A janitor or unpaid volunteer is usually tapped to turn the sound system on and off, and maybe set up a few mics.
At best, they’re working with an old-school, analog, 8-16 channel automixer that employs either NOM or GS algorithms to help manage input levels and gain-before-feedback. Or worse, an old TOA-style mixer amp, using little blue dots to indicate the appropriate volume setting on each channel.
Back in the late 1990s, digital signal processors were coming to market at a fairly manageable price point. This is where this story really begins.
What Would You Do?
Last century, circa 1998, I was hired to provide audio and acoustic design work for a new Catholic Church sanctuary (Figure 1) in Garden Grove, CA. During our first planning meeting the priest and the lead choir director/cantor said they have seven choirs. They wanted a large mixing console so each choir could have a dedicated number of input channels to use. Say what? My mind was pinballing. After digesting their request for a minute, I told them the idea would never work well in the analog world, and digital consoles were still way too expensive for their budget.

They needed something in the neighborhood of 48 inputs to accommodate all their various “choirs.” As I quickly explained, it wouldn’t take more than a few weeks before all the dedicated fader strip settings would become a chaotic mess.
For those unfamiliar with the Catholic Church, a choir is defined as anything involving two or more musicians or singers. At this church they had choirs that ranged from a contemporary 10-musician and 20-voice group and a 45-voice traditional group with pipe organ all the way down to an acoustic guitar vocal duo. The masses were also held in three languages.
This project started during the early days of the Peavey MediaMatrix DSP, running on the Windows 98 OS. It occurred to me that I could build a virtual digital mixer (VDM) and give them a custom, graphic user interface (GUI) touch screen. It would allow them to see and control faders, mutes, meters and presets. They seemed to understand the challenges and agreed to my proposal.
Obviously, that’s when the real work began. The plan was for me to do all the programming necessary to create the GUI, then spend multiple nights working with each choir to build a baseline mix. The process included mic selection and placement training; floor box channel assignments; optimization of preamp, EQ, and dynamics settings; and aux bus assignments and routing.
At the end of each rehearsal/sound check the mixes were saved as a preset, with the name of the choir prominently displayed as a dedicated touch screen button on the Home page. Fader levels and aux sends for monitors could be manually adjusted as needed, but the presets always returned to the parameters of the baseline mix.
All system-level gain structure, routing, EQ, crossovers, dynamics, and master output levels were set during the initial system commissioning. These were locked down and unavailable on the GUI.
The appropriate pulpit, cantor, baptistery, ambo, and priest wireless channels were locked into each choir’s preset too, so few if any extra adjustments were needed. And there was a morning mass preset that the “priest du jour” could easily access.
A “Mute All” master mute button was prominent on the GUI Home screen. During training the various users were instructed to press the Mute All button before and after each service so that mics could be safely connected or disconnected. All the “why” questions were answered too.
This approach is obviously time-consuming but ended up working so well that over the years I proposed and sold virtual digital mixing systems to several house of worship, corporate and educational facilities. A DSP engine was always going to be specified into these audio systems anyway, so the hardware cost was already factored. And yes, the time it took to program, rehearse, and store all the necessary presets comes at a premium cost, but if we’re in the business of selling effective, long-term solutions, it becomes a justifiable expense.
What follows are several of the GUIs and schematics I developed over the years. Examples include systems for St. Michael’s Catholic Church, Temple Solel Synagogue, Nutrilite Products corporate theater, St. Augustine High School Gymnasium, and San Rafael Catholic Church.
St. Michael’s Catholic Church
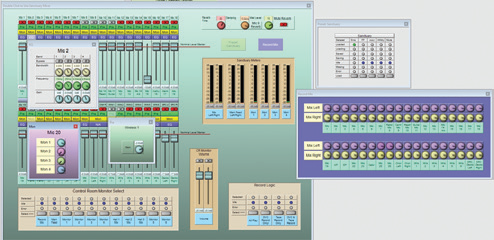
The St. Michael’s project presented an ideal opportunity for a VDM (Figure 2). This was a large, multi-purpose room with a recessed stage on one side of the building. The fully enclosed sound room is recessed into the opposite wall, with no operable window.

Because they use the room for a wide variety of events and activities, several preset scenarios were provided. And, per plan, an experienced sound op can do more sophisticated, real-time mixing.
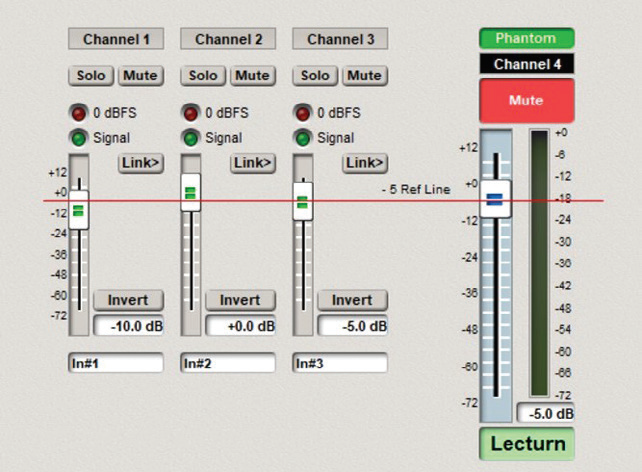
Notice the pan control on each channel strip. The loudspeaker system was a quasi-left-center-right configuration. The main mix is stereo, but for very small events, a single center channel loudspeaker is installed above the stage.
Each channel could be “soloed” on the booth monitors without interrupting the house mix. Parametric EQ and monitor and recording aux sends are included for each channel. Signal and clip lights are provided too.
Also available is a fader-level dB readout for each input and a nominal -5 dB reference line for the input faders. This reference line corresponds with the gain structure set for each input. Meters and mutes are provided where appropriate. This customer opted to use a keyboard and mouse to interface with the GUI.
Temple Solel Synagogue
The Temple Solel project presented many reasons and opportunities to specify a VDM. This was a multi-room venue with air-wall dividers between the main sanctuary and three additional halls. Note: room combining presets are factored into the design too (Figures 3, 4, 5 and 6).
Temple Solel had a small group of sound volunteers that had enough knowledge and experience to recall the various presets, as well as make real-time adjustments to the pre-amp trims, fader levels, channel EQ, and monitor and recording mix buses.
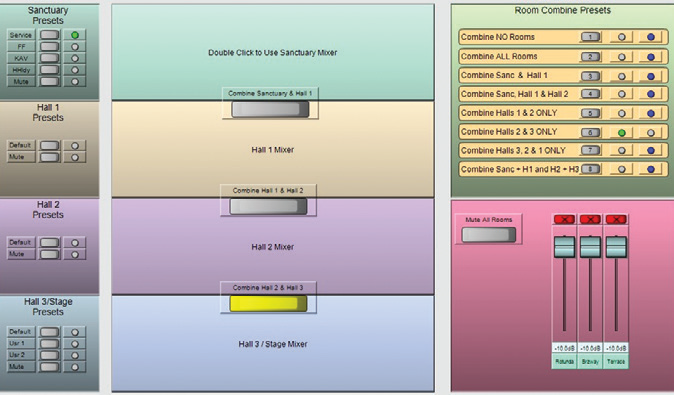

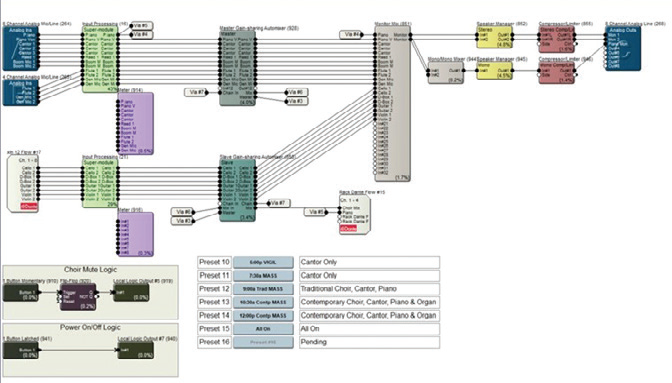
Only a small 10-input GS automixer was needed for the key rabbi, cantor, reader, and bema mics. These mics are always left on and were in use during almost all services. All channels have high-pass filter, parametric EQ, aux sends, and dynamics stored in the various presets. None of the operator’s real-time adjustments could be saved.
A fully enclosed sound room – with no operable window – is located on the second floor, overlooking the house-left side of the sanctuary. This customer opted to use a keyboard and mouse GUI interface.
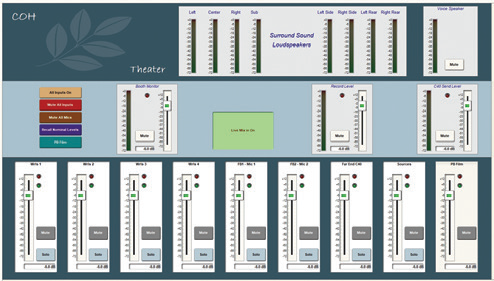
Nutrulite Products Theater
This corporate theater is unique because it serves as a multi-purpose video conference, lecture, and training room, as well as a full-scale cinema with 5.1 surround sound. The enclosed sound booth also serves dual purpose, as it sits directly between a second, large multi-purpose auditorium. One sound booth serves both rooms, and each room has a large, non-operable control room window.
The booth was designed for simultaneous operation if needed. Loudspeaker and headphone monitoring buses are provided for each system so that two sound ops could work together without distraction. And for operational simplicity, fader 9 on the far right is a sub-group master fader that controls all six channels of the 5.1 surround source material (Figures 7 and 8).
A second, very similar GUI provides all the controls for the auditorium. This customer opted to use a keyboard and mouse GUI interface.
What’s Under The Hood?
The VDM examples shown throughout have many things in common that aren’t obvious when looking at the main GUI screen. In addition to all the necessary output routing and loudspeaker processing, each input has been carefully “dialed in” to capture and save its appropriate settings for the following:
A. Gain structure
B. Multi-band parametric EQ
C. Compression
D. Where appropriate, gain-shared automixing with priority and side-chain-filtering
E. Aux sends for recording and fold-back monitoring
Other features common to most systems:
A. A nominal -5 dB fader reference based on mic selection and optimal preamp trim
B. Real-time fader level readout on each input channel
C. A functional label for each channel
D. Signal and clip meters for each input
E. Output meters for main mix, recording buses, and monitors
F. Input “solo” into booth monitor(s), without interrupting program or recording mixes
G. Control room monitor volume control, mute, and meter
H.While these DSP engines are always powered on, some systems have other equipment that is powered on and off through a sequential power distro. A status light is incorporated (see Figures 2, 10 and 11) to indicate that everything is powered up
Depending on the customer’s needs, the discrete input channel EQ buttons open a fully functional parametric EQ. (See Figure 5, mic 2) For some systems, each channel has two, multi-band parametric EQs. The first in the signal path is optimized during the rehearsal/sound check process and saved in the various presets. The second EQ is provided to customers who occasionally have a trained operator. It gives that operator a little more flexibility to make necessary adjustments, without losing the baseline EQ that’s been established. Recalling a preset zeros-out the volatile user EQ.
Again, depending on the needs of the customer, the discrete input channel Mon buttons open a 2- to 8-channel (pre- or post-fader) bank of aux sends. These are used to route input signals to various floor and/or booth monitors, as well as a recording bus. All these baseline settings are captured during sound check and saved into the various presets.
Generally speaking, the only time anyone needs to open the EQ or Mon windows is to make minor adjustments. But an obvious question remains: “what do we do when something significant changes with our setup or needs?”
After a first, free, three-month review of the programming and settings, a programming service call may need to be scheduled. If the owner has a list of specific changes to be made, those can be done off-line and loaded into the on-site hardware when time allows. If the changes require a rehearsal or sound check, that becomes a billable event. If the customer has a service contract with the integrator that installed the system, the contract needs to have specific language to cover the cost and scope of such programming changes.
Selecting The Right DSP Engine E
Should you decide that building a VDM is something you want to try (or hire out), here’s a short checklist of things to consider when selecting a DSP engine:
A. Sampling rate – 48 kHz is plenty
B. Processor speed – Something in the neighborhood of 300 MHz or greater
C. Raw processing capacity – 300 MIPS and 1.2 GFLOPS or greater
D. Architecture – Open as opposed to fixed
E. Audio I/O formats – Analog, AES, Dante, USB, and/or other digital formats as required
F. Non-audio I/O options – DC Control logic, RS-232, RS-485, and Ethernet as needed
G. Fully customizable controls and meters (Figure 9), which allow for optimized layout, visibility, usability, color choices, font types and sizes, and user engagement
H. Graphic options – It’s important that the GUI graphics are scalable to most modern video display resolutions and aspect ratios. Also, for full-featured, desktop VDMs, you’ll want to use a monitor that is no less than 17 inches, and 24 to 27 inches seems to be ideal for most applications
I. Mouse and keyboard versus touch screen – this is purely a customer/application-driven choice. Both will work. Some use a touch screen with a mouse and keyboard
I often specify and use Symetrix processors because I’m familiar and comfortable with the hardware and software. Designing a nice DVM is not easy. When given the option, I’d rather use my time working on the initial design than learning how to manage and manipulate a new software platform.
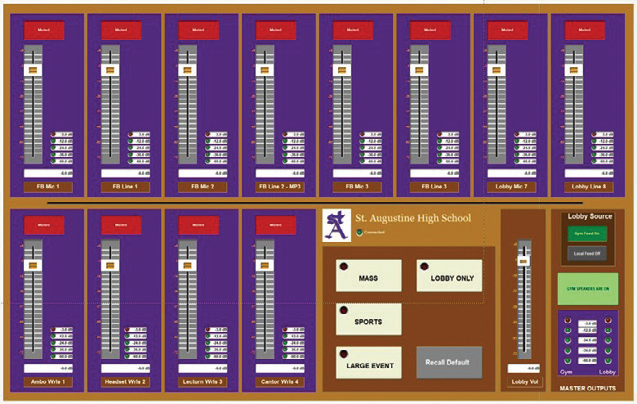
St. Augustine High School
St. Augustine High School had a somewhat unique set of requirements. The room is a very well-appointed gymnasium that rivals college-level facilities. It’s used as a multi-purpose venue, with morning mass for the students, basketball and volleyball games, graduation ceremonies, community events, fund-raising events, etc.
One specific design requirement called for a system that allows for staging and operational control to be positioned along the front of any of the four major interior walls. They also needed a way to control several inputs from a wireless tablet computer. Dante and WiFi to the rescue!
The staging and operational flexibility was accomplished using Dante snakes between a Yamaha TF3 mix console, the Symetrix DSP, and a Tio1608-D stage box. The wireless tablet has the Symetrix SymVue application installed, and connected via a dedicated, secured, WiFi channel (Figure 10). Most end-users preferred using a mouse and keyboard rather than a touch screen. The St. Callistus and St. Augustine projects were the only ones using some form of touch-based interface.
San Rafael Catholic Church
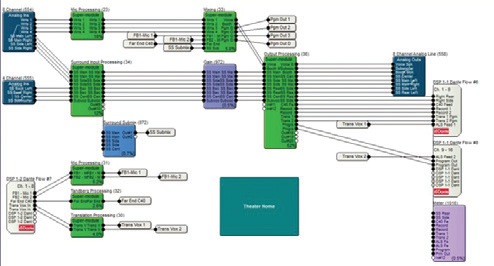
One last project worth mentioning: The San Rafael Catholic Church system did not have a GUI, but rather was programmed for hands-free operation of 20 inputs. All mic inputs run through the sophisticated GS automixer modules (Master and Slave). Two Symetrix Radius 12×8 DSPs and a xIn-12 were required (Figure 11). The preset recalls are managed through two Symetrix ARC wall panels, which are located in the choir section of the sanctuary seating and in the church vestry.
This system managed the mics and a couple of DIs for two priest wireless lavalier systems, the altar, ambo, choir, acoustic piano, acoustic guitars, electric bass, flutes, clarinet, violins, cantors, as well as aux sends for two floor monitor channels. No recording feeds were required.
The system is dialed in to a degree that all mics can be active and stable, without feedback issues. However, to maintain optimal control each preset muted all mics that are typically unused for a given service.
All the church usually does is select the appropriate preset based on their standard naming convention, which is typically the day and time of the services being offered. Example: “8 am Sunday.” I did give them a limited-range (+/- 3 dB) volume control on the priest’s wireless mics and the ambo mic, via the ARC panel located at the front of the choir area.
Final Thoughts
While the projects described here only show samples of what can be done with Symetrix and MediaMatrix processors and software, companies such as QSC, Lectrosonics, Biamp and others offer customizable GUI options that can be configured to perform similar functions.
Experienced designers can customize and deliver an audio system interface that includes as much or as little as needed. For sophisticated systems like those I’ve outlined, the things that make the difference between success and disappointment are a willingness to carefully select the right equipment; having the skills and time to build and fine-tune the appropriate mixes and presets; and providing high-quality training and support to the end user.
If your VDM designer is brilliant and has all the latest training certs available but has little or no experience mixing live sound – or access to someone who does – this approach will not work very well.
However, if VDM seems like something that would fit your needs, talk to your local systems integrator and find out if they’ve done this before. Ask to see examples and talk to the end users of those systems. You don’t want to start a project like this without having confidence that the end result will meet everyone’s needs and expectations.