
Mics For Recording/Broadcast
For recording and/or broadcasting a choir in a live setting, three types of mics have proven to work well: cardioid condenser, omni condenser, and stereo condenser types.
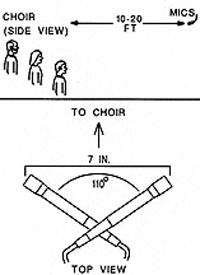
A stereo pair of cardioid condenser mics is shown in Figure 3. This array reduces pickup of audience noise and room acoustics, and tends to provide sharp imaging.
If mono compatibility is important, use two hypercardioid mics, angled 90 degrees apart, with their grilles almost touching and aligned vertically. This will prevent phase interference between the mics.
A spaced pair of omni condenser mics is a good choice if you want stereo images to be blended rather than pinpointed. Omni condensers have superior low-frequency response, so they also excel at reproducing a pipe organ.
A stereo condenser mic combines two mic capsules in a single housing, for convenience. One stereo mic generally costs more than two mics of comparable quality.
A special type of stereo mic is called “mid-side.” It has one mic capsule aiming straight ahead toward the middle of the choir, and another capsule aiming to the sides. In a mid-side stereo mic, you can adjust the stereo spread by remote control.
Placement for Recording/Broadcast
Mic placement for recording must be determined by ear as the choir rehearses. Experiment with a pair of mics, or a stereo mic, on a tall stand. Once you’ve found a good-sounding mic position, hang the mics there.
Start by placing the mics about 12 feet from the choir. Raise them a few feet above the heads of the back-row singers, and aim them down at the choir.
The setup shown previously in Figure 3 can provide excellent stereo. For convenience, you might want to mount both mics on a stereo bar or stereo mic adapter. This device mounts two microphones on a single stand.
A good starting position for two spaced mics is about 3 feet apart and 12 feet back. The wider the spacing between mics, the greater the stereo spread. But too-wide spacing results in an exaggerated left-right effect.
After setting up the mics, it’s time to fine-tune micing distance. The farther the mics are from the choir, the more room acoustics you’ll hear in the recording.
Listen to the mics’ signals, using either headphones or loudspeakers in a separate room. If the choir sounds too distant and muddy, move the mics about a foot closer and listen again. If the choir sounds too close, without much room sound, move the mics farther away.
Note: If the hall is acoustically “dead” (lacking reverberation), you might prefer to add artificial reverb.
Use a digital reverb unit patched into the effects loop of your mixing console. If the organ overpowers the choir, or if air handling is noisy, you’ll have to close-mike the choir and add digital reverb.
Simultaneous PA & Recording
Ideally, you’d use distant mics for recording and close mics for PA. But suppose you’re limited to just the PA mics.
Since PA mics are closer to the choir, their recorded sound will lack ambience unless you add some artificial reverb. You’ll want to send the reverb only to the recorder, not to the house loudspeakers.
Here’s one way to do it:
1. Connect buses 1 & 2 to the PA power amp inputs (or to the graphic EQ inputs). Connect buses 3 & 4 to the recorder line inputs.
2. Assign all mics to buses 1, 2, 3 and 4.
3. Connect the reverb returns to buses 3 & 4 (input).
4. Turn up the choir mics’ effects sends while monitoring the recorder output.
You also could record “dry” to multitrack, then add reverb during mixdown.
Try out these techniques, and feel free to experiment with your own techniques too. In time, you’ll enjoy a beautiful choir sound for both recording and PA applications.