Basic Programming
The first thing we did was to get a baseline layout in all the DSP.
Inputs and Outputs were labeled, patched routed and gained.
We set up our crossovers for the main speakers and dialed in system EQ. We set up the delays and got their EQ where we wanted it.
That formed the basis of our programming.
The next step was to build presets that turn inputs and outputs on and off.
Preset 1 is Mix, Delay Off, so we muted inputs 3-8, the delay output and turned off the delay amp. Preset 2 (Mix, Delay On) was created by un-muting the delay output and turning the amp on.
Preset 3 is EZ, Delays Off. To create this preset, inputs 1&2 are muted, meaning the output of the MG32 is completely ignored by the Jupiter.
We unmute inputs 3-8, which enable the two mics, video and the iPod cable. As with Preset 1, the delays are off. Preset 4 is like Preset 3, only with the delays on.
Once that was all set up, tested and found to be working, we hooked up the two controllers.
Controlling

The ARC2 is a menu driven controller. It’s extremely powerful and enables you to control quite a few parameters inside the Jupiter. I could have done everything I needed with this box, but figured the addition of an ARC-SWK would make the system easier to use.
In my setup, the ARC2 does one thing – enable users to switch between the four operating modes.

This is accomplished in the Jupiter software; simply add a controller, create a menu, and load the presets. You can edit the labels to make it easy to navigate.
Once it’s all assigned, you can simulate the controller to visually ensure it’s all working the way it’s supposed to.

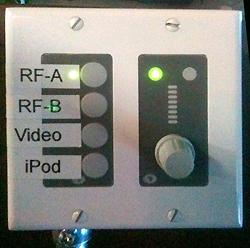
The next step is to add in the ARC-SWK controller. The SWK is a 4-button, single encoder remote with an A and B side. This means you can control up to 8 parameters very easily.
Here is how ours is set up:
—Button 1A: Wireless Mic 1
—Button 2A: Wireless Mic 2
—Button 3A: Stereo Audio for Video
—Button 4A: Stereo Audio for EZ iPod Cable

The software makes it easy to control inputs and outputs as mono or stereo channels. At the moment, I don’t have any need to control anything else, though I have the capability to control four more parameters if need be.
When controlling volume, you can specify minimum and maximum values – initial values are stored in the preset. It’s all very easy to do, and took less than 5 minutes to assign everything.

The ARC series of remotes connect daisy-chain style to the Jupiter over Cat5. You can also send audio through certain wall panels, either in or out, depending on the model.
Final Programming
What sold me on the Jupiter is the calendar feature. Once all the presets are built, you can create events (single or repeating) that will automatically switch modes.
So in our case, on Tuesday morning, the system goes into EZ, Delays On at 8:45 AM for the Women’s Bible Study. At 3:00 PM on Wednesday, it switches to Mix, Delay Off for Jr. High. On Thursday at 8:30, it switches back to EZ, Delay On for MOPS.

Eventually, I will add the Jupiter to the network so I can access it from anywhere and create custom events (like next Friday when the Boy Scouts use the room).
After all that, I dove into the logic outputs.
The Jupiter has 4 dual-mode logic outputs. Each logic output can deliver 5 VDC for connecting an LED indicator, or act as a simple contact closure (alternately, you can just use the +5VDC to close an externally powered relay).
The logic outputs are assigned to parameters anywhere in the system.
In our case, to make programming easy, I assigned the control to Output 7, which we weren’t using anyway.
When Out 7 is muted, the delay amp turns on (using a Furman Relay). When it’s unmuted, the amp turns off. The two mute states get saved into presets, and just like that, the amp turns on and off as if by magic.

The Cost
Doing something like this used to require a Crestron or AMX system, and programming could easily run into the thousands of dollars, not to mention the additional costs every time you wanted to make a change or the equipment cost. In this case, the whole system ran a little over $1,500, including controllers.
It took me about an hour to set up all the programming (and another few hours to tune the system).
It’s easy enough to use that any TD will be able to get the system doing whatever they want in no time. I was able to train our entire staff on the EZ Mode of operation in about 10 minutes, and the documentation takes just two pages (and half of each page is a large picture of each controller).
Best of all, I won’t have to take any more calls like this one…
Caller: Mike, the mics aren’t working.
Me: OK, so go to the fader labeled RF-A. Make sure the button above that fader is turned on and lit up.
Caller: [Long pause, obviously frustrated] I…I…don’t even know what a fader is.
Mike Sessler is the technical director at Coast Hills Community Church in Aliso Viejo, CA and serves as the Church Sound Editor for Live Sound International. He has been involved in live production for over 20 years and is the author of the blog, Church Tech Arts. Mike also hosts a weekly podcast called Church Tech Weekly on the TechArtsNetwork.