

There are lots of theories on channel layout.
Some mixing console operators prefer vocals first, followed by the band. Some use the opposite scenario, with the band first and then vocals.
And some don’t give much thought to the process, just plugging things in order as they come from the stage (Stage Pocket 1, 2, then 3, etc.) regardless of what instrument is represented on that line.
Over the years, I have advised my clients and friends to generally adopt the “Pyramid Mix” channel order.
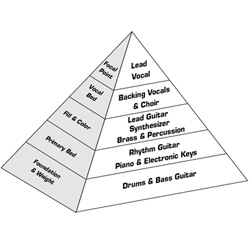
For those of you not familar with the Pyramid Mixing technique, a diagram can be found below which illustrates the concept.
So how do you build a pyramid? You start with the bottom layer and work your way up. I do modify it slightly, in the sense that I want to keep like instruments together (guitars, keys, drums, etc.).
Also, in most settings I’ve worked with in the last several years, guitars are dominant with keys being primarily ambience (organs, pads, etc.) – so the pyramid is slightly modified there.
It’s also helpful if you lay out the channel order with regard to your Groups. The typical large format board has 8 subgroups, so I take that into consideration as well.

Here is the general layout I recommend to most clients:
- 01 – Bass Gtr
02 – Kick Drum
03 – Snare Drum
04 – Tom 1
05 – Tom 2
06 – Tom 3
07 – Hi Hat
08 – Crash (OHL)
09 – Ride (OHR)
10 – Percussion 1
11 – Percussion 2
12 –
13 – EG 1
14 – EG2
15 – AG 1
16 – AG 2
17 –
18 – Piano L
19 – Piano R
20 – Synth L
21 – Synth R
22 – Track
23 – Click
24 –
25 – Lead Vox (or Worship Leader)
26 – BGV 1
27 – BGV 2
28 – BGV 3
29 – BGV 4
30 –
31 – Anouncement Mic
32 – Pastor Mic
Notice there are some blank channels in between the groupings.
This is for that last-minute request that always seems to come along like: “Bob is going to be using 2 amps today”, or “I fogot to tell you, we’ll need 3 acoustic channels this week”, or “We’re using the Djembe today so we need 3 percussion mics.”
Of course, this order can be scaled up or down depending your exact situation, but now let’s look at the group situation. Here’s a look at the typical 8-group layout:
- Group 1 – Bass/Kick
Group 2 – Drums (all drums/percussion except Kick)
Group 3 – Electric Gtrs
Group 4 – Acoustic Gtrs
Group 5 – Keys
Group 6 – Misc (could be brass, choir, lavs, whatever)
Group 7 – Lead Vox
Group 8 – BGVs
You may have to make some modifications if you are running true stereo. Group 1-2 may be Stereo Drums. Group 5-6 may be Stereo Keys, etc.
If you only have 4 groups, it might look something like this:
- Group 1 – Drums/Bass
Group 2 – Gtrs
Group 3 – Keys
Group 4 – Vocals
I realize this specific layout may not work for everyone, but it has proven to work in many situations I’ve been involved with over the last several years. Whatever layout you choose – it should make sense and should allow you to mix properly without having to go hunt for something.
Jeremy Carter is a veteran of the pro audio industry with extensive experience designing and operating church audio, video, and lighting systems. More information about Jeremy and his tutorial series Sound Sessions can be found on his website.