3) What’s a compressor for? How do I connect it to a mixer?
A compressor is used to reduce the dynamic range of whatever signal you pass through it. For example, a lead vocalist might suddenly sing a very loud note, blasting the listeners.
The compressor is an automatic volume control – it turns down loud notes so they don’t get too loud. If this isn’t a problem in your venue, you don’t need a compressor.
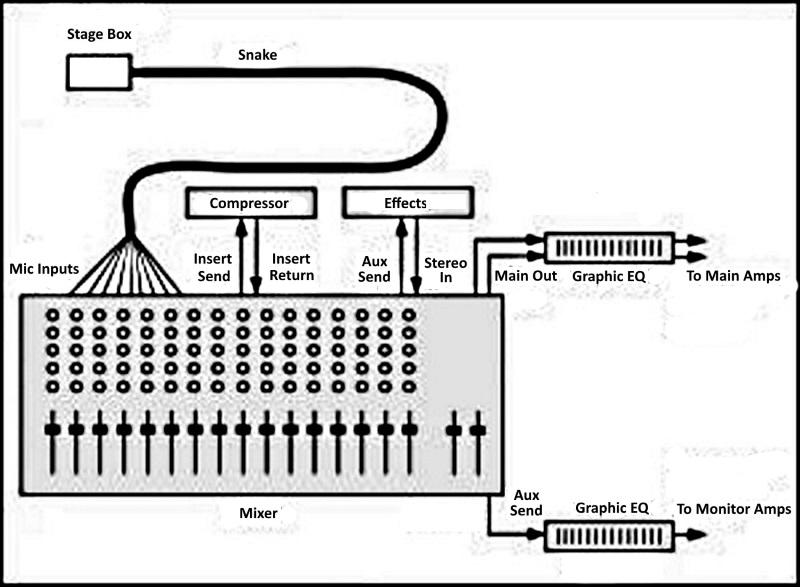
Insert a compressor in-line with one of the mic channels. Find the mic channel on the back of the mixer, and connect its insert send to the compressor input. Connect the compressor output to the insert return on the same mixer channel.
On most analog mixers there is only one insert jack per channel. The tip of the jack is normally send and the ring of the jack is normally return, so use an insert cable at the mixer going into two plugs (in and out) at the compressor.
4) Would I use grouping to combine several channels into one — say, for a monitor for just the vocalists?
The groups are for the house loudspeakers, not the monitor loudspeakers. You might assign all the vocal mics to Group 1 (also called Subgroup 1 or Submix 1).
Then you can control the overall level of the vocals with just the Group 1 fader. Start with the group fader and master fader at unity gain, or 0 dB.
Groups don’t have to be used, but some find it convenient to do so. If you don’t use them, just assign each mic channel to the stereo mix bus (the master stereo output of the console), and turn down all the group faders because they are not being used.
To confuse things, some consoles use Group 1 and Group 2 as the main stereo output channels. Other consoles have groups plus a separate stereo master output channel.
5) How do I set up monitor mixes?
The aux knobs on a mixer can serve either for monitor mixes or for controlling the amount of effects on each input channel. First decide which aux channel you want to use for a monitor mix.
The choice might be several aux channels (aux 1, aux 2, aux 3) to create separate monitor mixes for different performers. Each aux number is a separate monitor mix feeding a power amplifier channel that is in turn feeding a separate monitor loudspeaker.
Let’s start with just one monitor mix. Suppose that you’ll create a monitor mix with all the aux 1 knobs.
On the back of the mixer, connect the aux 1 send connector to the graphic equalizer (if any) used for the monitor speakers, and connect the graphic equalizer output to the monitor power amp input. If you’re not using a graphic EQ with the monitor loudspeakers, connect the aux 1 send to the monitor power amp input.
Set all of the monitor aux knobs to pre-fader so that the fader for each channel does not affect the monitor level.
What if you need several different monitor mixes? You might use all the aux 1 knobs to set up a monitor mix for the vocalists. Connect aux 1 out to the power amp channel for the vocalists’ monitor loudspeakers.
Then use all the aux 2 knobs to set up a monitor mix for the drummer. Connect aux 2 out to the power amp channel for the drummer’s monitor loudspeaker. Use aux 3 for the piano player, and so on.
For example, let’s say the vocalists need to hear only the piano and vocals in their monitors. Use all the aux 1 knobs across the console to set up a monitor mix for the vocalists. Turn up the piano channel’s aux 1 knob about halfway.
Also, turn up the vocal channels’ aux 1 knobs about halfway, and turn up the aux 1 master knob (if any) about halfway. Make sure the vocalists can hear the monitor mix, and adjust it according to what they want. Turn up the aux knobs slowly and stay below the feedback point.
Similarly, suppose the drummer needs to hear only the piano and bass. Use all of the aux 2 knobs across the console to set up a monitor mix for the drummer. Turn up the piano channel’s aux 2 knob about halfway.
Turn up the bass channel’s aux 2 knob about halfway, then turn up the aux 2 master knob (if any) about halfway. Make sure the drummer can hear the monitor mix, and adjust it according to what the drummer wants.
6) How do I set up the mixer to add effects?
As previously noted, the aux knobs in a mixer can be used either for monitor mixes or for controlling the amount of effects on each input channel. First, decide which aux channel you want to use for effects.
Suppose aux 4 is your effects channel. On the back of the mixer, connect the aux 4 send connector to the input of the effects device. Connect the output of the effects device to the Stereo In or Effects Return connector on the mixer.
Another option is to connect the effects outputs to the line inputs of two extra input channel strips on the mixer, then have those be the effects-return level controls.
Set the effects send (aux 4) knobs to post-fader so that the fader level also controls the amount of effects. Set the dry/wet mix control on the effects unit all the way to wet (100 percent effect).
For each input channel (vocal or instrument), use the aux 4 knob to set the amount of effects you want to hear on that vocal or instrument. Note that some mixers have effects built in so you don’t need to make any effects connections.