
Editor’s note: This article focuses primarily on analog mixers and basic sound reinforcement configurations for smaller systems.
Sound systems can be confusing because they’re made up of complex devices that need to work together to deliver the desired results.
Some of the questions I’ll answer here include:
- How do I hook up a mixer to the rest of the system? What jacks are best to use?
- How do I use graphic equalizers?
- What are compressors used for?
- How do I use groups?
- How do I set up monitor mixes?
- How do I set up the mixer to add effects?
Here we go… And note that all of the topics addressed in this article are illustrated in Figure 1 (below).
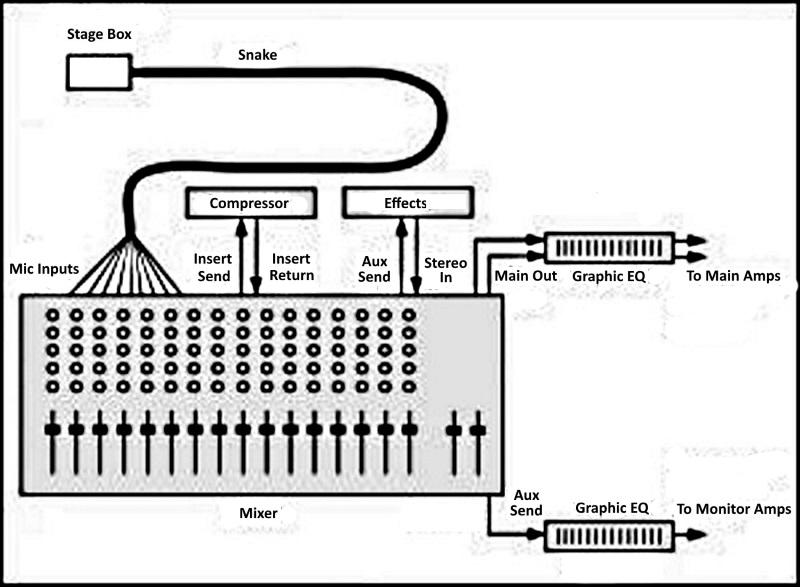
1) What jacks should I use to connect the mixer to my sound system?
- Connect each mic to the stage box (snake).
- Connect each snake XLR connector to each mic input XLR connector.
- Connect the mixer master or main output to your graphic equalizer input, and connect the graphic output to your house power-amp input. If you’re not using a graphic equalizer for the house speakers, connect the mixer master outputs to the inputs of the power amp that drives the house speakers.
- If you are recording a board mix of a service or show, connect the mixer REC OUT or TAPE OUT connectors to the recorder line inputs.
2) Why would I put a graphic equalizer between the mixer and power amps? Isn’t that what the mixer EQ is for?
Mixer EQ affects the sound of each individual instrument and voice, while the graphic EQ affects the sound of the complete mix. The graphic equalizer is used the flatten the frequency response of the house speakers and room so that the entire sound system is accurate or hi-fi.
One way to set a graphic EQ is to play some reference tracks alternately through high-quality headphones and through the house loudspeakers. Adjust the graphic-EQ sliders to make the loudspeakers sound like the headphones in their bass-midrange-treble balance.
Here’s another way to set a graphic equalizer:
- Obtain a measurement microphone, which is an omnidirectional condenser mic with a flat frequency response. Put the mic in the center of the audience area.
- Plug the mic into a real-time analyzer (RTA) set to display 1/3-octave bands.
- Play pink noise through one set of house loudspeakers (one combination of woofer, midrange and tweeter drivers).
- On the graphic equalizer, pull down the frequencies that are the highest on the RTA display.
- Try to get a flat spectrum (equal level in each frequency band) up to 1 kHz, then let the spectrum roll off gradually to about 10 dB down at 10 kHz. This is called a “house curve.”
It’s also common to use a graphic EQ between the mixer’s monitor send (aux out) jack and the power amp that drives the monitor speakers. That EQ is used to reduce the levels of frequencies that feed back.
You also can use the graphic EQ to reduce the “bassy” sound in the monitors caused by microphone proximity effect (the bass boost that occurs when directional mics are used up close). The monitor signal from the board is generally pre-EQ, so turning down the bass (low frequencies) on the mic channel does not turn down the bass in the monitor loudspeakers.
That’s where a graphic EQ can help: turn down frequencies a few dB below 200 Hz or so. Then the monitor loudspeakers won’t sound too bassy and muddy.