One Thing At A Time – Quickly
On most days, I have less than 15 minutes available to work on the tuning of the PA and address any quirks. That’s not a lot of time to try to achieve consistency every night. So how do I go about it? Once the console and analyzer are set up and we’re patched into the PA, I follow these steps:
Step 1: Reset all of my processing from the previous night. Flatten the output EQ, remove all alignment delay, return matrix sends to unity. I also ask the house engineer to bypass any user level EQ from the previous show – graphics, processors, etc. (In the advance/setup process I do everything possible to ensure I’m running the console as close to direct into the amplifiers as possible. There was only one night where running through the house console was the only option due to drive line/snake limitations.)
Step 2: Spray pink noise through all elements individually. Are they working? Do they sound reasonably level matched? Does the sub sound like a sub?
Step 3: Isolate one side of the PA and take a 3-position average from the middle of the coverage area. I stay on axis and measure from where the bulk of audience members will be standing, not against the back wall, not against the barricade. I note the response variation over the space, but I don’t make EQ decisions until there are multiple data points available.
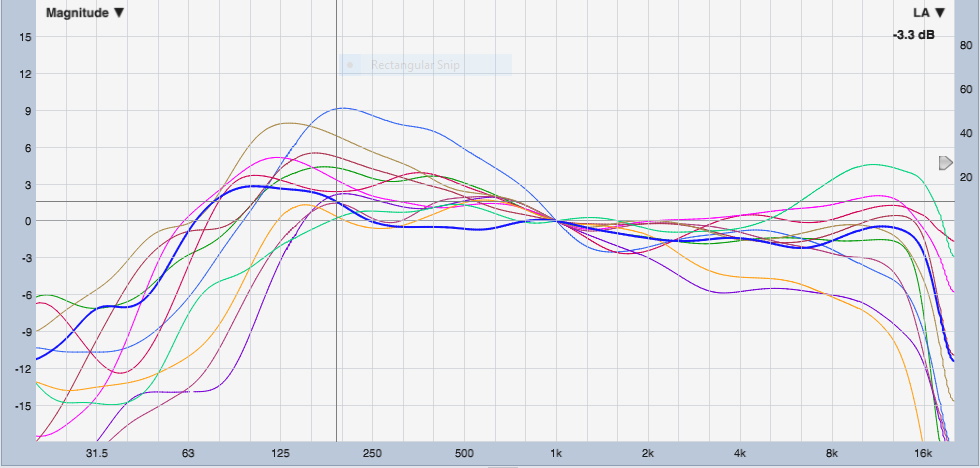
Step 4: EQ as needed. I try to stick to wide, gentle cuts, more like a 3-band car stereo EQ than anything too specific. Those tweaks can come later if time permits. My target curve goal for this tour was to have the entire response within 6 dB with a little “sub bump” at the bottom and a little gradual roll off from about 8 kHz up. I get as close to that goal as possible with the available time.
Step 5: Got front fills? I measure from a spot that seems to first take over high end duty from the mains, moving both toward the stage and laterally depending on the physical configuration of the loudspeakers/room. (Front fills are often the only boxes in a fixed install that I can walk up to and move/point, and I make sure to use that to my advantage) First I measure the main PA from this spot and see what I’m missing as compared to the response back in the coverage of the mains. Then I bring up the front fills to cover those gaps, both in frequency and level. Then I let (Rational Acoustics) Smaart delay tracker find the correct timing.
Step 6: Got delays or balcony fills? Unless I have access to a wireless measurement setup or a mic runner, I tune them by ear later (remember, we’re trying to move fast and I don’t need delays to sound check).
Step 7: Got subs? (I hope so!) Caution is advised when measuring subs in small, resonant spaces. In dealing with different models day to day, capable of different lowest frequencies and peaks, and dealing with varying positions/configurations in the room, the ultimate sub level that feels “right” will change. This is why I rarely use a target trace in less-than-ideal spaces. A sub that goes flat down to 35 Hz doesn’t require the same amount of “sub bump” as one that’s rolling off by 50 Hz and lacks attack.
Instead, I do it by ear using a familiar recording. I play the track and bring up my sub matrix until the balance feels right, and I also look at the sub response in Smaart with some pink noise to make sure there’s a low-pass filter in place and that it’s doing what I want. Often I nudge the filter a bit lower to put the crossover to where looks/feels natural as I find myself pushing the sub level a bit which raises the acoustical crossover point. A double low-pass filter isn’t ideal, but this is time-sensitive audio warfare and a lot of the time the house’s LPF isn’t adjustable or accessible.
Step 8: After that I check time alignment on the sub. There are a million people more qualified to talk about this, but I find a spot on the floor that averages the most audience and reflects what I’ll be feeling from my mix position (one of my rare non-democratic decisions), and set the alignment there.
Step 9: Finally, I play a song and also listen to my voice through the main vocal mic, and then it’s time to get the band on stage to check. (Just don’t forget to take a walk upstairs and listen to those balcony fills at some point!)
Barring any major issues with the system, I can have this done in about 10 minutes. Most of that comes from preparation, practice, and a few training courses with minds much more practiced in this than me, such as Rational Acoustics Smaart classes.